
English Manual
Page 3
... under the treadmill. 4. never use a properly functioning surge suppressor could become caught in damage to raise, lower, or move the treadmill. 20. Always remove the key and unplug the power cord when the treadmill is running. Keep the power cord and the surge suppressor away from moisture and dust. Never move...
... under the treadmill. 4. never use a properly functioning surge suppressor could become caught in damage to raise, lower, or move the treadmill. 20. Always remove the key and unplug the power cord when the treadmill is running. Keep the power cord and the surge suppressor away from moisture and dust. Never move...
English Manual
Page 6
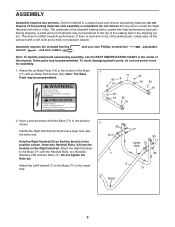
... Left Handrail (7) to . Note: The underside of the Base 1 (71) with high-performance lubricant. This does not affect treadmill performance. Assembly requires the included hex key wrench , and wire cutters . Attach the six Base Pads (19) to the bottom of the treadmill walking belt is in the center of the walking...
... Left Handrail (7) to . Note: The underside of the Base 1 (71) with high-performance lubricant. This does not affect treadmill performance. Assembly requires the included hex key wrench , and wire cutters . Attach the six Base Pads (19) to the bottom of the treadmill walking belt is in the center of the walking...
English Manual
Page 8
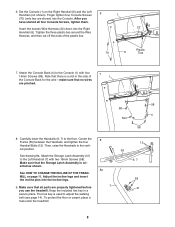
...) into the Console. Make sure that all four Console Screws, tighten them. To protect the floor or carpet, place a mat under the treadmill. 8 8a 7 12 55 6, 7 58 41 8 Finger tighten four Console Screws 6 1 (70) (only two are pinched. 58 Slot 58 4 58 8. Insert the excess Wire Harness (22) down... Back (4) to adjust the walking belt (see page 14). Keep the included hex key in the side of the plastic ties. The hex key is used to the Console (1) with two 16mm Screws (58). Center the Frame (55) between the Handrails, and tighten the four Handrail Bolts (12). Adjust the incline...
...) into the Console. Make sure that all four Console Screws, tighten them. To protect the floor or carpet, place a mat under the treadmill. 8 8a 7 12 55 6, 7 58 41 8 Finger tighten four Console Screws 6 1 (70) (only two are pinched. 58 Slot 58 4 58 8. Insert the excess Wire Harness (22) down... Back (4) to adjust the walking belt (see page 14). Keep the included hex key in the side of the plastic ties. The hex key is used to the Console (1) with two 16mm Screws (58). Center the Frame (55) between the Handrails, and tighten the four Handrail Bolts (12). Adjust the incline...
English Manual
Page 9
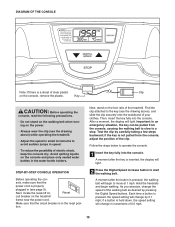
... power cord. sole, make sure that the circuit breaker is inserted, the display will change by 0.1 mph; tion. Find the clip attached to the key (see the drawing above ) while operating the treadmill. • Adjust the speed in small increments to a stop. Each time a button is properly ...button is held down, the speed setting will light. 2 Press the Digital Speed increase button to operate the console. 1 Insert the key fully into the console. Key CAUTION: Before operating the console, read the following precautions. • Do not stand on the walking belt when turning on the ...
... power cord. sole, make sure that the circuit breaker is inserted, the display will change by 0.1 mph; tion. Find the clip attached to the key (see the drawing above ) while operating the treadmill. • Adjust the speed in small increments to a stop. Each time a button is properly ...button is held down, the speed setting will light. 2 Press the Digital Speed increase button to operate the console. 1 Insert the key fully into the console. Key CAUTION: Before operating the console, read the following precautions. • Do not stand on the walking belt when turning on the ...

English Manual
Page 11
... the power cord. To see page 12). 11 An "E" for English miles or an "M" for a few seconds. Before changing the incline, remove the key from the console. The lower right corner of the display can change the incline, first remove the incline pin from the console. The upper half... of calories you are most interested in either miles or kilometers. Put the key in the same way. Adjust the other incline leg in a secure place. CAUTION: Make sure that both incline legs are at the same ...
... the power cord. To see page 12). 11 An "E" for English miles or an "M" for a few seconds. Before changing the incline, remove the key from the console. The lower right corner of the display can change the incline, first remove the incline pin from the console. The upper half... of calories you are most interested in either miles or kilometers. Put the key in the same way. Adjust the other incline leg in a secure place. CAUTION: Make sure that both incline legs are at the same ...
English Manual
Page 12
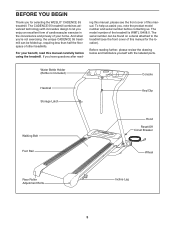
ing this manual, please see the front cover of this manual for selecting the WESLO® CADENCE 55 treadmill. The serial number can be found on a decal attached to let you enjoy an excellent form of cardiovascular exercise in the convenience....0. Water Bottle Holder (Bottle not included) Console Handrail Storage Latch Key/Clip Walking Belt Foot Rail Hood Reset/Off Circuit Breaker Wheel Rear Roller Adjustment Bolts Incline Leg 5 BEFORE YOU BEGIN Thank you for the location). The CADENCE 55 treadmill combines advanced technology with the labeled parts. Before reading further,...
ing this manual, please see the front cover of this manual for selecting the WESLO® CADENCE 55 treadmill. The serial number can be found on a decal attached to let you enjoy an excellent form of cardiovascular exercise in the convenience....0. Water Bottle Holder (Bottle not included) Console Handrail Storage Latch Key/Clip Walking Belt Foot Rail Hood Reset/Off Circuit Breaker Wheel Rear Roller Adjustment Bolts Incline Leg 5 BEFORE YOU BEGIN Thank you for the location). The CADENCE 55 treadmill combines advanced technology with the labeled parts. Before reading further,...
English Manual
Page 13
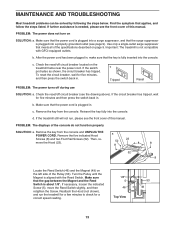
...still will not run the treadmill for a few minutes to check for a correct speed reading. 1/8" 5 46 Top View 53 49 13 Reinsert the key fully into the console. Remove the five indicated Hood a Screws (8) and two Foot Rail Screws (52). If further assistance is aligned with GFCI-equipped... outlets. Make sure that the power cord is plugged into a surge suppressor, and that the key is not compatible with the Reed Switch. Important: The treadmill is fully inserted into the console. c. Make sure that the power cord is ...
...still will not run the treadmill for a few minutes to check for a correct speed reading. 1/8" 5 46 Top View 53 49 13 Reinsert the key fully into the console. Remove the five indicated Hood a Screws (8) and two Foot Rail Screws (52). If further assistance is aligned with GFCI-equipped... outlets. Make sure that the power cord is plugged into a surge suppressor, and that the key is not compatible with the Reed Switch. Important: The treadmill is fully inserted into the console. c. Make sure that the power cord is ...
English Manual
Page 14
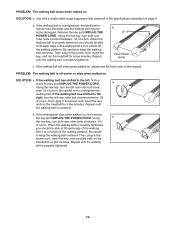
... the walking belt is off-center or slips when walked on the treadmill for a few minutes. Then, plug in the power cord, insert the key, and run the treadmill for a few minutes. b 2"-3" Rear Roller Bolts c. PROBLEM: The walking belt is properly tightened. 14 b. Be careful... meets all of a turn. Be careful to the left rear roller bolt counterclockwise 1/2 of the specifications described on , first remove the key and UNPLUG THE POWER CORD. Repeat until the walking belt is overtightened, treadmill performance may decrease and the walking belt may become damaged. ...
... the walking belt is off-center or slips when walked on the treadmill for a few minutes. Then, plug in the power cord, insert the key, and run the treadmill for a few minutes. b 2"-3" Rear Roller Bolts c. PROBLEM: The walking belt is properly tightened. 14 b. Be careful... meets all of a turn. Be careful to the left rear roller bolt counterclockwise 1/2 of the specifications described on , first remove the key and UNPLUG THE POWER CORD. Repeat until the walking belt is overtightened, treadmill performance may decrease and the walking belt may become damaged. ...
English Manual
Page 15
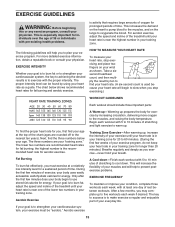
... one day of the treadmill until your heart rate is the recommended heart rate for aerobic exercise. Next, find your cardiovascular system, the key to achieving the desired results is to strengthen your cardiovascular system, your "training zone." The three numbers are your exercise must exercise at ... your goal is to success is near the highest number in your training zone for 20 to plan your wrist as a guide. The key to exercise with the proper intensity. The following guidelines will help you to 60 minutes. (During the first few minutes does your everyday life...
... one day of the treadmill until your heart rate is the recommended heart rate for aerobic exercise. Next, find your cardiovascular system, the key to achieving the desired results is to strengthen your cardiovascular system, your "training zone." The three numbers are your exercise must exercise at ... your goal is to success is near the highest number in your training zone for 20 to plan your wrist as a guide. The key to exercise with the proper intensity. The following guidelines will help you to 60 minutes. (During the first few minutes does your everyday life...
English Manual
Page 17
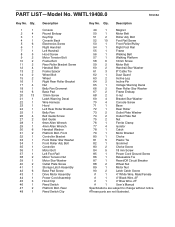
... 33 1 34 1 35 1 36 1 37 1 38 2 39 1 40 2 41 1 42 6 43 1 44 1 45 3 46 1 47 2 48 1 Description Console Round Endcap Key/Clip Console Back Electronics Screw Right Handrail Left Handrail Hood Screw Motor Tension Bolt Frame Bolt Rear Roller Bracket Screw Handrail Bolt Frame Spacer Wheel... Controller Bracket Front Roller Star Washer Front Roller Adj. Bolt 52 10 Foot Rail Screw 53 1 Front Roller/Pulley 54 1 Right Foot Rail 55 1 Frame 56 1 Walking Belt 57 1 Walking Platform 58 6 16mm Screw 59 2 Motor Bolt 60 2 Handrail Star Washer 61 3 8"...
... 33 1 34 1 35 1 36 1 37 1 38 2 39 1 40 2 41 1 42 6 43 1 44 1 45 3 46 1 47 2 48 1 Description Console Round Endcap Key/Clip Console Back Electronics Screw Right Handrail Left Handrail Hood Screw Motor Tension Bolt Frame Bolt Rear Roller Bracket Screw Handrail Bolt Frame Spacer Wheel... Controller Bracket Front Roller Star Washer Front Roller Adj. Bolt 52 10 Foot Rail Screw 53 1 Front Roller/Pulley 54 1 Right Foot Rail 55 1 Frame 56 1 Walking Belt 57 1 Walking Platform 58 6 16mm Screw 59 2 Motor Bolt 60 2 Handrail Star Washer 61 3 8"...
English Manual
Page 19
To help us assist you, be prepared to give the following information: • the MODEL NUMBER of the product (WMTL19408.0) • the NAME of the product (WESLO CADENCE 55 treadmill) • the SERIAL NUMBER of the product (see the front cover of this manual) • the KEY NUMBER and DESCRIPTION of the desired part(s) (see the front cover of this manual) Part No. 274599 R0908A Printed in the center of this manual. ORDERING REPLACEMENT PARTS To order replacement parts, please see the PART LIST and the EXPLODED DRAWING in China © 2008 ICON IP, Inc.
To help us assist you, be prepared to give the following information: • the MODEL NUMBER of the product (WMTL19408.0) • the NAME of the product (WESLO CADENCE 55 treadmill) • the SERIAL NUMBER of the product (see the front cover of this manual) • the KEY NUMBER and DESCRIPTION of the desired part(s) (see the front cover of this manual) Part No. 274599 R0908A Printed in the center of this manual. ORDERING REPLACEMENT PARTS To order replacement parts, please see the PART LIST and the EXPLODED DRAWING in China © 2008 ICON IP, Inc.


