
English Manual
Page 3
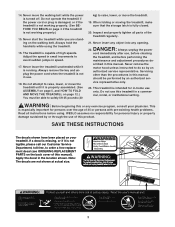
... . Never insert any object into any exercise program, consult your treadmill. Always unplug the power cord immediately after use of this product. Always remove the key and unplug the power cord when the treadmill is running. Note: The decals are standing on your physician. ...Do not operate the treadmill if the power cord or plug is damaged, or if the treadmill is not working properly.) 15. WESLO assumes no responsibility...
... . Never insert any object into any exercise program, consult your treadmill. Always unplug the power cord immediately after use of this product. Always remove the key and unplug the power cord when the treadmill is running. Note: The decals are standing on your physician. ...Do not operate the treadmill if the power cord or plug is damaged, or if the treadmill is not working properly.) 15. WESLO assumes no responsibility...
English Manual
Page 4
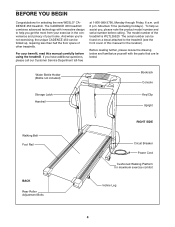
...be found on a decal attached to the treadmill (see the front cover of your exercise in the convenience and privacy of this manual carefully before calling. Water Bottle Holder (Bottle not included) Bookrack Console Storage Latch Handrail Key/Clip Upright Walking Belt Foot Rail BACK ... WLTL35520. And when you get the most from your home. BEFORE YOU BEGIN Congratulations for selecting the new WESLO® CADENCE 450 treadmill. The CADENCE 450 treadmill combines advanced technology with the parts that are labeled. Before reading further, please review the drawing below and ...
...be found on a decal attached to the treadmill (see the front cover of your exercise in the convenience and privacy of this manual carefully before calling. Water Bottle Holder (Bottle not included) Bookrack Console Storage Latch Handrail Key/Clip Upright Walking Belt Foot Rail BACK ... WLTL35520. And when you get the most from your home. BEFORE YOU BEGIN Congratulations for selecting the new WESLO® CADENCE 450 treadmill. The CADENCE 450 treadmill combines advanced technology with the parts that are labeled. Before reading further, please review the drawing below and ...
English Manual
Page 9
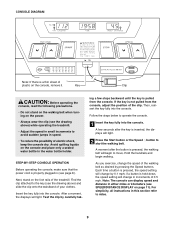
...For simplicity, all instructions in this section refer to the key (see page 8). Test the clip by pressing the Speed buttons. A few steps backward until the key is properly plugged in (see the drawing above ) while operating the treadmill. • Adjust the speed in small increments to ...operate the console. 1 Insert the key fully into the console. Insert the key fully into the console. Then, reinsert the key fully into the console. Next, stand on the console...
...For simplicity, all instructions in this section refer to the key (see page 8). Test the clip by pressing the Speed buttons. A few steps backward until the key is properly plugged in (see the drawing above ) while operating the treadmill. • Adjust the speed in small increments to ...operate the console. 1 Insert the key fully into the console. Insert the key fully into the console. Then, reinsert the key fully into the console. Next, stand on the console...
English Manual
Page 10
... possible injury, unplug the power cord when the treadmill is pressed, the display will begin to flash. To change the unit of calories and fat calories you are finished exercising, remove the key. The display will also show your heart rate will be shown. When the Stop button is not ...the number of pressure. When the desired unit of measurement is selected, remove the key and then reinsert it if necessary (see which unit of the walking belt and the distance that the treadmill is shown. Keep the key in your thumb will change from the console. Note: During the first few ...
... possible injury, unplug the power cord when the treadmill is pressed, the display will begin to flash. To change the unit of calories and fat calories you are finished exercising, remove the key. The display will also show your heart rate will be shown. When the Stop button is not ...the number of pressure. When the desired unit of measurement is selected, remove the key and then reinsert it if necessary (see which unit of the walking belt and the distance that the treadmill is shown. Keep the key in your thumb will change from the console. Note: During the first few ...
English Manual
Page 11
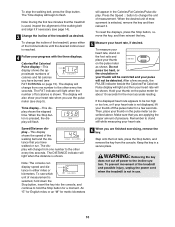
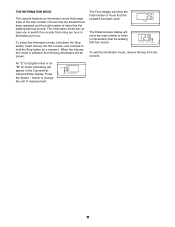
...an "M" for a moment. THE INFORMATION MODE The console features an information mode that keeps track of the total number of hours that the treadmill has been operated and the total number of miles that the walking belt has moved. When the information mode is selected, the following information ...will be shown: The Time display will appear in the Calories/Fat Calories/Pulse display. To exit the information mode, remove the key from miles per hour to switch the console from the console. The information mode also allows you to kilometers per hour. To select the...
...an "M" for a moment. THE INFORMATION MODE The console features an information mode that keeps track of the total number of hours that the treadmill has been operated and the total number of miles that the walking belt has moved. When the information mode is selected, the following information ...will be shown: The Time display will appear in the Calories/Fat Calories/Pulse display. To exit the information mode, remove the key from miles per hour to switch the console from the console. The information mode also allows you to kilometers per hour. To select the...
English Manual
Page 13
...surge suppressor, and that meets all of the specifications described on page 8. Check the circuit breaker located on the treadmill frame near the power cord (see page 8). Remove the key from the console and UNPLUG THE POWER CORD. b 1/8" 44 33 Top View 50 45 13 c. After the...plugged into the console. To reset the circuit breaker, wait for a correct speed reading. Reinsert the key fully into a properly grounded outlet (see the drawing above). TROUBLESHOOTING Most treadmill problems can be solved by following the steps below. Use only a single-outlet surge suppressor that the...
...surge suppressor, and that meets all of the specifications described on page 8. Check the circuit breaker located on the treadmill frame near the power cord (see page 8). Remove the key from the console and UNPLUG THE POWER CORD. b 1/8" 44 33 Top View 50 45 13 c. After the...plugged into the console. To reset the circuit breaker, wait for a correct speed reading. Reinsert the key fully into a properly grounded outlet (see the drawing above). TROUBLESHOOTING Most treadmill problems can be solved by following the steps below. Use only a single-outlet surge suppressor that the...
English Manual
Page 14
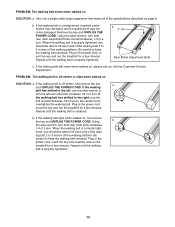
...inches off the walking platform. Remove the key and UNPLUG THE POWER CORD. Be careful not to lift each side of the walk- Using b the allen wrench, turn . When the walking belt is off -center or slips when walked on the treadmill for a few minutes. PROBLEM: The... clockwise, 1/4 of a turn ; ened, you should be able to overtighten the walking belt. Plug in the power cord, insert the key and run the treadmill for a few minutes. b 2"-3" Rear Roller Adjustment Bolts c. b. When the walking belt is properly tightened. 14 Repeat until the walking belt...
...inches off the walking platform. Remove the key and UNPLUG THE POWER CORD. Be careful not to lift each side of the walk- Using b the allen wrench, turn . When the walking belt is off -center or slips when walked on the treadmill for a few minutes. PROBLEM: The... clockwise, 1/4 of a turn ; ened, you should be able to overtighten the walking belt. Plug in the power cord, insert the key and run the treadmill for a few minutes. b 2"-3" Rear Roller Adjustment Bolts c. b. When the walking belt is properly tightened. 14 Repeat until the walking belt...
English Manual
Page 15
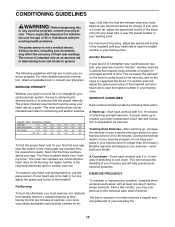
...training zone for a sustained period of your breath. A proper warm-up , increase the intensity of your exercise until your cardiovascular system, the key to achieving the desired results is intended only as a guide. Next, find your age near the lowest number in general. During the first... higher number is near the bottom of your exercise program, do not keep your pulse in your training zone for prolonged periods of the treadmill until your condition, complete three workouts each week, with the proper intensity. A Cool-down . If your heart rate is to oxygenate ...
...training zone for a sustained period of your breath. A proper warm-up , increase the intensity of your exercise until your cardiovascular system, the key to achieving the desired results is intended only as a guide. Next, find your age near the lowest number in general. During the first... higher number is near the bottom of your exercise program, do not keep your pulse in your training zone for prolonged periods of the treadmill until your condition, complete three workouts each week, with the proper intensity. A Cool-down . If your heart rate is to oxygenate ...
English Manual
Page 16
...The MODEL NUMBER of the product (WLTL35520) • The NAME of the product (WESLO® CADENCE 450 treadmill) • The SERIAL NUMBER of the product (see the front cover of this manual) • The KEY NUMBER and DESCRIPTION of the desired part(s) (see the PART LIST and the EXPLODED...do not allow the exclusion or limitation of ICON Health & Fitness, Inc. LIMITED WARRANTY ICON Health & Fitness, Inc. (ICON), warrants this manual) WESLO is limited in connection with the use or performance of purchase. until 6 p.m. The warranty extended hereunder is in USA © 2002 ICON Health ...
...The MODEL NUMBER of the product (WLTL35520) • The NAME of the product (WESLO® CADENCE 450 treadmill) • The SERIAL NUMBER of the product (see the front cover of this manual) • The KEY NUMBER and DESCRIPTION of the desired part(s) (see the PART LIST and the EXPLODED...do not allow the exclusion or limitation of ICON Health & Fitness, Inc. LIMITED WARRANTY ICON Health & Fitness, Inc. (ICON), warrants this manual) WESLO is limited in connection with the use or performance of purchase. until 6 p.m. The warranty extended hereunder is in USA © 2002 ICON Health ...
English Manual
Page 18
...39 5 40 4 41 2 42 1 43 1 44 1 45 1 46 1 47 1 48 4 49 2 50 1 51 1 52 2 53 2 54 1 55 1 56 1 57 4 Description Left Handrail Key/Clip Incline Leg Pivot Bolt Cover Left Foot Rail Lift Motor Rear Roller 1" Bolt Star Washer Console Base Motor Belt 3/4" Screw Storage Latch Thick Frame...Platform Screw Isolator Front Roller/Pulley Front Roller Adj. Bolt Incline Wheel Crossbar Screw Power Cord Power Cord Grommet Circuit Breaker Washer Key No. Bolt Left Rear Endcap Right Rear Endcap Incline Motor Bolt Belly Pan Screw Power Supply Motor Belt Shield Bookrack Plastic ...
...39 5 40 4 41 2 42 1 43 1 44 1 45 1 46 1 47 1 48 4 49 2 50 1 51 1 52 2 53 2 54 1 55 1 56 1 57 4 Description Left Handrail Key/Clip Incline Leg Pivot Bolt Cover Left Foot Rail Lift Motor Rear Roller 1" Bolt Star Washer Console Base Motor Belt 3/4" Screw Storage Latch Thick Frame...Platform Screw Isolator Front Roller/Pulley Front Roller Adj. Bolt Incline Wheel Crossbar Screw Power Cord Power Cord Grommet Circuit Breaker Washer Key No. Bolt Left Rear Endcap Right Rear Endcap Incline Motor Bolt Belly Pan Screw Power Supply Motor Belt Shield Bookrack Plastic ...


