
English Manual
Page 2
...age of carrying 15 or more than 250 pounds. 8. The treadmill should be used or where oxygen is turned off. Never move the walking belt while the power is being administered. 6. Do not operate the treadmill if the power cord or plug is damaged, or if the ... to persons, read the following important precautions and information before beginning assembly. It is not working properly. (See BEFORE YOU BEGIN on the walking belt. Never allow more amps. Wear appropriate exercise clothing when using the treadmill. 2 Always wear athletic shoes. Remove the PART LIST and EXPLODED ...
...age of carrying 15 or more than 250 pounds. 8. The treadmill should be used or where oxygen is turned off. Never move the walking belt while the power is being administered. 6. Do not operate the treadmill if the power cord or plug is damaged, or if the ... to persons, read the following important precautions and information before beginning assembly. It is not working properly. (See BEFORE YOU BEGIN on the walking belt. Never allow more amps. Wear appropriate exercise clothing when using the treadmill. 2 Always wear athletic shoes. Remove the PART LIST and EXPLODED ...
English Manual
Page 4
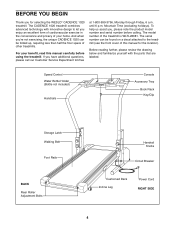
...Friday, 6 a.m. Speed Control Water Bottle Holder (Bottle not included) Handrails Console Accessory Tray Book Rack Key/Clip Storage Latch Walking Belt Foot Rails BACK Rear Roller Adjustment Bolts Handrail Knobs Circuit Breaker Cushioned Deck Incline Leg Power Cord RIGHT SIDE 4 And when you... (see the front cover of other treadmills. The CADENCE 1020 treadmill combines advanced technology with the parts that are labeled. The model number of your benefit, read this manual for selecting the WESLO¨ CADENCE 1020 treadmill. BEFORE YOU BEGIN Thank you for the location...
...Friday, 6 a.m. Speed Control Water Bottle Holder (Bottle not included) Handrails Console Accessory Tray Book Rack Key/Clip Storage Latch Walking Belt Foot Rails BACK Rear Roller Adjustment Bolts Handrail Knobs Circuit Breaker Cushioned Deck Incline Leg Power Cord RIGHT SIDE 4 And when you... (see the front cover of other treadmills. The CADENCE 1020 treadmill combines advanced technology with the parts that are labeled. The model number of your benefit, read this manual for selecting the WESLO¨ CADENCE 1020 treadmill. BEFORE YOU BEGIN Thank you for the location...

English Manual
Page 7
... adapter illustrated in drawing 2 may be held in an increased risk of five feet or less in doubt as to the walking belt or the walking plat- Your treadmill, like the plug illus- Some 2-pole receptacle outlet box covers are in length. Plug the power cord...gauge cord of electric shock. To decrease the possibility of electric shock. aged, always use on or off. OPERATION AND ADJUSTMENT THE PERFORMANT LUBETM WALKING BELT risk of your treadmill. used only until a properly grounded outlet (drawing 1) can be grounded. Check with your 1 treadmill being turned on...
... adapter illustrated in drawing 2 may be held in an increased risk of five feet or less in doubt as to the walking belt or the walking plat- Your treadmill, like the plug illus- Some 2-pole receptacle outlet box covers are in length. Plug the power cord...gauge cord of electric shock. To decrease the possibility of electric shock. aged, always use on or off. OPERATION AND ADJUSTMENT THE PERFORMANT LUBETM WALKING BELT risk of your treadmill. used only until a properly grounded outlet (drawing 1) can be grounded. Check with your 1 treadmill being turned on...

English Manual
Page 8
... by moving the speed control. Avoid spilling liquids on when the DISPLAY ON/RESET button is pressed or when the walking belt is removed from the console, the walking belt will not turn on the console and use only a sealable water bottle. Change the speed of electric shock, keep...speed control are general guidelines only. The displays will already be moved to the RESET position. Next, slowly slide the speed control until the walking belt begins to the RESET position. 8 If you just installed batteries, the displays will turn on the power. ¥ Always wear the clip...
... by moving the speed control. Avoid spilling liquids on when the DISPLAY ON/RESET button is pressed or when the walking belt is removed from the console, the walking belt will not turn on the console and use only a sealable water bottle. Change the speed of electric shock, keep...speed control are general guidelines only. The displays will already be moved to the RESET position. Next, slowly slide the speed control until the walking belt begins to the RESET position. 8 If you just installed batteries, the displays will turn on the power. ¥ Always wear the clip...

English Manual
Page 9
...sensor several times until you are applying the proper amount of two different heights. To change from one number to the pulse sensor. If the walking belt is reached. Before 87 5 5 adjusting the Handrails, remove the key 4, 32 and unplug the 38 power cord. ond person holds the ...detected. Hold your thumb on the sensor as shown. the sensor for another 15 seconds for about four minutes. mate numbers of the walking belt, in the pulse display flashes steadily. To measure your pulse, stand on the Pulse foot rails and place Sensor your thumb on page...
...sensor several times until you are applying the proper amount of two different heights. To change from one number to the pulse sensor. If the walking belt is reached. Before 87 5 5 adjusting the Handrails, remove the key 4, 32 and unplug the 38 power cord. ond person holds the ...detected. Hold your thumb on the sensor as shown. the sensor for another 15 seconds for about four minutes. mate numbers of the walking belt, in the pulse display flashes steadily. To measure your pulse, stand on the Pulse foot rails and place Sensor your thumb on page...

English Manual
Page 13
... roller adjust- ment bolt counterclockwise, and the right bolt clock- When the walking belt is correctly tightened, you should be able to lift each side of the walking belt 2 to keep the walking belt centered. Repeat until the walking belt is properly tightened. If the walking belt slips when walked on SOLUTION: a. Be careful to 3 inches off -center or slips when...
... roller adjust- ment bolt counterclockwise, and the right bolt clock- When the walking belt is correctly tightened, you should be able to lift each side of the walking belt 2 to keep the walking belt centered. Repeat until the walking belt is properly tightened. If the walking belt slips when walked on SOLUTION: a. Be careful to 3 inches off -center or slips when...

English Manual
Page 16
... Platform Screw Front Roller Adj. Bolt Wire Harness Frame Pivot Spacer (Left) Oval Isolator 56 12 Belly Pan Fastener 57 1 Choke 58 2 Belt Guide 59 1 Belly Pan 60 2 Isolator 61 1 Incline Control 62 1 Frame Pivot Spacer (Right) 63 2 Handrail Cover 64 3 Incline...86 1 Left Foot Rail 87 1 Console Base 88 1 Magnet 89 1 Reed Switch 90 1 Front Roller/Pulley 91 1 Sensor Clip 92 1 Walking Platform 93 1 Walking Belt 94 1 Ratchet Screw 95 2 Leg Endcap 96 1 Frame Guide 97 1 Console Rack 98 1 Upright Grommet 99 2 Upright Endcap 100 2 Front...
... Platform Screw Front Roller Adj. Bolt Wire Harness Frame Pivot Spacer (Left) Oval Isolator 56 12 Belly Pan Fastener 57 1 Choke 58 2 Belt Guide 59 1 Belly Pan 60 2 Isolator 61 1 Incline Control 62 1 Frame Pivot Spacer (Right) 63 2 Handrail Cover 64 3 Incline...86 1 Left Foot Rail 87 1 Console Base 88 1 Magnet 89 1 Reed Switch 90 1 Front Roller/Pulley 91 1 Sensor Clip 92 1 Walking Platform 93 1 Walking Belt 94 1 Ratchet Screw 95 2 Leg Endcap 96 1 Frame Guide 97 1 Console Rack 98 1 Upright Grommet 99 2 Upright Endcap 100 2 Front...


