
English Manual
Page 3
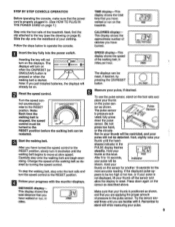
....on page 5, and 070spliy:TO MOVE Alwaysim u the power Cora:uetore Pe formaain.g.......iIaslcnrtelbneadncfenacndis:':atedelunSt#106'. ,.:VAM:'...... Do-not attempt to play on the walking belt. T Sri to 0, e pulse sensor is not legible, please call our Customer Service Department, toll-free, to avold :'`sudden jumps in general ever leaVe running.: the...
....on page 5, and 070spliy:TO MOVE Alwaysim u the power Cora:uetore Pe formaain.g.......iIaslcnrtelbneadncfenacndis:':atedelunSt#106'. ,.:VAM:'...... Do-not attempt to play on the walking belt. T Sri to 0, e pulse sensor is not legible, please call our Customer Service Department, toll-free, to avold :'`sudden jumps in general ever leaVe running.: the...
English Manual
Page 4
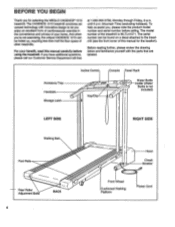
... combines advanced technology with the parts that are labeled. The model number of your benefit, read this manual for selecting the WESLO CADENCE° 1015 treadmill. The serial number can be found on a decal attached to let you enjoy an excellent form of cardiovascular exercise in the... convenience and privacy of the treadmill is not included) LEFT SIDE RIGHT SIDE Walking Belt Foot Rails - until 6 p.m. To help us assist you for the ...
... combines advanced technology with the parts that are labeled. The model number of your benefit, read this manual for selecting the WESLO CADENCE° 1015 treadmill. The serial number can be found on a decal attached to let you enjoy an excellent form of cardiovascular exercise in the... convenience and privacy of the treadmill is not included) LEFT SIDE RIGHT SIDE Walking Belt Foot Rails - until 6 p.m. To help us assist you for the ...
English Manual
Page 7
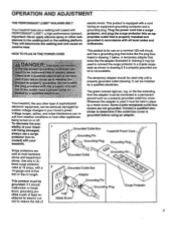
...Grounding Pin Treadmill Power Cord cluded) with your home's power. This product is used to connect the surge protector to the walking belt or the walking platform. Important: Never apply silicone spray or other appliances Whenever the adapter is equipped with a cord having an ... changes in drawing 2 if a properly grounded outlet is not available. use on or off. OPERATION AND ADJUSTMENT THE PERFORMANT LUBETu WALKING BELT electric shock. protector, and plug the surge protector into an ap- Some 2-pole receptacle outlet box covers are :'oti prod cot dee...
...Grounding Pin Treadmill Power Cord cluded) with your home's power. This product is used to connect the surge protector to the walking belt or the walking platform. Important: Never apply silicone spray or other appliances Whenever the adapter is equipped with a cord having an ... changes in drawing 2 if a properly grounded outlet is not available. use on or off. OPERATION AND ADJUSTMENT THE PERFORMANT LUBETu WALKING BELT electric shock. protector, and plug the surge protector into an ap- Some 2-pole receptacle outlet box covers are :'oti prod cot dee...
English Manual
Page 8
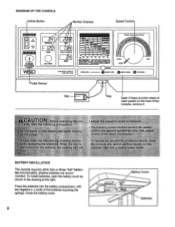
... batteries into the battery compartment, with the negative () ends of the console, remove it. raw n a "4:O: l the treadmlli When the key os ,from e console,the,wallking belt': Key Note: If there is a thin sheet of clear plastic on 1 e BATTERY INSTALLATION The console requires either two or three "AA" batteries (not included); w •...
... batteries into the battery compartment, with the negative () ends of the console, remove it. raw n a "4:O: l the treadmlli When the key os ,from e console,the,wallking belt': Key Note: If there is a thin sheet of clear plastic on 1 e BATTERY INSTALLATION The console requires either two or three "AA" batteries (not included); w •...
English Manual
Page 9
...installed batteries, the displays will already be detected. The pulse sensor Pulse Sensor is started. Next, slightly raise your thumb until the walking belt begins to 10 seconds, Indicator your pulse will not turn on -0- shaped indicator in SPEED miles. Hold your thumb at slow speed....displays. SPEED TRAINING ZONES wise to stand still while measuring your pulse. 9 DISTANCE display- Turn the speed con- To stop the walking belt, step onto the foot rails and turn it . Insert the key fully into the power switch. To use the pulse sensor, stand on...
...installed batteries, the displays will already be detected. The pulse sensor Pulse Sensor is started. Next, slightly raise your thumb until the walking belt begins to 10 seconds, Indicator your pulse will not turn on -0- shaped indicator in SPEED miles. Hold your thumb at slow speed....displays. SPEED TRAINING ZONES wise to stand still while measuring your pulse. 9 DISTANCE display- Turn the speed con- To stop the walking belt, step onto the foot rails and turn it . Insert the key fully into the power switch. To use the pulse sensor, stand on...
English Manual
Page 10
...indicated by placing objects under the treadmill. Raise the treadmill about five minutes. 1L____ 0 NMI an SS 0 Note: Any time that the walking belt is removed, the displays will automatically turn off. 6 Change the incline of the t-fr•Wrrr treadmill by the arrows. When you raise ... of the treadmill, if desired. Caution: To avoid pinching your hands in a secure place. Step onto the foot rails, stop the walking belt and remove the key. To decrease the possibility of the incline button. Hold the treadmill with your legs rather than your back straight. After...
...indicated by placing objects under the treadmill. Raise the treadmill about five minutes. 1L____ 0 NMI an SS 0 Note: Any time that the walking belt is removed, the displays will automatically turn off. 6 Change the incline of the t-fr•Wrrr treadmill by the arrows. When you raise ... of the treadmill, if desired. Caution: To avoid pinching your hands in a secure place. Step onto the foot rails, stop the walking belt and remove the key. To decrease the possibility of the incline button. Hold the treadmill with your legs rather than your back straight. After...
English Manual
Page 13
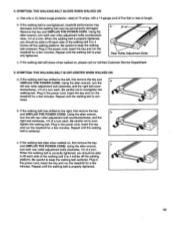
... both rear roller adjustment bolts counterclockwise, 1/4 of a turn. Using the alien wrench, turn both rear roller adjustment bolts clockwise, 1/4 of the walking belt 3 to the left rear roller adjustment bolt clockwise, and the right bolt coun- Using the allen wrench, turn . Be careful not to the right...side of a turn the left , first remove the key and a UNPLUG THE POWER CORD. Be careful to lift each . SYMPTOM: THE WALKING BELT IS OFF-CENTER WHEN WALKED ON a. Plug in the power cord, insert the key and run the treadmill for a few minutes. Using the allen ...
... both rear roller adjustment bolts counterclockwise, 1/4 of a turn. Using the alien wrench, turn both rear roller adjustment bolts clockwise, 1/4 of the walking belt 3 to the left rear roller adjustment bolt clockwise, and the right bolt coun- Using the allen wrench, turn . Be careful not to the right...side of a turn the left , first remove the key and a UNPLUG THE POWER CORD. Be careful to lift each . SYMPTOM: THE WALKING BELT IS OFF-CENTER WHEN WALKED ON a. Plug in the power cord, insert the key and run the treadmill for a few minutes. Using the allen ...
English Manual
Page 18
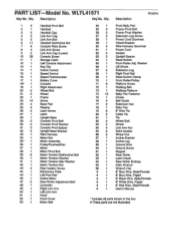
... Rear Isolator Screw Electronics Plate Left Foot Rail Incline Motor Rear Roller Adjustment Bolt Controller Right Link Arm Left Link Arm Hood Hood Cover Motor Belt 54 1 55 2 56 2 57 2 58 1 59 1 60 2 61 1 62 4 63 2 64 1 65 1 66 1 67 2 68 1 69 1 70 1 71 8 72 1 73 1 74 12 75 1 ...Switch Front Roller Adj. Washer Lift Shock Extension Leg Right Foot Rail Reed Switch Clamp Front Roller/Pulley Platform Screw Walking Belt Walking Platform Belly Pan Fastener Choke Belt Guide Extension Nut Belly Pan 8" Wire Tie Cable Tie Tie Wheel Bolt Wheel Link Arm Nut Solid Isolator Wheel Nut ...
... Rear Isolator Screw Electronics Plate Left Foot Rail Incline Motor Rear Roller Adjustment Bolt Controller Right Link Arm Left Link Arm Hood Hood Cover Motor Belt 54 1 55 2 56 2 57 2 58 1 59 1 60 2 61 1 62 4 63 2 64 1 65 1 66 1 67 2 68 1 69 1 70 1 71 8 72 1 73 1 74 12 75 1 ...Switch Front Roller Adj. Washer Lift Shock Extension Leg Right Foot Rail Reed Switch Clamp Front Roller/Pulley Platform Screw Walking Belt Walking Platform Belly Pan Fastener Choke Belt Guide Extension Nut Belly Pan 8" Wire Tie Cable Tie Tie Wheel Bolt Wheel Link Arm Nut Solid Isolator Wheel Nut ...


