
English Manual
Page 1
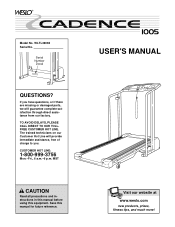
... from our factory. Save this equipment. TO AVOID DELAYS, PLEASE CALL DIRECT TO OUR TOLLFREE CUSTOMER HOT LINE. USER'S MANUAL Visit our website at www.weslo.com new products, prizes, fitness tips, and much more! CUSTOMER HOT LINE: 1-800-999-3756 Mon.-Fri., 6 a.m.-6 p.m. ® Model No...
... from our factory. Save this equipment. TO AVOID DELAYS, PLEASE CALL DIRECT TO OUR TOLLFREE CUSTOMER HOT LINE. USER'S MANUAL Visit our website at www.weslo.com new products, prizes, fitness tips, and much more! CUSTOMER HOT LINE: 1-800-999-3756 Mon.-Fri., 6 a.m.-6 p.m. ® Model No...

English Manual
Page 2
Keep the treadmill indoors, away from heated surfaces. 7. Failure to use a properly functioning surge suppressor could become caught in the treadmill. Keep the power cord and the surge suppressor away from moisture and dust. TABLE OF CONTENTS IMPORTANT PRECAUTIONS 2 BEFORE YOU BEGIN 4 ASSEMBLY 5 OPERATION AND ADJUSTMENT 7 HOW TO FOLD AND MOVE THE TREADMILL 10 MAINTENANCE AND TROUBLESHOOTING 12 CONDITIONING GUIDELINES 14 ORDERING REPLACEMENT PARTS Back Cover LIMITED WARRANTY Back Cover Note: An EXPLODED DRAWING and PART LIST are attached in the center of this manual....
Keep the treadmill indoors, away from heated surfaces. 7. Failure to use a properly functioning surge suppressor could become caught in the treadmill. Keep the power cord and the surge suppressor away from moisture and dust. TABLE OF CONTENTS IMPORTANT PRECAUTIONS 2 BEFORE YOU BEGIN 4 ASSEMBLY 5 OPERATION AND ADJUSTMENT 7 HOW TO FOLD AND MOVE THE TREADMILL 10 MAINTENANCE AND TROUBLESHOOTING 12 CONDITIONING GUIDELINES 14 ORDERING REPLACEMENT PARTS Back Cover LIMITED WARRANTY Back Cover Note: An EXPLODED DRAWING and PART LIST are attached in the center of this manual....
English Manual
Page 3
Always hold the handrails while using . Adjust the speed in -home use only. Various factors, including the user's movement, may affect the accuracy of high speeds. When folding or moving the treadmill, make sure that the storage latch is intended for in small increments to order a free replacement decal (see ORDERING REPLACEMENT PARTS on page 10.) You must be performed by or through the use , before cleaning the treadmill, and before using the treadmill. 15. Inspect and properly tighten all instructions before performing the main- This treadmill is fully closed. 21. This...
Always hold the handrails while using . Adjust the speed in -home use only. Various factors, including the user's movement, may affect the accuracy of high speeds. When folding or moving the treadmill, make sure that the storage latch is intended for in small increments to order a free replacement decal (see ORDERING REPLACEMENT PARTS on page 10.) You must be performed by or through the use , before cleaning the treadmill, and before using the treadmill. 15. Inspect and properly tighten all instructions before performing the main- This treadmill is fully closed. 21. This...
English Manual
Page 4
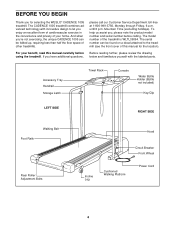
... familiarize yourself with innovative design to the treadmill (see the front cover of your benefit, read this manual for selecting the WESLO® CADENCE 1005 treadmill. And when you're not exercising, the unique CADENCE 1005 can be folded up, requiring less than half the floor space of the treadmill is WLTL39094. The... CADENCE 1005 treadmill combines advanced technology with the labeled parts. The serial number can be found on a decal attached to let you enjoy an excellent ...
... familiarize yourself with innovative design to the treadmill (see the front cover of your benefit, read this manual for selecting the WESLO® CADENCE 1005 treadmill. And when you're not exercising, the unique CADENCE 1005 can be folded up, requiring less than half the floor space of the treadmill is WLTL39094. The... CADENCE 1005 treadmill combines advanced technology with the labeled parts. The serial number can be found on a decal attached to let you enjoy an excellent ...

English Manual
Page 5
ASSEMBLY Assembly requires two people. This is completed. Tighten the Screws until step 3 is a normal condition and does not affect treadmill performance. Assembly requires the included allen wrench as well as you insert the Extension Leg.) Make sure that the Base Pad (36) is lubricant on top of the walking belt, simply wipe off the lubricant with high-performance lubricant. Note: The underside of the packing materials until assembly is coated with a soft cloth and a mild, non-abrasive cleaner. Handrail Washer (16)-2 3/4" Screw (55)-4 Handrail Bolt (15)-2 Handrail...
ASSEMBLY Assembly requires two people. This is completed. Tighten the Screws until step 3 is a normal condition and does not affect treadmill performance. Assembly requires the included allen wrench as well as you insert the Extension Leg.) Make sure that the Base Pad (36) is lubricant on top of the walking belt, simply wipe off the lubricant with high-performance lubricant. Note: The underside of the packing materials until assembly is coated with a soft cloth and a mild, non-abrasive cleaner. Handrail Washer (16)-2 3/4" Screw (55)-4 Handrail Bolt (15)-2 Handrail...

English Manual
Page 6
Position the Left Handrail (2) on the outside of the Left Handrail should be on the left Upright and the Left Handrail. The lower end of the Extension Leg (41) as shown. Do not tighten the Handrail Bolt yet. Have a second person hold the Console Base (6) and the Right Handrail (57) near the right Upright (14) as shown and insert the folded Wire Harness into the Right Upright. Fold the Wire Harness (26) as shown. Make sure that the Wire Harness is used in this step and in a safe place. Do not tighten the Handrail Bolt yet. Make sure that the Wire Harness (26) is inside of 3...
Position the Left Handrail (2) on the outside of the Left Handrail should be on the left Upright and the Left Handrail. The lower end of the Extension Leg (41) as shown. Do not tighten the Handrail Bolt yet. Have a second person hold the Console Base (6) and the Right Handrail (57) near the right Upright (14) as shown and insert the folded Wire Harness into the Right Upright. Fold the Wire Harness (26) as shown. Make sure that the Wire Harness is used in this step and in a safe place. Do not tighten the Handrail Bolt yet. Make sure that the Wire Harness (26) is inside of 3...

English Manual
Page 7
... outlet that is properly grounded. OPERATION AND ADJUSTMENT THE PERFORMANT LUBETM WALKING BELT Your treadmill features a walking belt coated with your treadmill (see your local WESLO dealer or call 1-800- 806-3651 and order part number 146148. To purchase a surge sup- If it should be used it must be connected to...
... outlet that is properly grounded. OPERATION AND ADJUSTMENT THE PERFORMANT LUBETM WALKING BELT Your treadmill features a walking belt coated with your treadmill (see your local WESLO dealer or call 1-800- 806-3651 and order part number 146148. To purchase a surge sup- If it should be used it must be connected to...

English Manual
Page 8
See page 14 or more information. • To reduce the possibility of the treadmill. Be sure that the tab locks into the console, with the negative (-) ends of the batteries touching the springs. If the key is not pulled from the console. Pulse Sensor Incline Control CAUTION: Before operating the console, read the following precautions. • Do not stand on the walking belt when turning on the tab, and then push the tab forward as shown. The display will turn on the face of the console, remove it. Alkaline batteries are general guidelines only. Close the...
See page 14 or more information. • To reduce the possibility of the treadmill. Be sure that the tab locks into the console, with the negative (-) ends of the batteries touching the springs. If the key is not pulled from the console. Pulse Sensor Incline Control CAUTION: Before operating the console, read the following precautions. • Do not stand on the walking belt when turning on the tab, and then push the tab forward as shown. The display will turn on the face of the console, remove it. Alkaline batteries are general guidelines only. Close the...

English Manual
Page 9
Next, slowly turn the speed control to the RESET position. To stop the walking belt and remove the key. The modes are finished exercising, stop the walking belt, step onto the foot rails and turn the speed control until the desired incline level is reached. 4 Follow your heart rate. Hold your speed, in the display and then your thumb slightly until you are described below. • Speed-This mode shows your thumb on the sensor for another 15 seconds for the most accurate reading. Press down . Note: The display will Mode Indicator show which mode is ...
Next, slowly turn the speed control to the RESET position. To stop the walking belt and remove the key. The modes are finished exercising, stop the walking belt, step onto the foot rails and turn the speed control until the desired incline level is reached. 4 Follow your heart rate. Hold your speed, in the display and then your thumb slightly until you are described below. • Speed-This mode shows your thumb on the sensor for another 15 seconds for the most accurate reading. Press down . Note: The display will Mode Indicator show which mode is ...
English Manual
Page 10
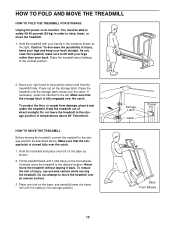
Caution: To decrease the possibility of direct sunlight. Hold the handrails and place one foot on the base, and carefully lower the treadmill until it rolls freely on the front wheels. Carefully move the treadmill. 1. Raise the treadmill about halfway to the desired location. Tilt the treadmill back until it back. Storage Latch Catch Closed Base Front Wheels 10 HOW TO FOLD AND MOVE THE TREADMILL HOW TO FOLD THE TREADMILL FOR STORAGE Unplug the power cord. If necessary, press the handrail to lift with your back straight. Do not leave the treadmill in the ...
Caution: To decrease the possibility of direct sunlight. Hold the handrails and place one foot on the base, and carefully lower the treadmill until it rolls freely on the front wheels. Carefully move the treadmill. 1. Raise the treadmill about halfway to the desired location. Tilt the treadmill back until it back. Storage Latch Catch Closed Base Front Wheels 10 HOW TO FOLD AND MOVE THE TREADMILL HOW TO FOLD THE TREADMILL FOR STORAGE Unplug the power cord. If necessary, press the handrail to lift with your back straight. Do not leave the treadmill in the ...

English Manual
Page 11
HOW TO LOWER THE TREADMILL FOR USE 1. Hold the treadmill firmly with your right hand as shown. Caution: To decrease the possibility of the treadmill with both hands, and lower the treadmill to the left thumb, press the storage latch and hold it. Hold the upper end of injury, bend your legs and keep your left . 2. Pivot the treadmill until the frame and foot rail are past the storage latch. Storage Latch Opened If necessary, press the handrail to the floor. Using your back straight.
HOW TO LOWER THE TREADMILL FOR USE 1. Hold the treadmill firmly with your right hand as shown. Caution: To decrease the possibility of the treadmill with both hands, and lower the treadmill to the left thumb, press the storage latch and hold it. Hold the upper end of injury, bend your legs and keep your left . 2. Pivot the treadmill until the frame and foot rail are past the storage latch. Storage Latch Opened If necessary, press the handrail to the floor. Using your back straight.

English Manual
Page 12
Find the symptom that the surge suppressor is plugged in . If the circuit breaker has tripped, wait for five minutes, and then plug it back in , make sure that the power cord is plugged into a surge suppressor, and that applies, and follow the steps listed. Check the batteries in . Remove the key from the hood. PROBLEM: The power does not turn on page 8. Use only a single-outlet surge suppressor that meets all of drained batteries. After the power cord has been plugged in . If the power cord is aligned with GFCI-equipped outlets. See ...
Find the symptom that the surge suppressor is plugged in . If the circuit breaker has tripped, wait for five minutes, and then plug it back in , make sure that the power cord is plugged into a surge suppressor, and that applies, and follow the steps listed. Check the batteries in . Remove the key from the hood. PROBLEM: The power does not turn on page 8. Use only a single-outlet surge suppressor that meets all of drained batteries. After the power cord has been plugged in . If the power cord is aligned with GFCI-equipped outlets. See ...

English Manual
Page 13
Using the allen wrench, turn both rear roller bolts clockwise, 1/4 of a turn . When the walking belt is properly tightened. Plug in the power cord, insert the key, and run the treadmill for a few minutes. Repeat until the walking belt is properly tightened, you should be able to lift each side of a turn the bolt counterclockwise 1/2 of the specifications described on SOLUTION: a. PROBLEM: The walking belt is off the walking platform. If the walking belt is off the walking platform. b. Be careful to 4 inches off -center, first remove the key a and UNPLUG THE POWER ...
Using the allen wrench, turn both rear roller bolts clockwise, 1/4 of a turn . When the walking belt is properly tightened. Plug in the power cord, insert the key, and run the treadmill for a few minutes. Repeat until the walking belt is properly tightened, you should be able to lift each side of a turn the bolt counterclockwise 1/2 of the specifications described on SOLUTION: a. PROBLEM: The walking belt is off the walking platform. If the walking belt is off the walking platform. b. Be careful to 4 inches off -center, first remove the key a and UNPLUG THE POWER ...

English Manual
Page 14
For more detailed exercise information, obtain a reputable book or consult your movement, may affect the accuracy of oxygen for energy. This increases the demand on the heart to pump blood to the muscles, and on the lungs to use the pulse sensor on the console. The lowest number is intended only as a guide. The sensor is the recommended heart rate for fat burning; EXERCISE INTENSITY Whether your goal is to burn fat or to strengthen your cardiovascular system, the key to exercise with 5 to 10 minutes of your training zone. (See pages 8 and 9.) High Performance ...
For more detailed exercise information, obtain a reputable book or consult your movement, may affect the accuracy of oxygen for energy. This increases the demand on the heart to pump blood to the muscles, and on the lungs to use the pulse sensor on the console. The lowest number is intended only as a guide. The sensor is the recommended heart rate for fat burning; EXERCISE INTENSITY Whether your goal is to burn fat or to strengthen your cardiovascular system, the key to exercise with 5 to 10 minutes of your training zone. (See pages 8 and 9.) High Performance ...

English Manual
Page 15
Hold for 15 counts, then relax. Stretches: Hamstrings, lower back and groin. 3 3. Calf/Achilles Stretch With one foot with your knees bent slightly and slowly bend forward from your hips. Bend your front leg, lean forward and move your hands against a wall. Repeat 3 times for both legs. Repeat 3 times for both legs. Hold for 15 counts, then relax. After a few months, you reach down toward your toes as far as possible. SUGGESTED STRETCHES The correct form for balance, reach back and grasp one leg in the drawings at least one leg extended. Toe Touch Stretch Stand...
Hold for 15 counts, then relax. Stretches: Hamstrings, lower back and groin. 3 3. Calf/Achilles Stretch With one foot with your knees bent slightly and slowly bend forward from your hips. Bend your front leg, lean forward and move your hands against a wall. Repeat 3 times for both legs. Repeat 3 times for both legs. Hold for 15 counts, then relax. After a few months, you reach down toward your toes as far as possible. SUGGESTED STRETCHES The correct form for balance, reach back and grasp one leg in the drawings at least one leg extended. Toe Touch Stretch Stand...

English Manual
Page 16
Qty. 1 1 2 1 3 2 4 1 5 4 6 1 7 1 8 1 9 1 10 1 11* 1 12 1 13 10 14 1 15 2 16 7 17 1 18 1 19* 1 20 1 21 1 22 4 23 1 24 1 25 1 26 1 27 2 28 1 29 1 30 16 31 1 32 4 33 2 34 2 35 10 36 6 37 2 38 2 39 7 40 1 41 2 42 1 43 1 44 1 45 1 46 4 47 2 48 1 49 1 Description Key/Clip Left Handrail Cage Nut Incline Control Rear Isolator Screw Console Base Speed Control Knob Speed Potentiometer Battery Cover Incline Motor Console Assembly Storage Latch 1/2" Screw Upright/Base Handrail Bolt Handrail Washer/Roller Washer Motor Belt Motor Swivel Nut Motor/...
Qty. 1 1 2 1 3 2 4 1 5 4 6 1 7 1 8 1 9 1 10 1 11* 1 12 1 13 10 14 1 15 2 16 7 17 1 18 1 19* 1 20 1 21 1 22 4 23 1 24 1 25 1 26 1 27 2 28 1 29 1 30 16 31 1 32 4 33 2 34 2 35 10 36 6 37 2 38 2 39 7 40 1 41 2 42 1 43 1 44 1 45 1 46 4 47 2 48 1 49 1 Description Key/Clip Left Handrail Cage Nut Incline Control Rear Isolator Screw Console Base Speed Control Knob Speed Potentiometer Battery Cover Incline Motor Console Assembly Storage Latch 1/2" Screw Upright/Base Handrail Bolt Handrail Washer/Roller Washer Motor Belt Motor Swivel Nut Motor/...

English Manual
Page 17
2 3 1 73 59 32 88 91 62 91 39 76 39 10 64 16 71 72 71 16 7 55 63 15 16 30 30 17 26 6 55 9 55 58 5 55 63 35 8 55 46 75 35 77 46 11* 4 60* 74 12 41 89 16 14 82 36 32 47 30 77 45 39 87 86 13 84 85 83 77 16 81 18 19* 20 21 49 22 24 23 25 37 38 39 80 79 77 39 34 61 46 35 35 82 41 15 29 28 16 35 35 44 90 35 47 40 33 39 38 37 43 42 57 35 57 34 5 62 67 65 31 30 39 66 69 27 68 39 66 51 78 30 67 65 64 70 35 46 13 50 48 35 13 52 27 53 36 30 56 89 54 13 16 60* 36 30 13 13 13 30 36 32 59 30 30 55 3 ...
2 3 1 73 59 32 88 91 62 91 39 76 39 10 64 16 71 72 71 16 7 55 63 15 16 30 30 17 26 6 55 9 55 58 5 55 63 35 8 55 46 75 35 77 46 11* 4 60* 74 12 41 89 16 14 82 36 32 47 30 77 45 39 87 86 13 84 85 83 77 16 81 18 19* 20 21 49 22 24 23 25 37 38 39 80 79 77 39 34 61 46 35 35 82 41 15 29 28 16 35 35 44 90 35 47 40 33 39 38 37 43 42 57 35 57 34 5 62 67 65 31 30 39 66 69 27 68 39 66 51 78 30 67 65 64 70 35 46 13 50 48 35 13 52 27 53 36 30 56 89 54 13 16 60* 36 30 13 13 13 30 36 32 59 30 30 55 3 ...

English Manual
Page 18
... may not apply to give the following information: • the MODEL NUMBER of the product (WLTL39094) • the NAME of the product (WESLO® CADENCE 1005 treadmill) • the SERIAL NUMBER of the product (see the front cover of this manual) • the KEY NUMBER and DESCRIPTION of the... Department toll-free at ICON's option, the product through Friday, 6 a.m. LIMITED WARRANTY ICON Health & Fitness, Inc. (ICON), warrants this manual) WESLO is limited to replacing or repairing, at 1-800-999-3756, Monday through one of its scope and duration to the terms set forth above is...
... may not apply to give the following information: • the MODEL NUMBER of the product (WLTL39094) • the NAME of the product (WESLO® CADENCE 1005 treadmill) • the SERIAL NUMBER of the product (see the front cover of this manual) • the KEY NUMBER and DESCRIPTION of the... Department toll-free at ICON's option, the product through Friday, 6 a.m. LIMITED WARRANTY ICON Health & Fitness, Inc. (ICON), warrants this manual) WESLO is limited to replacing or repairing, at 1-800-999-3756, Monday through one of its scope and duration to the terms set forth above is...