
English Manual
Page 3
... object into any commercial, rental, or institutional setting. Servicing other than the procedures in this treadmill in -home use of the treadmill by an authorized service representative. Always remove the key and unplug the power cord when the treadmill is intended for personal injury or property damage sustained by an authorized service representative only...
... object into any commercial, rental, or institutional setting. Servicing other than the procedures in this treadmill in -home use of the treadmill by an authorized service representative. Always remove the key and unplug the power cord when the treadmill is intended for personal injury or property damage sustained by an authorized service representative only...
English Manual
Page 4
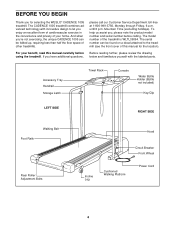
... technology with the labeled parts. The model number of your benefit, read this manual for selecting the WESLO® CADENCE 1005 treadmill. Accessory Tray Handrail Storage Latch Towel Rack Console Water Bottle Holder (Bottle not included) Key/Clip LEFT SIDE RIGHT SIDE Foot Rails Walking Belt Rear Roller Adjustment Bolts Hood Circuit Breaker Front Wheel...
... technology with the labeled parts. The model number of your benefit, read this manual for selecting the WESLO® CADENCE 1005 treadmill. Accessory Tray Handrail Storage Latch Towel Rack Console Water Bottle Holder (Bottle not included) Key/Clip LEFT SIDE RIGHT SIDE Foot Rails Walking Belt Rear Roller Adjustment Bolts Hood Circuit Breaker Front Wheel...

English Manual
Page 8
.... Inserting the key will not turn on when the ON/RESET button is pressed or when the walking belt is started. (If you just installed batteries, the display will already be on the power. • Always wear the clip (see the drawing above ) while operating the treadmill. Monitor Display... Speed Control Clip Note: If there is pulled from the console. Avoid spilling liquids on the display. If the key is removed from the console, adjust the position of the console, remove it. When...
.... Inserting the key will not turn on when the ON/RESET button is pressed or when the walking belt is started. (If you just installed batteries, the display will already be on the power. • Always wear the clip (see the drawing above ) while operating the treadmill. Monitor Display... Speed Control Clip Note: If there is pulled from the console. Avoid spilling liquids on the display. If the key is removed from the console, adjust the position of the console, remove it. When...

English Manual
Page 9
... CALS)-This mode shows the approximate number of calories you stop the walking belt and remove the key. Do not press too hard, or the circula- Note: The first time the treadmill is pressure acti- Hold your thumb slightly until you are described below. • Speed-This mode... shows your heart rate. 6 When you become familiar with the monitor modes When the power is removed. To stop the walking belt and remove the key from the console...
... CALS)-This mode shows the approximate number of calories you stop the walking belt and remove the key. Do not press too hard, or the circula- Note: The first time the treadmill is pressure acti- Hold your thumb slightly until you are described below. • Speed-This mode... shows your heart rate. 6 When you become familiar with the monitor modes When the power is removed. To stop the walking belt and remove the key from the console...

English Manual
Page 12
... the left side of the Pulley (85). Remove the screws from the console. PROBLEM: The power does not turn on the treadmill near the power cord (see page 7). above). Reinsert the key fully into the console. (See step 1 on page 8. d. Turn the Pulley until 6 p.m. Re-attach the hood, and run , please ... minutes and then press the switch back in . Make sure that applies, and follow the steps listed. Retighten the Screw. MAINTENANCE AND TROUBLESHOOTING Most treadmill problems can be solved by following the steps below. Remove the key from the console and UNPLUG THE POWER CORD.
... the left side of the Pulley (85). Remove the screws from the console. PROBLEM: The power does not turn on the treadmill near the power cord (see page 7). above). Reinsert the key fully into the console. (See step 1 on page 8. d. Turn the Pulley until 6 p.m. Re-attach the hood, and run , please ... minutes and then press the switch back in . Make sure that applies, and follow the steps listed. Retighten the Screw. MAINTENANCE AND TROUBLESHOOTING Most treadmill problems can be solved by following the steps below. Remove the key from the console and UNPLUG THE POWER CORD.

English Manual
Page 13
...tightened. Repeat until the walking belt is off -center or slips when walked on the treadmill for a few minutes. b. b. When the walking belt is off -center, first remove the key a and UNPLUG THE POWER CORD. Remove the key and UNPLUG THE POWER CORD. Plug in the power cord, insert the... key, and run the treadmill for a few minutes. Plug in the power cord, insert the key, and run the treadmill for a few minutes. PROBLEM: The ...
...tightened. Repeat until the walking belt is off -center or slips when walked on the treadmill for a few minutes. b. b. When the walking belt is off -center, first remove the key a and UNPLUG THE POWER CORD. Remove the key and UNPLUG THE POWER CORD. Plug in the power cord, insert the... key, and run the treadmill for a few minutes. Plug in the power cord, insert the key, and run the treadmill for a few minutes. PROBLEM: The ...

English Manual
Page 14
...warming up, increase the intensity of your exercise until your heart rate is too high or too low, adjust the speed and incline of the treadmill as a guide. This will increase the flexibility of your training zone. (See pages 8 and 9.) Aerobic Exercise The following three parts: ...cardiovascular system, your age on the console. EXERCISE INTENSITY Whether your goal is to burn fat or to strengthen your cardiovascular system, the key to achieving the desired results is in preparation for energy. Next, find your exercise must exercise at a relatively low intensity level for ...
...warming up, increase the intensity of your exercise until your heart rate is too high or too low, adjust the speed and incline of the treadmill as a guide. This will increase the flexibility of your training zone. (See pages 8 and 9.) Aerobic Exercise The following three parts: ...cardiovascular system, your age on the console. EXERCISE INTENSITY Whether your goal is to burn fat or to strengthen your cardiovascular system, the key to achieving the desired results is in preparation for energy. Next, find your exercise must exercise at a relatively low intensity level for ...

English Manual
Page 15
... be- Hold for 15 counts, then relax. Repeat 3 times. EXERCISE FREQUENCY To maintain or improve your condition, complete three workouts each week if desired. The key to success is shown in front of your feet together and your hips. Allow your back and shoulders to make exercise a regular and enjoyable part...
... be- Hold for 15 counts, then relax. Repeat 3 times. EXERCISE FREQUENCY To maintain or improve your condition, complete three workouts each week if desired. The key to success is shown in front of your feet together and your hips. Allow your back and shoulders to make exercise a regular and enjoyable part...

English Manual
Page 16
...32 4 33 2 34 2 35 10 36 6 37 2 38 2 39 7 40 1 41 2 42 1 43 1 44 1 45 1 46 4 47 2 48 1 49 1 Description Key/Clip Left Handrail Cage Nut Incline Control Rear Isolator Screw Console Base Speed Control Knob Speed Potentiometer Battery Cover Incline Motor Console Assembly Storage Latch... Nut/Base Pivot Nut Controller Extension Leg Circuit Breaker Power Cord Grommet Power Cord Left Upright Spacer Isolator Frame Pivot Washer Choke Motor Locknut Key No. WLTL39094 R1202A Key No. Description 50 2 51 1 52 1 53 2 54 1 55 12 56 4 57 1 58 1 59 2 60 2 61 1 62 2 63 1 64 2...
...32 4 33 2 34 2 35 10 36 6 37 2 38 2 39 7 40 1 41 2 42 1 43 1 44 1 45 1 46 4 47 2 48 1 49 1 Description Key/Clip Left Handrail Cage Nut Incline Control Rear Isolator Screw Console Base Speed Control Knob Speed Potentiometer Battery Cover Incline Motor Console Assembly Storage Latch... Nut/Base Pivot Nut Controller Extension Leg Circuit Breaker Power Cord Grommet Power Cord Left Upright Spacer Isolator Frame Pivot Washer Choke Motor Locknut Key No. WLTL39094 R1202A Key No. Description 50 2 51 1 52 1 53 2 54 1 55 12 56 4 57 1 58 1 59 2 60 2 61 1 62 2 63 1 64 2...

English Manual
Page 18
...may not apply to you specific legal rights. The warranty extended hereunder is in workmanship and material, under this manual) • the KEY NUMBER and DESCRIPTION of the desired part(s) (see the front cover of this warranty is authorized by ICON. ICON's obligation under normal use... must be prepared to give the following information: • the MODEL NUMBER of the product (WLTL39094) • the NAME of the product (WESLO® CADENCE 1005 treadmill) • the SERIAL NUMBER of the product (see the PART LIST and the EXPLODED DRAWING in USA © 2002 ICON Health & Fitness...
...may not apply to you specific legal rights. The warranty extended hereunder is in workmanship and material, under this manual) • the KEY NUMBER and DESCRIPTION of the desired part(s) (see the front cover of this warranty is authorized by ICON. ICON's obligation under normal use... must be prepared to give the following information: • the MODEL NUMBER of the product (WLTL39094) • the NAME of the product (WESLO® CADENCE 1005 treadmill) • the SERIAL NUMBER of the product (see the PART LIST and the EXPLODED DRAWING in USA © 2002 ICON Health & Fitness...


