

Instruction Manual
Page 1
... there are committed to give the following information: • The MODEL of the product (WLEMBE71000) • The NAME of the product (WESLO® BENCH 600 weight bench) • The SERIAL NUMBER of the product (see the PART LIST on page 15 and the EXPLODED DRAWING attached in this manual before using... (see the front cover of this manual) • The KEY NUMBER and DESCRIPTION of this equipment. USER'S MANUAL Visit our website at www.weslo.com new products, prizes, fitness tips, and much more! Greenwich House 223 North Street Sheepscar Leeds LS7 2AA West Yorkshire Tel: Country Code: ...
... there are committed to give the following information: • The MODEL of the product (WLEMBE71000) • The NAME of the product (WESLO® BENCH 600 weight bench) • The SERIAL NUMBER of the product (see the PART LIST on page 15 and the EXPLODED DRAWING attached in this manual before using... (see the front cover of this manual) • The KEY NUMBER and DESCRIPTION of this equipment. USER'S MANUAL Visit our website at www.weslo.com new products, prizes, fitness tips, and much more! Greenwich House 223 North Street Sheepscar Leeds LS7 2AA West Yorkshire Tel: Country Code: ...
Instruction Manual
Page 2
... Bracket Adjustment Tube 9" Pad Tube 11" Weight Tube Weight Clip Stabiliser Plate User's Manual Note: "#" Indicates an non-illustrated part. WESLO is a registered trademark of this manual for information about ordering replacement parts. WLEMBE71000 R1100A To find the parts listed below, refer to.... Key No. Description Key No. TABLE OF CONTENTS IMPORTANT PRECAUTIONS 3 BEFORE YOU BEGIN 4 ASSEMBLY 5 HOW TO ADJUST THE WEIGHT BENCH 12 PART LIST 15 ORDERING REPLACEMENT PARTS Back Cover Note: A PART IDENTIFICATION CHART and an EXPLODED DRAWING are subject to the EXPLODED ...
... Bracket Adjustment Tube 9" Pad Tube 11" Weight Tube Weight Clip Stabiliser Plate User's Manual Note: "#" Indicates an non-illustrated part. WESLO is a registered trademark of this manual for information about ordering replacement parts. WLEMBE71000 R1100A To find the parts listed below, refer to.... Key No. Description Key No. TABLE OF CONTENTS IMPORTANT PRECAUTIONS 3 BEFORE YOU BEGIN 4 ASSEMBLY 5 HOW TO ADJUST THE WEIGHT BENCH 12 PART LIST 15 ORDERING REPLACEMENT PARTS Back Cover Note: A PART IDENTIFICATION CHART and an EXPLODED DRAWING are subject to the EXPLODED ...
Instruction Manual
Page 3
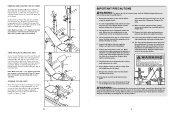
... the responsibility of serious injury, read the following important precau- Inspect and tighten all times. 9. Inspect the cables before using the weight bench. 2. If you are exercising, stop immediately and begin cooling down. 15. Keep hands and feet away from the Frame (51). Do... use only. If the decal is especially important for personal injury or property damage sustained by only one of all instructions before using the weight bench. 1. Always wear athletic shoes for home use . Next, remove the indicated 5/16" x 2" Bolt (10), 5/16" Washers (3), and 5/16" Nylon...
... the responsibility of serious injury, read the following important precau- Inspect and tighten all times. 9. Inspect the cables before using the weight bench. 2. If you are exercising, stop immediately and begin cooling down. 15. Keep hands and feet away from the Frame (51). Do... use only. If the decal is especially important for personal injury or property damage sustained by only one of all instructions before using the weight bench. 1. Always wear athletic shoes for home use . Next, remove the indicated 5/16" x 2" Bolt (10), 5/16" Washers (3), and 5/16" Nylon...

Instruction Manual
Page 4
... improve your goal is WLEMBE71000. When using the weight bench. Attach the Lat Bar (42) to the Upper Cable (37) with the Weight Clips (64). If you for selecting the versatile WESLO® BENCH 600 weight bench. tions, please call our Customer Service Department at 0345...-089009. BEFORE YOU BEGIN Thank you have additional ques- Whether your cardiovascular system, the BENCH 600 will help us assist you want. Slide the desired...
... improve your goal is WLEMBE71000. When using the weight bench. Attach the Lat Bar (42) to the Upper Cable (37) with the Weight Clips (64). If you for selecting the versatile WESLO® BENCH 600 weight bench. tions, please call our Customer Service Department at 0345...-089009. BEFORE YOU BEGIN Thank you have additional ques- Whether your cardiovascular system, the BENCH 600 will help us assist you want. Slide the desired...

Instruction Manual
Page 5
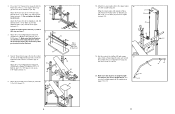
...Attach the Left Stabiliser (50) to the locked position, with a 5/16" x 2 1/2" Bolt (2), a 5/16" Washer (3), and a 5/16" Nylon Locknut (1). The weight bench can be adjusted. Rotate the Medium Lock Pins to the "H" Frame (52) with a damp cloth and a mild, non-abrasive detergent. Make sure that both Weight...the Leg Lever (45), make sure that there is completed. • For help identifying the small parts used in assembly, use the weight bench. Raise the Backrest and insert the Adjustment Tube (61) through the "H" Frame and the Weight Rests. Lay the Backrest on the Adjustment ...
...Attach the Left Stabiliser (50) to the locked position, with a 5/16" x 2 1/2" Bolt (2), a 5/16" Washer (3), and a 5/16" Nylon Locknut (1). The weight bench can be adjusted. Rotate the Medium Lock Pins to the "H" Frame (52) with a damp cloth and a mild, non-abrasive detergent. Make sure that both Weight...the Leg Lever (45), make sure that there is completed. • For help identifying the small parts used in assembly, use the weight bench. Raise the Backrest and insert the Adjustment Tube (61) through the "H" Frame and the Weight Rests. Lay the Backrest on the Adjustment ...
Instruction Manual
Page 6
... Lat Bar. 33 34 21 12 42 20. Press a 1" Round Inner Cap (12) into each end of the Adjustment Tube (61). The use the weight bench. Attach the Left and Right Backrest Brackets (59, 60) to the "H" Frame (52) with the 5/16" x 4" Bolt (9), two 1/2" x 7/8" Spacers (8), and a 5/16" Nylon Locknut (1). 5. Press a 1 1/2" Square...
... Lat Bar. 33 34 21 12 42 20. Press a 1" Round Inner Cap (12) into each end of the Adjustment Tube (61). The use the weight bench. Attach the Left and Right Backrest Brackets (59, 60) to the "H" Frame (52) with the 5/16" x 4" Bolt (9), two 1/2" x 7/8" Spacers (8), and a 5/16" Nylon Locknut (1). 5. Press a 1 1/2" Square...