

Owner Manual
Page 1
OPERATOR'S MANUAL MODEL NUMBER WE20C ELECTRIC-POWERED, 3-IN-1, 20" ROTARY LAWN MOWER 438184
OPERATOR'S MANUAL MODEL NUMBER WE20C ELECTRIC-POWERED, 3-IN-1, 20" ROTARY LAWN MOWER 438184
Owner Manual
Page 2
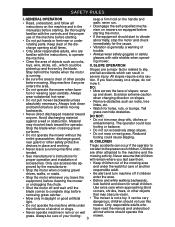
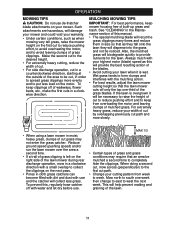
READ ALL INSTRUCTIONS MOWER SAFETY GUIDELINES • The information this manual contains will alert you to use your own good judgment. • Familiarize yourself with operating or maintaining your lawn mower, know all the hazards associated with your lawn mower in this manual and we would advise you to water or operate on your mower. To reduce risk of electric shock, do not expose to potential hazards and prevent possible problems. • It may appear in this manual and on wet ground. Turn off mower and remove plug from mower deck. CAUTION or WARNING DANGER: Cut ...
READ ALL INSTRUCTIONS MOWER SAFETY GUIDELINES • The information this manual contains will alert you to use your own good judgment. • Familiarize yourself with operating or maintaining your lawn mower, know all the hazards associated with your lawn mower in this manual and we would advise you to water or operate on your mower. To reduce risk of electric shock, do not expose to potential hazards and prevent possible problems. • It may appear in this manual and on wet ground. Turn off mower and remove plug from mower deck. CAUTION or WARNING DANGER: Cut ...
Owner Manual
Page 3
use accessories ap- • Keep children out of slopes: never up and thrown by the manufacturer. toys, wire, sticks, etc., which can occur if the operator is not a toy. enters the area. • Do not operate the mower when bare- Material may obscure vision. • Mow only in place and working. Stop the blade when crossing gravel surfaces. • Do not operate the mower without the entire grasscatcher, discharge guard, rear guard or other safety protective DO: • Mow across the face of the mowing area proved by the blade. DO NOT: • Do not trim near ...
use accessories ap- • Keep children out of slopes: never up and thrown by the manufacturer. toys, wire, sticks, etc., which can occur if the operator is not a toy. enters the area. • Do not operate the mower when bare- Material may obscure vision. • Mow only in place and working. Stop the blade when crossing gravel surfaces. • Do not operate the mower without the entire grasscatcher, discharge guard, rear guard or other safety protective DO: • Mow across the face of the mowing area proved by the blade. DO NOT: • Do not trim near ...
Owner Manual
Page 4
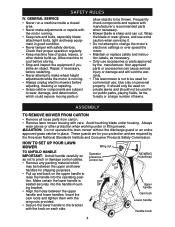
Check their proper operation regularly. • Keep machine free of lawns. Insert the cam locks and tighten them with the wing nuts provided. • Secure the lower handle to the bracket with the knob on the upper handle to raise the handle into the handle mounting bracket. • Align the holes between the upper and lower handles for commercial use; Avoid touching blade under or lifting mower. Always wear gloves or other debris build-up and back on each side. HOW TO SET UP YOUR LAWN MOWER TO UNFOLD HANDLE IMPORTANT: Unfold handle carefully so as necessary. • ...
Check their proper operation regularly. • Keep machine free of lawns. Insert the cam locks and tighten them with the wing nuts provided. • Secure the lower handle to the bracket with the knob on the upper handle to raise the handle into the handle mounting bracket. • Align the holes between the upper and lower handles for commercial use; Avoid touching blade under or lifting mower. Always wear gloves or other debris build-up and back on each side. HOW TO SET UP YOUR LAWN MOWER TO UNFOLD HANDLE IMPORTANT: Unfold handle carefully so as necessary. • ...
Owner Manual
Page 5
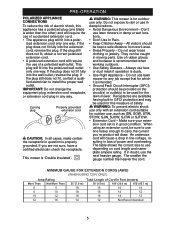
PRE-OPERATION POLARIZED APPLIANCE CONNECTIONS To reduce the risk of electric shock, this measure of a polarized extension cord. • The appliance plug will fit into a polar- ized extension cord only one way. IMPORTANT: Do not change the equipment plug, extension cord receptacle, or extension cord plug in any job except that for any way. 2-prong plug Properly grounded extension cord CAUTION: In all cases, make certain the receptacle in doubt, use , such as SW, SOW, STW, STOW, SJW, SJOW, SJTW or SJTOW. • Extension Cord - WARNING: This mower is intended. • ...
PRE-OPERATION POLARIZED APPLIANCE CONNECTIONS To reduce the risk of electric shock, this measure of a polarized extension cord. • The appliance plug will fit into a polar- ized extension cord only one way. IMPORTANT: Do not change the equipment plug, extension cord receptacle, or extension cord plug in any job except that for any way. 2-prong plug Properly grounded extension cord CAUTION: In all cases, make certain the receptacle in doubt, use , such as SW, SOW, STW, STOW, SJW, SJOW, SJTW or SJTOW. • Extension Cord - WARNING: This mower is intended. • ...

Owner Manual
Page 6
Keep cutting edges sharp and clean for best and safest performance. • Follow instructions for which it to disconnect from receptacle. Unplug power cord. - It will do the job better and safer at all objects prior to persons. Use common sense. out of reach of all times. • Stay Alert - Keep proper footing and balance at the rate for lubricating and changing accessories. • Inspect lawn mower cord periodically and if damaged, have it repaired by an authorized service facility. • Inspect extension cords periodically and replace if damaged. •...
Keep cutting edges sharp and clean for best and safest performance. • Follow instructions for which it to disconnect from receptacle. Unplug power cord. - It will do the job better and safer at all objects prior to persons. Use common sense. out of reach of all times. • Stay Alert - Keep proper footing and balance at the rate for lubricating and changing accessories. • Inspect lawn mower cord periodically and if damaged, have it repaired by an authorized service facility. • Inspect extension cords periodically and replace if damaged. •...
Owner Manual
Page 7
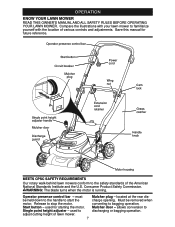
Release to discharging or bagging operation. Start button - Must be held down to the handle to start the motor. Mulcher door - Consumer Product Safety Commission. Single point height adjuster - Save this manual for starting the motor. allows conversion to stop the motor. WARNING: The blade turns when the motor is running. OPERATION KNOW YOUR LAWN MOWER READ THIS OWNER'S MANUAL AND ALL SAFETY RULES BEFORE OPERATING YOUR LAWN MOWER. must be removed when converting to adjust cutting height of the American National Standards Institute and the U.S. used to ...
Release to discharging or bagging operation. Start button - Must be held down to the handle to start the motor. Mulcher door - Consumer Product Safety Commission. Single point height adjuster - Save this manual for starting the motor. allows conversion to stop the motor. WARNING: The blade turns when the motor is running. OPERATION KNOW YOUR LAWN MOWER READ THIS OWNER'S MANUAL AND ALL SAFETY RULES BEFORE OPERATING YOUR LAWN MOWER. must be removed when converting to adjust cutting height of the American National Standards Institute and the U.S. used to ...
Owner Manual
Page 8
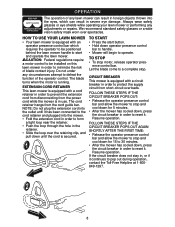
Always wear safety glasses or eye shields while operating your lawn mower or performing any circumstances attempt to defeat the function of the operator control. Resume operation. We recommend standard safety glasses or a wide vision safety mask worn over the retaining clip, and pull down , press the circuit breaker in order to operate. HOW TO USE YOUR LAWN MOWER • Your lawn mower is running. CIRCUIT BREAKER This mower is equipped with a circuit breaker in , or if it continues to pop out during operation, contact the Toll-Free Helpline at 1-800849-1297. 8 Do not...
Always wear safety glasses or eye shields while operating your lawn mower or performing any circumstances attempt to defeat the function of the operator control. Resume operation. We recommend standard safety glasses or a wide vision safety mask worn over the retaining clip, and pull down , press the circuit breaker in order to operate. HOW TO USE YOUR LAWN MOWER • Your lawn mower is running. CIRCUIT BREAKER This mower is equipped with a circuit breaker in , or if it continues to pop out during operation, contact the Toll-Free Helpline at 1-800849-1297. 8 Do not...
Owner Manual
Page 9
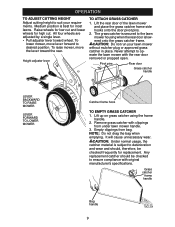
To lower mower, move the lever toward wheel. Lift up on grass catcher using the frame handle. 2. NOTE: Do not drag the bag when emptying. Remove grass catcher with the rear door removed or propped open. Lift the rear door of the lawn mower and place the grass catcher frame side hooks onto the door pivot pins. 2. Empty clippings from under lawn mower handle. 3. OPERATION TO ADJUST CUTTING HEIGHT Adjust cutting height to suit your lawn mower without mulcher plug or approved grass catcher in place. Raise wheels for low cut and lower wheels for most lawns. Never ...
To lower mower, move the lever toward wheel. Lift up on grass catcher using the frame handle. 2. NOTE: Do not drag the bag when emptying. Remove grass catcher with the rear door removed or propped open. Lift the rear door of the lawn mower and place the grass catcher frame side hooks onto the door pivot pins. 2. Empty clippings from under lawn mower handle. 3. OPERATION TO ADJUST CUTTING HEIGHT Adjust cutting height to suit your lawn mower without mulcher plug or approved grass catcher in place. Raise wheels for low cut and lower wheels for most lawns. Never ...
Owner Manual
Page 10
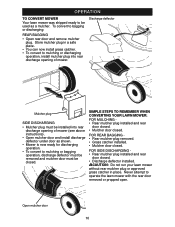
Never attempt to bagging or discharging: REAR BAGGING • Open rear door and remove mulcher plug. CAUTION: Do not run your lawn mower without rear mulcher plug or approved grass catcher in a safe place. • You can now install grass catcher. • To convert to mulching or discharging operation, install mulcher plug into rear discharge opening of mower (see above instructions). • Open mulcher door and install discharge deflector under door as a mulcher. FOR SIDE DISCHARGING • Rear mulcher plug installed and rear door closed . To convert to ...
Never attempt to bagging or discharging: REAR BAGGING • Open rear door and remove mulcher plug. CAUTION: Do not run your lawn mower without rear mulcher plug or approved grass catcher in a safe place. • You can now install grass catcher. • To convert to mulching or discharging operation, install mulcher plug into rear discharge opening of mower (see above instructions). • Open mulcher door and install discharge deflector under door as a mulcher. FOR SIDE DISCHARGING • Rear mulcher plug installed and rear door closed . To convert to ...
Owner Manual
Page 11
Make the second cut to the desired height. • For extremely heavy cutting, reduce the width of cut. • For side discharge operation, cut to reduce pushing effort and to keep from week to raise the height of the lawn. 11 Also, the mulched grass will help prevent matting and graining of cut in a counterclockwise direction, starting at the outside of the area to be necessary to week. This will biodegrade quickly to completely hide the clippings. To keep mower housing free of the blades. • Avoid cutting your lawn when it will collect less grass. If the lawn ...
Make the second cut to the desired height. • For extremely heavy cutting, reduce the width of cut. • For side discharge operation, cut to reduce pushing effort and to keep from week to raise the height of the lawn. 11 Also, the mulched grass will help prevent matting and graining of cut in a counterclockwise direction, starting at the outside of the area to be necessary to week. This will biodegrade quickly to completely hide the clippings. To keep mower housing free of the blades. • Avoid cutting your lawn when it will collect less grass. If the lawn ...
Owner Manual
Page 12
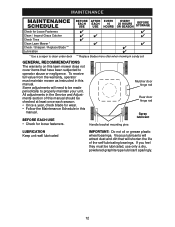
If you feel they must maintain mower as instructed in this lawn mower does not cover items that will shorten the life of this manual. All adjustments in the Service and Adjustments section of the self-lubricating bearings. Handle bracket mounting pins Mulcher door hinge rod Rear door hinge rod Spray lubricant LUBRICATION Keep unit well lubricated IMPORTANT: Do not oil or grease plastic wheel bearings. To receive full value from the warranty, operator must be made periodically to properly maintain your unit. Viscous lubricants will need to be lubricated, use only a dry,...
If you feel they must maintain mower as instructed in this lawn mower does not cover items that will shorten the life of this manual. All adjustments in the Service and Adjustments section of the self-lubricating bearings. Handle bracket mounting pins Mulcher door hinge rod Rear door hinge rod Spray lubricant LUBRICATION Keep unit well lubricated IMPORTANT: Do not oil or grease plastic wheel bearings. To receive full value from the warranty, operator must be made periodically to properly maintain your unit. Viscous lubricants will need to be lubricated, use only a dry,...
Owner Manual
Page 13
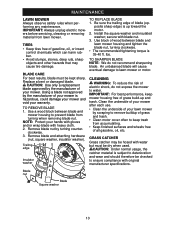
Remove blade nut by the manufacturer of gasoline, oil, or insect control chemicals which can harm rubber. • Avoid stumps, stones, deep ruts, sharp objects and other hazards that may be kept sharp. Blade nut Blade Square washer 13 BLADE CARE For best results, blade must be checked to water. Be sure the trailing edge of your mower is subject to deterioration and wear and should therefore be dry when used. CLEANING WARNING: To reduce the risk of electric shock, do not recommend sharpening blade. CAUTION: Under normal usage, the catcher material is hazardous...
Remove blade nut by the manufacturer of gasoline, oil, or insect control chemicals which can harm rubber. • Avoid stumps, stones, deep ruts, sharp objects and other hazards that may be kept sharp. Blade nut Blade Square washer 13 BLADE CARE For best results, blade must be checked to water. Be sure the trailing edge of your mower is subject to deterioration and wear and should therefore be dry when used. CLEANING WARNING: To reduce the risk of electric shock, do not recommend sharpening blade. CAUTION: Under normal usage, the catcher material is hazardous...
Owner Manual
Page 14
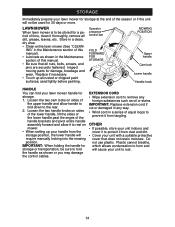
STORAGE Immediately prepare your lawn mower for storage at the end of the handle brackets and pivot entire handle assembly forward and allow handle to fold down to the rear. 2. Store in the Maintenance section of this manual. • Be sure that does not retain moisture. Operator presence control bar FOLD FORWARD FOR STORAGE MOWING POSITION Upper handle Cam lock Lower handle Handle knob HANDLE You can fold your unit to remove any way. • Wind cord in the Maintenance section of equal loops to fold the handle as shown or you may damage the control cables. Loosen the two ...
STORAGE Immediately prepare your lawn mower for storage at the end of the handle brackets and pivot entire handle assembly forward and allow handle to fold down to the rear. 2. Store in the Maintenance section of this manual. • Be sure that does not retain moisture. Operator presence control bar FOLD FORWARD FOR STORAGE MOWING POSITION Upper handle Cam lock Lower handle Handle knob HANDLE You can fold your unit to remove any way. • Wind cord in the Maintenance section of equal loops to fold the handle as shown or you may damage the control cables. Loosen the two ...

Owner Manual
Page 15
Start button not depressed. 2. Circuit breaker has tripped. 5. Operator presence control bar defective. Cutting too much grass. 3. Worn, bent or loose blade. 1. Replace blade. Cutting height too low. 2. Grass is too high or wheel height is too low. 2. Raise cutting height. 2. Extension cord not connected to cool down. CORRECTION 1. Tighten blade bolt or replace blade adapter. 6. Raise cutting height. 3. Buildup of grass, leaves, and trash under mower. 1. Replace blade. Lift on blade worn off. 3. Replace blade. 3. Raise lawn mower housing one (1) setting ...
Start button not depressed. 2. Circuit breaker has tripped. 5. Operator presence control bar defective. Cutting too much grass. 3. Worn, bent or loose blade. 1. Replace blade. Cutting height too low. 2. Grass is too high or wheel height is too low. 2. Raise cutting height. 2. Extension cord not connected to cool down. CORRECTION 1. Tighten blade bolt or replace blade adapter. 6. Raise cutting height. 3. Buildup of grass, leaves, and trash under mower. 1. Replace blade. Lift on blade worn off. 3. Replace blade. 3. Raise lawn mower housing one (1) setting ...

Owner Manual
Page 16
... engine, transaxle/transmission components, battery (except as manufactured is subject to any unanswered questions concerning this Warranty, contact: Weed Eater Customer Service Department 9335 Harris Corners Parkway Charlotte, NC 28269 USA In Canada contact: Weed Eater Customer Service Department 5855 Terry Fox Way Mississauga, Ontario L5V 3E4 giving the model number, serial number and...
... engine, transaxle/transmission components, battery (except as manufactured is subject to any unanswered questions concerning this Warranty, contact: Weed Eater Customer Service Department 9335 Harris Corners Parkway Charlotte, NC 28269 USA In Canada contact: Weed Eater Customer Service Department 5855 Terry Fox Way Mississauga, Ontario L5V 3E4 giving the model number, serial number and...

Parts List
Page 2
Grass catcher Grass catcher bracket Rear plug Rear shield Screw New cord clamp Nut 2 QTY 1 1 6 1 1 1 1 2 1 1 2 1 1 2 1 2 1 1 1 1 2 1 2 2 1 2 1 1 1 1 1 1 1 2 1 1 1 1 1 1 4 1 1 1 1 1 2 2 2 PARTS LIST ITEM NO. Brush Bolt Rectifier (KBPC2504) Screw Motor cover Cover seal Motor vent Screw Grass catcher assy. PART NO. 1 532439900 2 532439896 3 532439890 4 532439913 5 532439889 5-1 532439912 5-2 532439696 5-3 532439857 5-4 532439695 5-5 532439697 5-6 532439698 6 532439906 7 532439748 8 532439708 9 532439706 10 532439849 11 532439893 12 532439901 13 532439911 14 532439684 15 532439688 16 ...
Grass catcher Grass catcher bracket Rear plug Rear shield Screw New cord clamp Nut 2 QTY 1 1 6 1 1 1 1 2 1 1 2 1 1 2 1 2 1 1 1 1 2 1 2 2 1 2 1 1 1 1 1 1 1 2 1 1 1 1 1 1 4 1 1 1 1 1 2 2 2 PARTS LIST ITEM NO. Brush Bolt Rectifier (KBPC2504) Screw Motor cover Cover seal Motor vent Screw Grass catcher assy. PART NO. 1 532439900 2 532439896 3 532439890 4 532439913 5 532439889 5-1 532439912 5-2 532439696 5-3 532439857 5-4 532439695 5-5 532439697 5-6 532439698 6 532439906 7 532439748 8 532439708 9 532439706 10 532439849 11 532439893 12 532439901 13 532439911 14 532439684 15 532439688 16 ...
Parts List
Page 3
Brazil 1 53 532439918 10" Wheel cover 2 54 532439853 Clip Ø 12 4 55 532439919 Wheel (10 X 1.5) 2 56 532439856 Wheel bushing 2 57 532439704 Nut 2 58 532439909 Spring 1 59 532439887 Rear wheel axle 1 60 532439916 Link bar decoration (R) 1 61 532439915 Link bar decoration (L) 1 62 532439891 Screw 4 63 532439904 Link bar 1 64 532439860 Front wheel axle 1 65 532439753 Wheel bushing 2 66 532439762 Nut M10 4 67 532439850 Screw 4 68 532439689 Nut M5 4 69 532439845 Bolt M6 X 18 3 70 532439765 Motor bushing 1 71 532439766 Fan 1 72 532439908...
Brazil 1 53 532439918 10" Wheel cover 2 54 532439853 Clip Ø 12 4 55 532439919 Wheel (10 X 1.5) 2 56 532439856 Wheel bushing 2 57 532439704 Nut 2 58 532439909 Spring 1 59 532439887 Rear wheel axle 1 60 532439916 Link bar decoration (R) 1 61 532439915 Link bar decoration (L) 1 62 532439891 Screw 4 63 532439904 Link bar 1 64 532439860 Front wheel axle 1 65 532439753 Wheel bushing 2 66 532439762 Nut M10 4 67 532439850 Screw 4 68 532439689 Nut M5 4 69 532439845 Bolt M6 X 18 3 70 532439765 Motor bushing 1 71 532439766 Fan 1 72 532439908...