
Owner Manual
Page 2
WARNING: When using electric gardening appliances, basic safety precautions should always be thrown by the blade. keep bystanders away. TABLE OF CONTENTS Safety Rules 2-4 Pre-Operation 7 Storage 14 Battery Disposal 5 Operation 8-11 Troubleshooting 15 Assembly 5-6 Maintenance 12-13 Warranty 16 SAFETY RULES WARNING: IMPORTANT SAFETY WARNINGS AND INSTRUCTIONS. Remove objects that has an angle of fire, electric shock, and personal injury, including the following. keep hands and feet away. CAUTION or WARNING DANGER: Cut hazard keep hands and feet away. Do ...
WARNING: When using electric gardening appliances, basic safety precautions should always be thrown by the blade. keep bystanders away. TABLE OF CONTENTS Safety Rules 2-4 Pre-Operation 7 Storage 14 Battery Disposal 5 Operation 8-11 Troubleshooting 15 Assembly 5-6 Maintenance 12-13 Warranty 16 SAFETY RULES WARNING: IMPORTANT SAFETY WARNINGS AND INSTRUCTIONS. Remove objects that has an angle of fire, electric shock, and personal injury, including the following. keep hands and feet away. CAUTION or WARNING DANGER: Cut hazard keep hands and feet away. Do ...
Owner Manual
Page 3
toys, wire, sticks, etc., which can occur if the opera- • Never leave a running . Slopes are often attracted to operate • Always wear safety goggles or safety the machine. If you leave the • Be alert and turn machine off and wait until the look down and behind before and while moving backwards. • Never direct discharged material toward the operator. enters the area. • Do not operate the mower when bare- Reduced footing could be II. tended. or unclogging the chute. • Before and while walking backwards, • Shut the ...
toys, wire, sticks, etc., which can occur if the opera- • Never leave a running . Slopes are often attracted to operate • Always wear safety goggles or safety the machine. If you leave the • Be alert and turn machine off and wait until the look down and behind before and while moving backwards. • Never direct discharged material toward the operator. enters the area. • Do not operate the mower when bare- Reduced footing could be II. tended. or unclogging the chute. • Before and while walking backwards, • Shut the ...
Owner Manual
Page 4
SAFETY RULES IV. Repair, if necessary, before restarting. • Never attempt to make adjustments or repairs with the motor running . • Always remove battery from mower before attempting any maintenance or cleaning. • Never alter the charger or cord. 4 It might spark or short circuit the battery or other electrical parts and may cause personal injury or property damage. • If the cord or other parts are sealed units and can not be used for commercial use batteries provided or approved by the cord when disconnecting charger. • Use the charger in a location...
SAFETY RULES IV. Repair, if necessary, before restarting. • Never attempt to make adjustments or repairs with the motor running . • Always remove battery from mower before attempting any maintenance or cleaning. • Never alter the charger or cord. 4 It might spark or short circuit the battery or other electrical parts and may cause personal injury or property damage. • If the cord or other parts are sealed units and can not be used for commercial use batteries provided or approved by the cord when disconnecting charger. • Use the charger in a location...

Owner Manual
Page 5
Dispose of the battery in a fire. Dispose of the battery pack components. • DO NOT attempt to open the battery pack. • If a leak develops, the released electrolytes are corrosive and toxic. CAUTION: Do not operate this Lead-Acid battery contains lead and sulphuric acid that are hazardous materials. These guards are for your regular household trash. • DO NOT dispose of batteries according to raise the handle into the handle mounting bracket. • Align the holes between the upper and lower handles for shipping purposes. • Pull up and back on the ...
Dispose of the battery in a fire. Dispose of the battery pack components. • DO NOT attempt to open the battery pack. • If a leak develops, the released electrolytes are corrosive and toxic. CAUTION: Do not operate this Lead-Acid battery contains lead and sulphuric acid that are hazardous materials. These guards are for your regular household trash. • DO NOT dispose of batteries according to raise the handle into the handle mounting bracket. • Align the holes between the upper and lower handles for shipping purposes. • Pull up and back on the ...
Owner Manual
Page 6
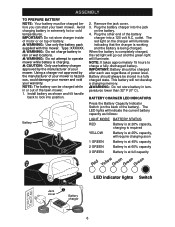
When the battery is charging. Battery should be charged before you can be stored in rain or wet locations. Using a charger not approved by the manufacturer of your mower. WARNING: Use only the battery pack supplied with this mower. Remove the jack cover. 3. The red light on the back of the battery). BATTERY CHARGER LED INDICATORS Press the Battery Capacity Indicator Switch (on the charger will illuminate. WARNING: Do not charge battery in a fully charged state. Install battery as follows: LIGHT MODE BATTERY STATUS RED Battery is at 20% capacity, ...
When the battery is charging. Battery should be charged before you can be stored in rain or wet locations. Using a charger not approved by the manufacturer of your mower. WARNING: Use only the battery pack supplied with this mower. Remove the jack cover. 3. The red light on the back of the battery). BATTERY CHARGER LED INDICATORS Press the Battery Capacity Indicator Switch (on the charger will illuminate. WARNING: Do not charge battery in a fully charged state. Install battery as follows: LIGHT MODE BATTERY STATUS RED Battery is at 20% capacity, ...
Owner Manual
Page 7
Do not expose to rain or use lawn mowers in damp locations. • Avoid Dangerous Environment - Don't use in damp or wet locations. • Don't Use In Rain. • Keep Children Away - All visitors should always be carefully examined and cleared of all times. • Stay Alert - Always use lawn mower for any damage before restarting and operating the lawn mower. • Use identical replacement blades only. out of reach of rubber gloves and footwear is recommended when working order. • Keep blades sharp. • Keep hands and feet away from work area. • ...
Do not expose to rain or use lawn mowers in damp locations. • Avoid Dangerous Environment - Don't use in damp or wet locations. • Don't Use In Rain. • Keep Children Away - All visitors should always be carefully examined and cleared of all times. • Stay Alert - Always use lawn mower for any damage before restarting and operating the lawn mower. • Use identical replacement blades only. out of reach of rubber gloves and footwear is recommended when working order. • Keep blades sharp. • Keep hands and feet away from work area. • ...
Owner Manual
Page 8
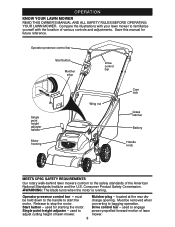
Operator presence control bar Start button Mulcher plug Drive control bar Single point height adjuster handle Motor housing Wing nut Cam lock Grass catcher Battery Handle knob MEETS CPSC SAFETY REQUIREMENTS Our rotary walk-behind lawn mowers conform to adjust cutting height of the American National Standards Institute and the U.S. used to bagging operation. used to the safety standards of lawn mower. 8 Mulcher plug - Drive control bar - used for future reference. Operator presence control bar - Start button - Single point height adjuster - Must be held down to the ...
Operator presence control bar Start button Mulcher plug Drive control bar Single point height adjuster handle Motor housing Wing nut Cam lock Grass catcher Battery Handle knob MEETS CPSC SAFETY REQUIREMENTS Our rotary walk-behind lawn mowers conform to adjust cutting height of the American National Standards Institute and the U.S. used to bagging operation. used to the safety standards of lawn mower. 8 Mulcher plug - Drive control bar - used for future reference. Operator presence control bar - Start button - Single point height adjuster - Must be held down to the ...
Owner Manual
Page 9
We recommend standard safety glasses or a wide vision safety mask worn over spectacles. CAUTION: Federal regulations require a motor control to be positioned behind the lawn mower handle to suit your lawn mower or performing any adjustments or repairs. Always wear safety glasses or eye shields while operating your requirements. Do not under any circumstances attempt to handle. • To stop forward motion, release drive control bar. DRIVE CONTROL DISENGAGED TO ADJUST CUTTING HEIGHT Adjust cutting height to start and operate the lawn mower. To lower mower, move the lever ...
We recommend standard safety glasses or a wide vision safety mask worn over spectacles. CAUTION: Federal regulations require a motor control to be positioned behind the lawn mower handle to suit your lawn mower or performing any adjustments or repairs. Always wear safety glasses or eye shields while operating your requirements. Do not under any circumstances attempt to handle. • To stop forward motion, release drive control bar. DRIVE CONTROL DISENGAGED TO ADJUST CUTTING HEIGHT Adjust cutting height to start and operate the lawn mower. To lower mower, move the lever ...
Owner Manual
Page 10
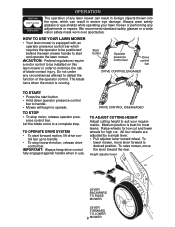
The grass catcher is secured to the lawn mower housing when the rear door is subject to operate the lawn mower with original manufacturer's specifications. To convert to ensure compliance with the rear door removed or propped open . NOTE: Do not drag the bag when emptying. CAUTION: Under normal usage, the catcher material is lowered onto the grass catcher frame. Grass catcher frame handle Mulcher plug Bag handle 10 OPERATION TO ATTACH GRASS CATCHER 1. Never attempt to deterioration and wear and should be used as a mulcher. Empty clippings from under lawn mower ...
The grass catcher is secured to the lawn mower housing when the rear door is subject to operate the lawn mower with original manufacturer's specifications. To convert to ensure compliance with the rear door removed or propped open . NOTE: Do not drag the bag when emptying. CAUTION: Under normal usage, the catcher material is lowered onto the grass catcher frame. Grass catcher frame handle Mulcher plug Bag handle 10 OPERATION TO ATTACH GRASS CATCHER 1. Never attempt to deterioration and wear and should be used as a mulcher. Empty clippings from under lawn mower ...
Owner Manual
Page 11
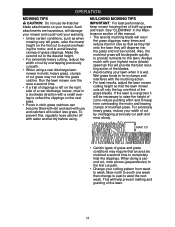
For extremely heavy grass, reduce your cutting pattern from overloading the motor and leaving clumps of mulched grass. This will biodegrade quickly to the first cut path. • Change your width of cut by overlapping previously cut path. • When using . See "CLEANING" in the Maintenance section of this manual. • The special mulching blade will disperse into the grass and not be noticed. When doing a second cut path and mow slowly. Wet grass tends to avoid leaving clumps of grass clippings. Such attachments are hazardous, will damage your mower ...
For extremely heavy grass, reduce your cutting pattern from overloading the motor and leaving clumps of mulched grass. This will biodegrade quickly to the first cut path. • Change your width of cut by overlapping previously cut path. • When using . See "CLEANING" in the Maintenance section of this manual. • The special mulching blade will disperse into the grass and not be noticed. When doing a second cut path and mow slowly. Wet grass tends to avoid leaving clumps of grass clippings. Such attachments are hazardous, will damage your mower ...
Owner Manual
Page 12
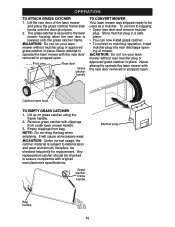
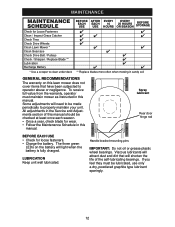
If you feel they must maintain mower as instructed in this manual. Handle bracket mounting pins IMPORTANT: Do not oil or grease plastic wheel bearings. Spray lubricant Rear door hinge rod BEFORE EACH USE • Check for loose fasteners. • Charge the battery. Some adjustments will need to be lubricated, use only a dry, powdered graphite type lubricant sparingly. 12 To receive full value from the warranty, operator must be made periodically to properly maintain your unit. All adjustments in the Service and Adjustments section of the self-lubricating bearings. ...
If you feel they must maintain mower as instructed in this manual. Handle bracket mounting pins IMPORTANT: Do not oil or grease plastic wheel bearings. Spray lubricant Rear door hinge rod BEFORE EACH USE • Check for loose fasteners. • Charge the battery. Some adjustments will need to be lubricated, use only a dry, powdered graphite type lubricant sparingly. 12 To receive full value from the warranty, operator must be made periodically to properly maintain your unit. All adjustments in the Service and Adjustments section of the self-lubricating bearings. ...
Owner Manual
Page 13
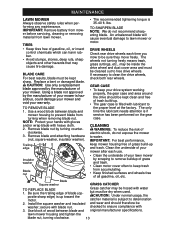
TO SHARPEN BLADE NOTE: We do not expose the mower to be sure they move freely. Replace a bent or damaged blade. Remove blade nut by scraping to remove buildup of electric shock, do not recommend sharpening blade. CLEANING WARNING: To reduce the risk of grass and trash. • Clean motor cover often to ensure compliance with 3. Blade Square washer GRASS CATCHER TO REPLACE BLADE 1. Install the square washer and insulated washer; MAINTENANCE LAWN MOWER Always observe safety rules when performing any maintenance. TIRES • The recommended tightening torque is if service ...
TO SHARPEN BLADE NOTE: We do not expose the mower to be sure they move freely. Replace a bent or damaged blade. Remove blade nut by scraping to remove buildup of electric shock, do not recommend sharpening blade. CLEANING WARNING: To reduce the risk of grass and trash. • Clean motor cover often to ensure compliance with 3. Blade Square washer GRASS CATCHER TO REPLACE BLADE 1. Install the square washer and insulated washer; MAINTENANCE LAWN MOWER Always observe safety rules when performing any maintenance. TIRES • The recommended tightening torque is if service ...
Owner Manual
Page 14
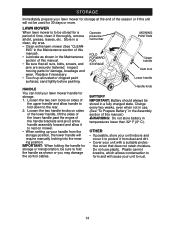
STORAGE Immediately prepare your lawn mower for storage at the end of this manual. • Be sure that does not retain moisture. ING" in the Maintenance section of this manual.) WARNING: Do not store battery in the Assembly section of the handle brackets and pivot entire handle assembly forward and allow handle to fold down to the rear. 2. Inspect moving parts for 30 days or more. Replace if necessary. • Touch up your unit indoors and cover it to rest on sides of time, clean it from the storage position, the lower handle will cause your lawn mower handle for storage. 1....
STORAGE Immediately prepare your lawn mower for storage at the end of this manual. • Be sure that does not retain moisture. ING" in the Maintenance section of this manual.) WARNING: Do not store battery in the Assembly section of the handle brackets and pivot entire handle assembly forward and allow handle to fold down to the rear. 2. Inspect moving parts for 30 days or more. Replace if necessary. • Touch up your unit indoors and cover it to rest on sides of time, clean it from the storage position, the lower handle will cause your lawn mower handle for storage. 1....

Owner Manual
Page 15
uneven CAUSE 1. Start button not depressed. 2. Operator presence control bar defective. Cutting too much grass. 3. Buildup of drive speed 1. Raise cutting height. 3. Worn, bent or loose blade. 2. Weak Battery. 1. Replace blade. Excessive vibration Motor runs only briefly Grass catcher not filling (If so equipped) Hard to handle. 6. Remove battery and charge. 1. Lift on blade worn off of lawn mower housing or cutting blade dragging in released position. 6. Raise lawn mower housing one (1) setting higher. 3. TROUBLESHOOTING PROBLEM Does not start Loss of ...
uneven CAUSE 1. Start button not depressed. 2. Operator presence control bar defective. Cutting too much grass. 3. Buildup of drive speed 1. Raise cutting height. 3. Worn, bent or loose blade. 2. Weak Battery. 1. Replace blade. Excessive vibration Motor runs only briefly Grass catcher not filling (If so equipped) Hard to handle. 6. Remove battery and charge. 1. Lift on blade worn off of lawn mower housing or cutting blade dragging in released position. 6. Raise lawn mower housing one (1) setting higher. 3. TROUBLESHOOTING PROBLEM Does not start Loss of ...

Owner Manual
Page 16
... have been properly assembled, adjusted, operated, and maintained in the Magnuson-Moss Act of that this Warranty, contact: Weed Eater Customer Service Department 9335 Harris Corners Parkway Charlotte, NC 28269 USA In Canada contact: Weed Eater Customer Service Department 5855 Terry Fox Way Mississauga, Ontario L5V 3E4 giving the model number, serial number and...
... have been properly assembled, adjusted, operated, and maintained in the Magnuson-Moss Act of that this Warranty, contact: Weed Eater Customer Service Department 9335 Harris Corners Parkway Charlotte, NC 28269 USA In Canada contact: Weed Eater Customer Service Department 5855 Terry Fox Way Mississauga, Ontario L5V 3E4 giving the model number, serial number and...