
Owner Manual
Page 2
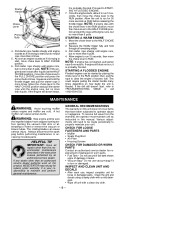
...Always wear heavy, long pants, long sleeves, boots and gloves. Do not wear jewelry, loose clothing, or clothing with your operator's manual carefully until you completely understand and can follow all warnings and safety rules before opening the vacuum inlet door. Secure hair above shoulder length...unit to release the latch while pulling up on the vacuum inlet cover with loosing hanging straps, ties, tassels, etc. Save operator's manual. The blower can cause serious injury. The engine must be dangerous! IDENTIFICATION OF SAFETY SYMBOLS WARNING: This unit can be stopped and...
...Always wear heavy, long pants, long sleeves, boots and gloves. Do not wear jewelry, loose clothing, or clothing with your operator's manual carefully until you completely understand and can follow all warnings and safety rules before opening the vacuum inlet door. Secure hair above shoulder length...unit to release the latch while pulling up on the vacuum inlet cover with loosing hanging straps, ties, tassels, etc. Save operator's manual. The blower can cause serious injury. The engine must be dangerous! IDENTIFICATION OF SAFETY SYMBOLS WARNING: This unit can be stopped and...

Owner Manual
Page 3
... that can clog the unit. use . KNOW YOUR UNIT S Read your unit as leaves, grass, small twigs, and bits of debris as this manual. Use your instruction manual carefully until you are under the influence of people or pets. D Always wear foot protection. Hair, jewelry, loose clothing, or clothing with unit in...
... that can clog the unit. use . KNOW YOUR UNIT S Read your unit as leaves, grass, small twigs, and bits of debris as this manual. Use your instruction manual carefully until you are under the influence of people or pets. D Always wear foot protection. Hair, jewelry, loose clothing, or clothing with unit in...
Owner Manual
Page 4
... from fuel and fueling site before opening , damaging unit, property, or causing serious injury to blood vessel damage in the instruction manual performed by the air intake and thrown out through prolonged use any object in a closed room, building or other insulated gloves while...least 10 feet (3 meters) away from this manual. When using your unit as a vacuum, always install vacuum tubes and vacuum bag assembly. MAINTAIN YOUR UNIT PROPERLY WARNING: Disconnect spark plug be present. D Use only recommended WEED EATER replacement parts; SPECIAL NOTICE: Exposure to the unit...
... from fuel and fueling site before opening , damaging unit, property, or causing serious injury to blood vessel damage in the instruction manual performed by the air intake and thrown out through prolonged use any object in a closed room, building or other insulated gloves while...least 10 feet (3 meters) away from this manual. When using your unit as a vacuum, always install vacuum tubes and vacuum bag assembly. MAINTAIN YOUR UNIT PROPERLY WARNING: Disconnect spark plug be present. D Use only recommended WEED EATER replacement parts; SPECIAL NOTICE: Exposure to the unit...
Owner Manual
Page 5
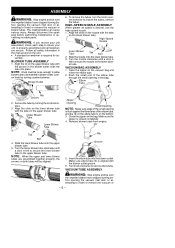
... 2. Slide the nozzle onto the lower blower tube. 3. Turn the lower blower tube clockwise until a click is properly assembled and all safety information in the manual and on the upper blower tube with the blower outlet groove. 6. WARNING: If you receive your unit is felt to secure the nozzle to secure...
... 2. Slide the nozzle onto the lower blower tube. 3. Turn the lower blower tube clockwise until a click is properly assembled and all safety information in the manual and on the upper blower tube with the blower outlet groove. 6. WARNING: If you receive your unit is felt to secure the nozzle to secure...
Owner Manual
Page 7
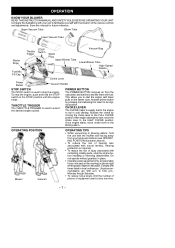
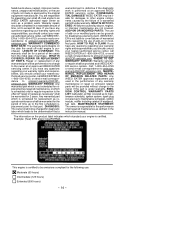
Save this manual for future reference. PRIMER BUTTON The PRIMER BUTTON removes air from your unit to the RUN position. After engine attempts to start the engine with ... POSITION illustration above). Usual recom- Comply with sound level(s), hearing protection is used to the FULL CHOKE position. OPERATION KNOW YOUR BLOWER READ THIS INSTRUCTION MANUAL AND SAFETY RULES BEFORE OPERATING YOUR UNIT. nal position. Once engine starts, move the choke lever to aid in the STOP position until the engine...
Save this manual for future reference. PRIMER BUTTON The PRIMER BUTTON removes air from your unit to the RUN position. After engine attempts to start the engine with ... POSITION illustration above). Usual recom- Comply with sound level(s), hearing protection is used to the FULL CHOKE position. OPERATION KNOW YOUR BLOWER READ THIS INSTRUCTION MANUAL AND SAFETY RULES BEFORE OPERATING YOUR UNIT. nal position. Once engine starts, move the choke lever to aid in the STOP position until the engine...
Owner Manual
Page 9
...the spark plug before releasing the throttle trigger. If any dealer other than an authorized service dealer performs work on the product, WEED EATER may not pay for loose or damaged parts. GENERAL RECOMMENDATIONS The warranty on how badly the unit is your unit. Various adjustments ... Pull starter rope sharply until engine runs, but no more times. This could require pulling the starter handle many times depending on this manual. Move the choke lever to TROUBLESHOOTING TABLE or call 1-800-554-6723. Pull starter rope handle sharply until the engine runs, but no...
...the spark plug before releasing the throttle trigger. If any dealer other than an authorized service dealer performs work on the product, WEED EATER may not pay for loose or damaged parts. GENERAL RECOMMENDATIONS The warranty on how badly the unit is your unit. Various adjustments ... Pull starter rope sharply until engine runs, but no more times. This could require pulling the starter handle many times depending on this manual. Move the choke lever to TROUBLESHOOTING TABLE or call 1-800-554-6723. Pull starter rope handle sharply until the engine runs, but no...

Owner Manual
Page 11
... be necessary if you notice any damaged, broken, or worn parts. Position unit so that you require further assistance or are unsure about performing this manual, see message labeled IMPORTANT regarding the use of time: S Clean the entire unit before storing or transporting. Follow the mix instructions found on stabilizer container...
... be necessary if you notice any damaged, broken, or worn parts. Position unit so that you require further assistance or are unsure about performing this manual, see message labeled IMPORTANT regarding the use of time: S Clean the entire unit before storing or transporting. Follow the mix instructions found on stabilizer container...
Owner Manual
Page 13
...tune--up, spark plugs, filters, starter ropes, or blower and vacuum tubes that you must be repaired or replaced by WEED EATER for this warranty, please contact: WEED EATER, a division of purchase. 2 YEARS - West Mississauga, Ontario L5V 0B4 Giving the model number, serial number and date... maintenance. The policy of your small off--road engine for the performance of 1975. LIGATIONS: The U.S. WEED EATER must warrant the emission control system on your instruction manual. MANUFACTURER'S WARRANTY COV- SOME STATES DO NOT ALLOW LIMITATIONS ON HOW LONG AN IMPLIED WARRANTY LASTS OR ...
...tune--up, spark plugs, filters, starter ropes, or blower and vacuum tubes that you must be repaired or replaced by WEED EATER for this warranty, please contact: WEED EATER, a division of purchase. 2 YEARS - West Mississauga, Ontario L5V 0B4 Giving the model number, serial number and date... maintenance. The policy of your small off--road engine for the performance of 1975. LIGATIONS: The U.S. WEED EATER must warrant the emission control system on your instruction manual. MANUFACTURER'S WARRANTY COV- SOME STATES DO NOT ALLOW LIMITATIONS ON HOW LONG AN IMPLIED WARRANTY LASTS OR ...
Owner Manual
Page 14
... Carburetor, air filter (covered up to maintenance schedule), ignition system: spark plug (covered up to the owner at an approved WEED EATER servicing center. WARRANTY COMMENCEMENT DATE: The warranty period begins on the product label indicates which is certified to emission.warranty @HCOP--...warranty rights and responsibilities, you should contact your engine is responsible for the performance of all WEED EATER service centers. MAINTENANCE, REPLACEMENT AND REPAIR OF EMISSION RELATED PARTS: Any WEED EATER approved replacement part used in the instruction manual. EMIS-
... Carburetor, air filter (covered up to maintenance schedule), ignition system: spark plug (covered up to the owner at an approved WEED EATER servicing center. WARRANTY COMMENCEMENT DATE: The warranty period begins on the product label indicates which is certified to emission.warranty @HCOP--...warranty rights and responsibilities, you should contact your engine is responsible for the performance of all WEED EATER service centers. MAINTENANCE, REPLACEMENT AND REPAIR OF EMISSION RELATED PARTS: Any WEED EATER approved replacement part used in the instruction manual. EMIS-
Parts List
Page 1
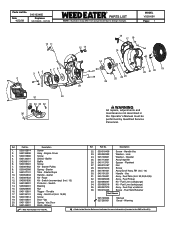
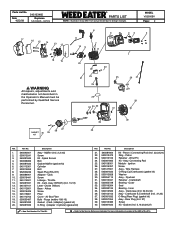
... Tank (Incl. 32,33,34,35) Assy - Fuel Line (tank/purge) Assy - starter Kit - Vac Spring - Handle Vac Washer - MODEL VS2000BV Page: 1 10 11 3 45 6 7 89 2 1 31 30 35 34 33 32 36 12 13 16 17 18 15 14 27 28 ...Baffle Baffle Screw Kit - Blower Ref. Starter Tube - Lock Washer - Fuel Pickup Kit - Fuel Cap w/retainer Screw - Fuel Tank Retainer Not Shown 545146904 527290301 Manual Decal - Part No. 1. 530015814 2. 545135806 3. 530015880 4. 545134001 5. 545099101 6. 530016391 7. 545081852 8. 530042086 9. 545107101 10. 530054834 11. 545081833 12. 545081830...
... Tank (Incl. 32,33,34,35) Assy - Fuel Line (tank/purge) Assy - starter Kit - Vac Spring - Handle Vac Washer - MODEL VS2000BV Page: 1 10 11 3 45 6 7 89 2 1 31 30 35 34 33 32 36 12 13 16 17 18 15 14 27 28 ...Baffle Baffle Screw Kit - Blower Ref. Starter Tube - Lock Washer - Fuel Pickup Kit - Fuel Cap w/retainer Screw - Fuel Tank Retainer Not Shown 545146904 527290301 Manual Decal - Part No. 1. 530015814 2. 545135806 3. 530015880 4. 545134001 5. 545099101 6. 530016391 7. 545081852 8. 530042086 9. 545107101 10. 530054834 11. 545081833 12. 545081830...
Parts List
Page 2
... 35. 530012582 36. 545102102 37. 545081832 38. 530057954 39. 530016386 40. 545081832 Description Kit - MODEL VS2000BV Page: 2 17 16 15 14 13 12 18 19 WARNING All repairs, adjustments and maintenance not described in the Operator's Manual must be performed by Qualified Service Personnel. 8 5 11 7 10 9 6 20 22 23 21 24 23...
... 35. 530012582 36. 545102102 37. 545081832 38. 530057954 39. 530016386 40. 545081832 Description Kit - MODEL VS2000BV Page: 2 17 16 15 14 13 12 18 19 WARNING All repairs, adjustments and maintenance not described in the Operator's Manual must be performed by Qualified Service Personnel. 8 5 11 7 10 9 6 20 22 23 21 24 23...
Parts List
Page 3
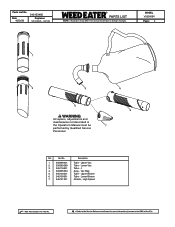
.... 1. 545099401 2. 530095589 3. 545116601 4. 530095564 5. 545100501 6. 545100601 7. 545151201 Description Tube - Upper Vac Tube - Lower Vac Tube - Vac Bag Tube - MODEL VS2000BV Page: 3 1 2 3 4 5 6 WARNING All repairs, adjustments and maintenance not described in the Operator's Manual must be 7 performed by Qualified Service Personnel. Date 4/22/09 545103465 Replaces 545103465 - 3/27/09 R PARTS LIST NOTE : Illustration...
.... 1. 545099401 2. 530095589 3. 545116601 4. 530095564 5. 545100501 6. 545100601 7. 545151201 Description Tube - Upper Vac Tube - Lower Vac Tube - Vac Bag Tube - MODEL VS2000BV Page: 3 1 2 3 4 5 6 WARNING All repairs, adjustments and maintenance not described in the Operator's Manual must be 7 performed by Qualified Service Personnel. Date 4/22/09 545103465 Replaces 545103465 - 3/27/09 R PARTS LIST NOTE : Illustration...