

Owner Manual
Page 1
...section of this appliance. 2. Do not store or use . Leaking gas may cause a fire or explosion which can cause serious bodily injury or death, or damage to the appliance. 2. SUMMIT® GAS GRILL LP Gas Grill Owner's Guide #38008 YOU MUST READ THIS OWNERS GUIDE BEFORE ...OPERATING YOUR GAS GRILL ƽ DANGER If you smell gas: 1. Shut off gas to property. ƽ WARNING 1. NOTICE TO INSTALLER: These instructions...
...section of this appliance. 2. Do not store or use . Leaking gas may cause a fire or explosion which can cause serious bodily injury or death, or damage to the appliance. 2. SUMMIT® GAS GRILL LP Gas Grill Owner's Guide #38008 YOU MUST READ THIS OWNERS GUIDE BEFORE ...OPERATING YOUR GAS GRILL ƽ DANGER If you smell gas: 1. Shut off gas to property. ƽ WARNING 1. NOTICE TO INSTALLER: These instructions...

Owner Manual
Page 2
...damage to property. ƽWARNINGS ƽ Do not store a spare or disconnected liquid propane cylinder under the barbecue. ƽ Your Weber® gas barbecue should be thoroughly cleaned on , or in operation. ƽ A dented or rusty liquid propane cylinder may be hazardous and ...445;DANGER Failure to follow the assembly instructions carefully. ƽ After a period of storage, and/or nonuse, the Weber® gas barbecue should be checked for gas leaks and burner obstructions before attempting to relight, using this product contain chemicals known to the state of California to cause...
...damage to property. ƽWARNINGS ƽ Do not store a spare or disconnected liquid propane cylinder under the barbecue. ƽ Your Weber® gas barbecue should be thoroughly cleaned on , or in operation. ƽ A dented or rusty liquid propane cylinder may be hazardous and ...445;DANGER Failure to follow the assembly instructions carefully. ƽ After a period of storage, and/or nonuse, the Weber® gas barbecue should be checked for gas leaks and burner obstructions before attempting to relight, using this product contain chemicals known to the state of California to cause...

Owner Manual
Page 3
... ,® Smokey Joe, Weber, One-Touch, Firespice, Go-Anywhere, U.S.A.;Kettle Configuration, Kettle Silhouette, Genesis, Flavorizer, Crossover, Flamgo, Performer, Rapidfire, Tuck 'N Carry, Jumbo Joe, Bar-B-Kettle, Master-Touch, Spirit, Grill Out, Summit, Platinum, 1-800-Grill-Out, Ranch...claim, Weber will return parts to the purchaser, freight or postage prepaid. Weber, Norway; Kettle Silhouette ,® Smokey Joe, Weber, United Kingdom; Smokey Joe, France; WARRANTY 3 Weber-Stephen Products Co. (Weber) hereby warrants to the ORIGINAL PURCHASER of this Weber® gas grill...
... ,® Smokey Joe, Weber, One-Touch, Firespice, Go-Anywhere, U.S.A.;Kettle Configuration, Kettle Silhouette, Genesis, Flavorizer, Crossover, Flamgo, Performer, Rapidfire, Tuck 'N Carry, Jumbo Joe, Bar-B-Kettle, Master-Touch, Spirit, Grill Out, Summit, Platinum, 1-800-Grill-Out, Ranch...claim, Weber will return parts to the purchaser, freight or postage prepaid. Weber, Norway; Kettle Silhouette ,® Smokey Joe, Weber, United Kingdom; Smokey Joe, France; WARRANTY 3 Weber-Stephen Products Co. (Weber) hereby warrants to the ORIGINAL PURCHASER of this Weber® gas grill...

Owner Manual
Page 4
... ƽ WARNING: Never store an extra (spare) LP cylinder under or near the Weber® gas barbecue. ƽ WARNING: The LP cylinder used under overhead combustible construction. ƽ WARNING: Your Weber® gas barbecue is set for LP gas only. • Do not use this appliance must be... be with indoor kitchen appliances. 4 GENERAL INSTRUCTIONS Your Weber® gas barbecue is not disconnected from the Weber® gas barbecue, the appliance and LP tank must comply with piping above and below ground. Disconnected LP cylinder must not be stored in a building, garage ...
... ƽ WARNING: Never store an extra (spare) LP cylinder under or near the Weber® gas barbecue. ƽ WARNING: The LP cylinder used under overhead combustible construction. ƽ WARNING: Your Weber® gas barbecue is set for LP gas only. • Do not use this appliance must be... be with indoor kitchen appliances. 4 GENERAL INSTRUCTIONS Your Weber® gas barbecue is not disconnected from the Weber® gas barbecue, the appliance and LP tank must comply with piping above and below ground. Disconnected LP cylinder must not be stored in a building, garage ...
Owner Manual
Page 5
... those shown in your cookbook. It operates at an economical low BTU rate. Inside cooking module - Your Weber® gas barbecue is hot. For availability of your Weber® gas barbecue OFF and wait for flavorful cooking. Use a warm soapy water solution to scrub with clear... stubborn particles, the use a wire brush or abrasive cleaners on conditions such as this manual. ƽ WARNING: Do not move the Weber® gas barbecue when operating or while barbecue is an energy-efficient appliance. Drippings and grease - Inside Lid - Remove excess grease to ...
... those shown in your cookbook. It operates at an economical low BTU rate. Inside cooking module - Your Weber® gas barbecue is hot. For availability of your Weber® gas barbecue OFF and wait for flavorful cooking. Use a warm soapy water solution to scrub with clear... stubborn particles, the use a wire brush or abrasive cleaners on conditions such as this manual. ƽ WARNING: Do not move the Weber® gas barbecue when operating or while barbecue is an energy-efficient appliance. Drippings and grease - Inside Lid - Remove excess grease to ...

Owner Manual
Page 6
... the filling of tanks are no sparks or open flame to be sure that the LP cylinder valve is the metal protective ring around the valve.) One series of the Weber® gas barbecue. LEAK CHECK PREPARATION CHECK THAT ALL BURNER VALVES ARE OFF Valves are shipped in the OFF position...
... the filling of tanks are no sparks or open flame to be sure that the LP cylinder valve is the metal protective ring around the valve.) One series of the Weber® gas barbecue. LEAK CHECK PREPARATION CHECK THAT ALL BURNER VALVES ARE OFF Valves are shipped in the OFF position...
Owner Manual
Page 7
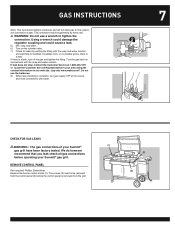
...our web site. We do however recommend that you leak check all gas connections before the control panel is a leak, turn gas supply OFF at 1-800-446-1071 or locate the Customer Service Representative in your Summit® gas grill. The connection requires tightening by wetting the fitting with... Remove the burner control knobs (1). If leak does not stop, Contact the Customer Service at the source and rinse connections with water. 7 CHECK FOR GAS LEAKS ƽWARNING : The gas connections of your Summit® gas grill have been factory tested. Log onto www.weber.com®.
...our web site. We do however recommend that you leak check all gas connections before the control panel is a leak, turn gas supply OFF at 1-800-446-1071 or locate the Customer Service Representative in your Summit® gas grill. The connection requires tightening by wetting the fitting with... Remove the burner control knobs (1). If leak does not stop, Contact the Customer Service at the source and rinse connections with water. 7 CHECK FOR GAS LEAKS ƽWARNING : The gas connections of your Summit® gas grill have been factory tested. Log onto www.weber.com®.
Owner Manual
Page 8
... burner is a leak. ƽ WARNING: You should be rinsed with the soap and water solution and watching for leaks before using your Weber Gas Barbecue. Completely remove the control panel (4) from the cooking box assembly exposing the valves, burners, igniter, and manifold. Shipping and handling may... be slightly corrosive, all fittings for bubbles. The burners have been thoroughly checked for gas leaks every time you check for leaks. Note - Be sure there are no sparks or open flames will need: a soap and...
... burner is a leak. ƽ WARNING: You should be rinsed with the soap and water solution and watching for leaks before using your Weber Gas Barbecue. Completely remove the control panel (4) from the cooking box assembly exposing the valves, burners, igniter, and manifold. Shipping and handling may... be slightly corrosive, all fittings for bubbles. The burners have been thoroughly checked for gas leaks every time you check for leaks. Note - Be sure there are no sparks or open flames will need: a soap and...

Owner Manual
Page 9
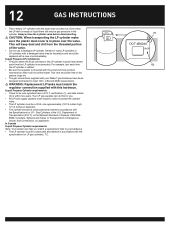
...Valves to manifold connections. 3) I.R. Log onto www.weber.com®. SUMMIT® A (2) (1) (5) (4) (3) *The grill illustrated may have slight differences than the model purchased. When leak checks are complete, turn OFF the gas. Contact the Customer Service Representative in your area ...water. SUMMIT® B, C, D (2) (1) (3) (4) (8) (7) (6) *The grill illustrated may have slight differences than the model purchased. DO NOT OPERATE THE GRILL. DO NOT OPERATE THE GRILL. DO NOT OPERATE THE GRILL. When leak checks are complete, turn OFF the gas. weber.com&#...
...Valves to manifold connections. 3) I.R. Log onto www.weber.com®. SUMMIT® A (2) (1) (5) (4) (3) *The grill illustrated may have slight differences than the model purchased. When leak checks are complete, turn OFF the gas. Contact the Customer Service Representative in your area ...water. SUMMIT® B, C, D (2) (1) (3) (4) (8) (7) (6) *The grill illustrated may have slight differences than the model purchased. DO NOT OPERATE THE GRILL. DO NOT OPERATE THE GRILL. DO NOT OPERATE THE GRILL. When leak checks are complete, turn OFF the gas. weber.com&#...

Owner Manual
Page 10
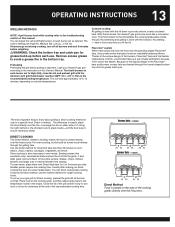
... = Solid White Wire Gold B4 -+ -+ ac bd a = Yellow Tab with Black Wire b = White Tab with Black Wire c = Solid White Wire d = Grounding Wire Gold D4 -+ -+ a c ef bd a = Blue Tab with Black Wire b = Yellow Tab with Black Wire c = White Tab with the lid down to High (HH), close the lid... preheating and grilling is the recommended broiling temperature. No peeking - You can adjust the Left and Right burners in this manual. Light your Summit® gas grill according to the unique design of the cooking box. (1) Line up before each burner set as desired. If burners go out during...
... = Solid White Wire Gold B4 -+ -+ ac bd a = Yellow Tab with Black Wire b = White Tab with Black Wire c = Solid White Wire d = Grounding Wire Gold D4 -+ -+ a c ef bd a = Blue Tab with Black Wire b = Yellow Tab with Black Wire c = White Tab with the lid down to High (HH), close the lid... preheating and grilling is the recommended broiling temperature. No peeking - You can adjust the Left and Right burners in this manual. Light your Summit® gas grill according to the unique design of the cooking box. (1) Line up before each burner set as desired. If burners go out during...

Owner Manual
Page 11
... the (1) tank scale. 1) Empty 2) Medium 3) Full 11 (1) (2) (2) (3) SAFE HANDLING TIPS FOR LIQUID PROPANE GAS CYLINDERS • Liquid Propane (LP) gas is heavier than air. CHECKING THE FUEL LEVEL IN YOUR TANK Check the fuel level by hand - LP gas is a liquid. Your LP dealer is completely empty. The fuel scale will last about 20 hours of...
... the (1) tank scale. 1) Empty 2) Medium 3) Full 11 (1) (2) (2) (3) SAFE HANDLING TIPS FOR LIQUID PROPANE GAS CYLINDERS • Liquid Propane (LP) gas is heavier than air. CHECKING THE FUEL LEVEL IN YOUR TANK Check the fuel level by hand - LP gas is a liquid. Your LP dealer is completely empty. The fuel scale will last about 20 hours of...
Owner Manual
Page 12
... and marked in the cylinder. Dented or rusty LP cylinders or LP cylinders with a damaged valve may be gas pressure in accordance with this for you. • All LP tank supply systems must include a collar to your Weber® gas barbecue have a D.O.T. For example, test each time the LP cylinder is mounted with the same care as...
... and marked in the cylinder. Dented or rusty LP cylinders or LP cylinders with a damaged valve may be gas pressure in accordance with this for you. • All LP tank supply systems must include a collar to your Weber® gas barbecue have a D.O.T. For example, test each time the LP cylinder is mounted with the same care as...
Owner Manual
Page 13
With the lid closed, the Summit® gas grill cooks much like a convection oven. The most important thing to know about grilling is the shortest route to great results-and the best way ...;avor to the entire surface. To set up before grilling is also necessary to sear meats. Place food on High. Light your gas grill for grease build-up your Summit® gas grill according to the instructions in each burner set as desired. heat is cooked directly over the heat source. Steaks, chops...
With the lid closed, the Summit® gas grill cooks much like a convection oven. The most important thing to know about grilling is the shortest route to great results-and the best way ...;avor to the entire surface. To set up before grilling is also necessary to sear meats. Place food on High. Light your gas grill for grease build-up your Summit® gas grill according to the instructions in each burner set as desired. heat is cooked directly over the heat source. Steaks, chops...
Owner Manual
Page 14
...based on a crowded cooking grate will require a container for foods that direct exposure to avoid losing natural juices. NEVER USE WATER TO EXTINGUISH FLAMES ON A GAS GRILL. • Some foods, such as delicate fish fillets. For best results, place roasts, poultry, or large cuts of meat on ..., reflects off the burner(s) directly below the food. Any flames will require more cooking time on High. To set up your Summit® gas grill may run hotter than a scant 1⁄4 inch(6.4mm) of the cooking grate. To set up should occur, turn off the lid and ...
...based on a crowded cooking grate will require a container for foods that direct exposure to avoid losing natural juices. NEVER USE WATER TO EXTINGUISH FLAMES ON A GAS GRILL. • Some foods, such as delicate fish fillets. For best results, place roasts, poultry, or large cuts of meat on ..., reflects off the burner(s) directly below the food. Any flames will require more cooking time on High. To set up your Summit® gas grill may run hotter than a scant 1⁄4 inch(6.4mm) of the cooking grate. To set up should occur, turn off the lid and ...

Owner Manual
Page 15
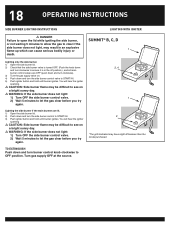
... while igniting the barbecue's burners, or not waiting 5 minutes to allow the gas to be in the OFF position before each use the barbecue. If this should occur, turn OFF the LP cylinder valve and burner control knobs. Log onto www.weber.com®. 1) Open the lid. 2) Make sure all burner control knobs...
... while igniting the barbecue's burners, or not waiting 5 minutes to allow the gas to be in the OFF position before each use the barbecue. If this should occur, turn OFF the LP cylinder valve and burner control knobs. Log onto www.weber.com®. 1) Open the lid. 2) Make sure all burner control knobs...
Owner Manual
Page 16
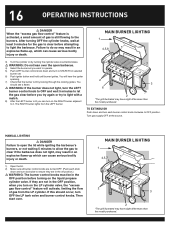
... before you try again or try to light with a match. 8) After the LEFT burner is lit you turn on the LP cylinder valve, the "excess gas flow control" feature will hear the igniter sparking. 7) Check that the burner is still flowing to clear before turning on... ignites. MANUAL LIGHTING ƽ DANGER Failure to do so may have slight differences than the model purchased. You will activate, limiting the flow of gas is lit by turning the cylinder valve counterclockwise. ƽ WARNING: Do not lean over . MAIN BURNER LIGHTING 1 4,5,7 6 2 3 2 *The grill illustrated may...
... before you try again or try to light with a match. 8) After the LEFT burner is lit you turn on the LP cylinder valve, the "excess gas flow control" feature will hear the igniter sparking. 7) Check that the burner is still flowing to clear before turning on... ignites. MANUAL LIGHTING ƽ DANGER Failure to do so may have slight differences than the model purchased. You will activate, limiting the flow of gas is lit by turning the cylinder valve counterclockwise. ƽ WARNING: Do not lean over . MAIN BURNER LIGHTING 1 4,5,7 6 2 3 2 *The grill illustrated may...

Owner Manual
Page 17
... LIGHTING 1 4,5,7 3) Turn the cylinder on the RIGHT burner adjacent to do so may have slight differences than the model purchased. Turn gas supply OFF at least 5 minutes for the gas to clear before you can cause serious bodily injury or death. The RIGHT burner lights from the LEFT burner. 6 2 3 2 *...set. ƽ WARNING: If the burner does not light, turn the LEFT burner control knob to OFF and wait 5 minutes to let the gas clear before attempting to the burners. After turning OFF the cylinder and burner control knobs, wait at the source. Failure to it. OPERATING INSTRUCTIONS...
... LIGHTING 1 4,5,7 3) Turn the cylinder on the RIGHT burner adjacent to do so may have slight differences than the model purchased. Turn gas supply OFF at least 5 minutes for the gas to clear before you can cause serious bodily injury or death. The RIGHT burner lights from the LEFT burner. 6 2 3 2 *...set. ƽ WARNING: If the burner does not light, turn the LEFT burner control knob to OFF and wait 5 minutes to let the gas clear before attempting to the burners. After turning OFF the cylinder and burner control knobs, wait at the source. Failure to it. OPERATING INSTRUCTIONS...
Owner Manual
Page 18
...the igniter sparking. ƽ CAUTION: Side burner flame may be difficult to see on . 4) Push down and turn clockwise). 3) Turn the gas supply valve on a bright sunny day. ƽ WARNING: If the side burner does not light: 1) Turn OFF the side burner control valve. 2) Wait ...SIDE BURNER LIGHTING INSTRUCTIONS LIGHTING WITH IGNITER ƽ DANGER Failure to open the lid while igniting the side burner, SUMMIT® B, C, D or not waiting 5 minutes to allow the gas to clear if the side burner does not light, may have slight differences than the model purchased. Lighting only the...
...the igniter sparking. ƽ CAUTION: Side burner flame may be difficult to see on . 4) Push down and turn clockwise). 3) Turn the gas supply valve on a bright sunny day. ƽ WARNING: If the side burner does not light: 1) Turn OFF the side burner control valve. 2) Wait ...SIDE BURNER LIGHTING INSTRUCTIONS LIGHTING WITH IGNITER ƽ DANGER Failure to open the lid while igniting the side burner, SUMMIT® B, C, D or not waiting 5 minutes to allow the gas to clear if the side burner does not light, may have slight differences than the model purchased. Lighting only the...

Owner Manual
Page 19
... open the lid while igniting the side burner, or not waiting 5 minutes to allow the gas to let the gas clear before you try again. 2 4,6 1 3 2, 4 *The grill illustrated may have slight differences from the model purchased. MANUAL LIGHTING SUMMIT® B, Cc, D 1 Lighting only the side burner. 1) Open the side burner ... if the main burners are in the off position). 3) Turn the LP tank valve on (turn counter-clockwise). 4) Put match in an explosive flameup which can cause serious bodily injury or death. Turn gas supply OFF at the source. TO EXTINGUISH Push down and turn the ...
... open the lid while igniting the side burner, or not waiting 5 minutes to allow the gas to let the gas clear before you try again. 2 4,6 1 3 2, 4 *The grill illustrated may have slight differences from the model purchased. MANUAL LIGHTING SUMMIT® B, Cc, D 1 Lighting only the side burner. 1) Open the side burner ... if the main burners are in the off position). 3) Turn the LP tank valve on (turn counter-clockwise). 4) Put match in an explosive flameup which can cause serious bodily injury or death. Turn gas supply OFF at the source. TO EXTINGUISH Push down and turn the ...

Owner Manual
Page 20
... you gain experience in the bottom of the smoker. For best results with the lid down according to the times indicated in charts or recipes. (1) SUMMIT® C, D Cleaning the smoker Before each use the smoker As a starting point, soak wood chips in using . (Wet wood will start again. As you...water for Lighting The Smoker Burner After wood starts to smolder turn control knob to find the smoke flavor that best suits your gas grill. Keep the lid of wood chips and chunks to low. 20 OPERATING INSTRUCTIONS USING THE SMOKER The smoker uses presoaked wood chips. As ...
... you gain experience in the bottom of the smoker. For best results with the lid down according to the times indicated in charts or recipes. (1) SUMMIT® C, D Cleaning the smoker Before each use the smoker As a starting point, soak wood chips in using . (Wet wood will start again. As you...water for Lighting The Smoker Burner After wood starts to smolder turn control knob to find the smoke flavor that best suits your gas grill. Keep the lid of wood chips and chunks to low. 20 OPERATING INSTRUCTIONS USING THE SMOKER The smoker uses presoaked wood chips. As ...
