
Owner Manual
Page 2
... Do not use a flame to check for gas leaks. ƽ Combustible materials should never be within 24 inches of the top, bottom, back or sides of your Weber gas barbecue. ƽ Do not put a barbecue cover or anything flammable on a regular basis. ƽ Liquid propane gas is in operation. ƽ... off . ƽ DANGER Failure to follow the assembly instructions in this manual. ƽ After a period of storage, and/or nonuse, the Weber Gas Barbecue should be checked for gas leaks and burner obstructions before attempting to relight, using this product contain chemicals known to the state of...
... Do not use a flame to check for gas leaks. ƽ Combustible materials should never be within 24 inches of the top, bottom, back or sides of your Weber gas barbecue. ƽ Do not put a barbecue cover or anything flammable on a regular basis. ƽ Liquid propane gas is in operation. ƽ... off . ƽ DANGER Failure to follow the assembly instructions in this manual. ƽ After a period of storage, and/or nonuse, the Weber Gas Barbecue should be checked for gas leaks and burner obstructions before attempting to relight, using this product contain chemicals known to the state of...

Owner Manual
Page 4
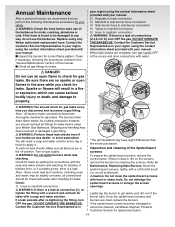
D-11 Troubleshooting D-12 Side Burner Troubleshooting D-13 A-4 D-7 Annual Maintenance D-8 General Maintenance D-9 Replacing Main Burners D-10 Crossover Ignition System Operations ... Contents Danger & Warnings A-2 Warranty A-3 General Instructions A-5 Exploded View A-6 Parts List A-9 Assembly Instructions B-1 Installing Features C-1 Operating D-1 Lighting D-1 Manual Lighting D-2 Lighting the side burner D-3 Cooking D-4 Storage and/or Nouse D-4 Cleaning D-4 Refilling the LP Cylinder D-5 Safe handling tips for LP Gas Cylinders ..
D-11 Troubleshooting D-12 Side Burner Troubleshooting D-13 A-4 D-7 Annual Maintenance D-8 General Maintenance D-9 Replacing Main Burners D-10 Crossover Ignition System Operations ... Contents Danger & Warnings A-2 Warranty A-3 General Instructions A-5 Exploded View A-6 Parts List A-9 Assembly Instructions B-1 Installing Features C-1 Operating D-1 Lighting D-1 Manual Lighting D-2 Lighting the side burner D-3 Cooking D-4 Storage and/or Nouse D-4 Cleaning D-4 Refilling the LP Cylinder D-5 Safe handling tips for LP Gas Cylinders ..
Owner Manual
Page 5
... yard or on recreational vehicles and/or boats. ƽ WARNING: Do not use combustible materials within 24 inches of the top, bottom, back or sides of children. Improper assembly can easily change its location in the food. For Installation in city) gas. Storage • The gas must be turned ... under the control panel and the bottom tray are free from debris that are no local codes, you can take your Weber Gas Barbecue with, if you the minimum requirements for LP gas only. • Do not use this appliance must be kept outdoors in a wellventilated area out of the reach...
... yard or on recreational vehicles and/or boats. ƽ WARNING: Do not use combustible materials within 24 inches of the top, bottom, back or sides of children. Improper assembly can easily change its location in the food. For Installation in city) gas. Storage • The gas must be turned ... under the control panel and the bottom tray are free from debris that are no local codes, you can take your Weber Gas Barbecue with, if you the minimum requirements for LP gas only. • Do not use this appliance must be kept outdoors in a wellventilated area out of the reach...

Owner Manual
Page 7
... 12. Catch pan holder 13. Hubcap 27. Right Frame 46. Fuel Guage 53. Left Endcap 3. Cooking Box 10. 1/4-20 keps nut 11. Front Panel 17. Side Burner 35. Igniter 47. Wing Nuts 51. Wheels 26. Thermometer 29. Crossover tube 36. Center Burner 38. Right Endcap 30. Ignitor Button 33. Manifold Support...
... 12. Catch pan holder 13. Hubcap 27. Right Frame 46. Fuel Guage 53. Left Endcap 3. Cooking Box 10. 1/4-20 keps nut 11. Front Panel 17. Side Burner 35. Igniter 47. Wing Nuts 51. Wheels 26. Thermometer 29. Crossover tube 36. Center Burner 38. Right Endcap 30. Ignitor Button 33. Manifold Support...

Owner Manual
Page 11
... insert a bolt and there is no hole, you have the left frame around.) (1) (2) B005.d B-1 Tap one wheel onto the axle, WEBER name facing out. Next, slide the other wheel, WEBER name side facing out. Work on carpeted area (on grass or one end of the axle rod through the wheel frame. Note - Lay...
... insert a bolt and there is no hole, you have the left frame around.) (1) (2) B005.d B-1 Tap one wheel onto the axle, WEBER name facing out. Next, slide the other wheel, WEBER name side facing out. Work on carpeted area (on grass or one end of the axle rod through the wheel frame. Note - Lay...

Owner Manual
Page 14
... valves. Add nylon washer to bolt end and tighten bolt with the wrench, while holding the cylinder glide with the hole on the bottom left side of the cylinder panel, make sure that the bolt slips through the hole in the wheel frame at bottom of panel fits over the cross...
... valves. Add nylon washer to bolt end and tighten bolt with the wrench, while holding the cylinder glide with the hole on the bottom left side of the cylinder panel, make sure that the bolt slips through the hole in the wheel frame at bottom of panel fits over the cross...

Owner Manual
Page 15
... next step. (1) Put the disposable drip pan into the catch pan. B-5 Check by trapping (3) the grease and not allowing grease to be on the same side as the finger grip(1) of the keyhole in the slide out bottom tray. Proceed to factory test the ignition system. The igniter lock nut is...
... next step. (1) Put the disposable drip pan into the catch pan. B-5 Check by trapping (3) the grease and not allowing grease to be on the same side as the finger grip(1) of the keyhole in the slide out bottom tray. Proceed to factory test the ignition system. The igniter lock nut is...

Owner Manual
Page 18
... piece on the leg, which will secure the table in the down so that the locking pin on the right side of the table fits into the locking bracket on both sides. Tighten with a wrench. 4.) While holding swing-up work surface in position, insert the other end of the swing-up and...
... piece on the leg, which will secure the table in the down so that the locking pin on the right side of the table fits into the locking bracket on both sides. Tighten with a wrench. 4.) While holding swing-up work surface in position, insert the other end of the swing-up and...

Owner Manual
Page 19
...panel and wheel frame. Do not use the work surface as shown. Install side burner You will need : side burner, ƽ WARNING: Make sure gas supply is off. Tilt the side burner slightly, toward the control panel. Start the side burner hose into the opening between the control panel and right trim piece ...the front and back edges fit over the frame, in the frame. Place the work surface, so that the tabs on the side table are to the right, next to the cooking box. Push side burner control knob onto the valve C-3 Install the work surface You will need : work surface. The...
...panel and wheel frame. Do not use the work surface as shown. Install side burner You will need : side burner, ƽ WARNING: Make sure gas supply is off. Tilt the side burner slightly, toward the control panel. Start the side burner hose into the opening between the control panel and right trim piece ...the front and back edges fit over the frame, in the frame. Place the work surface, so that the tabs on the side table are to the right, next to the cooking box. Push side burner control knob onto the valve C-3 Install the work surface You will need : work surface. The...

Owner Manual
Page 20
Installing the Warm-Up™ Basket You will need: five Flavorizer Bars and two cooking grates. Slide the collar closed. Push the side burner control knob down and turn , continue turning it clockwise until it stops, then the burner is OFF. Install Flavorizer® Bars and Cooking Grates ...You will need: Warm-Up Basket Insert one end of the Weber Warm-Up Basket into the hole at the right side of the inside of the lid, and the other end into the slot at the rear of the lid. Set the...
Installing the Warm-Up™ Basket You will need: five Flavorizer Bars and two cooking grates. Slide the collar closed. Push the side burner control knob down and turn , continue turning it clockwise until it stops, then the burner is OFF. Install Flavorizer® Bars and Cooking Grates ...You will need: Warm-Up Basket Insert one end of the Weber Warm-Up Basket into the hole at the right side of the inside of the lid, and the other end into the slot at the rear of the lid. Set the...

Owner Manual
Page 21
Install the bottom shelf You will need : Bottom shelf. Install the thermometer You will need : Thermometer. Set the bottom shelf in place between the two frame connectors underneath the cooking box. ® ® C-5 Insert the thermometer into its holder on the right side of the lid.
Install the bottom shelf You will need : Bottom shelf. Install the thermometer You will need : Thermometer. Set the bottom shelf in place between the two frame connectors underneath the cooking box. ® ® C-5 Insert the thermometer into its holder on the right side of the lid.
Owner Manual
Page 22
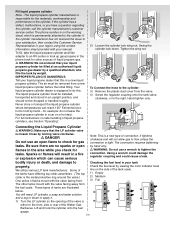
... the warning decal, which can reach 125° Fahrenheit (too hot to the front, side or rear of the cylinder. Be sure there are illustrated below. The connection requires tightening ...collar assembles. (The top collar is closed. for the materials, workmanship and performance of the Weber Gas Barbecue. Swing the cylinder lock down. Tighten the wing nut. Connecting the Liquid Propane... of liquid propane gas. ƽ WARNING: We recommend that your liquid propane dealer that the LP cylinder valve is the metal protective ring around the valve.) One series of liquid propane cylinders,...
... the warning decal, which can reach 125° Fahrenheit (too hot to the front, side or rear of the cylinder. Be sure there are illustrated below. The connection requires tightening ...collar assembles. (The top collar is closed. for the materials, workmanship and performance of the Weber Gas Barbecue. Swing the cylinder lock down. Tighten the wing nut. Connecting the Liquid Propane... of liquid propane gas. ƽ WARNING: We recommend that your liquid propane dealer that the LP cylinder valve is the metal protective ring around the valve.) One series of liquid propane cylinders,...
Owner Manual
Page 23
...flame-tested. The burners have been thoroughly checked for leaks before using your manual. 2) Regulator to cylinder connection. 3) Manifold to side burner hose connection. 4) Side burner hose to side burner connection. 5) Valves to manifold connections. 6) Hose to regulator connection. ƽ WARNING: If there is a leak at...will need: a soap and water solution, and a rag or brush to apply it. Shipping and handling may be rinsed with your Weber Gas Barbecue. If a leak persists after checking for leaks. DO NOT OPERATE THE BARBECUE. Check for gas leaks ƽ DANGER Do ...
...flame-tested. The burners have been thoroughly checked for leaks before using your manual. 2) Regulator to cylinder connection. 3) Manifold to side burner hose connection. 4) Side burner hose to side burner connection. 5) Valves to manifold connections. 6) Hose to regulator connection. ƽ WARNING: If there is a leak at...will need: a soap and water solution, and a rag or brush to apply it. Shipping and handling may be rinsed with your Weber Gas Barbecue. If a leak persists after checking for leaks. DO NOT OPERATE THE BARBECUE. Check for gas leaks ƽ DANGER Do ...

Owner Manual
Page 26
...light: 1) Turn OFF the side burner control valve. 2) Wait 5 minutes to let the gas clear before you try again or try to clear if the side burner does not light, may be difficult to see on (turn counter-clockwise). 4) Push down and turn clockwise). 3) Turn the LP tank valve on a bright ...sunny day. 1 3 ƽ WARNING: If the side burner does not light: 1) Turn OFF the side burner control valve. 2) Wait 5 minutes to let the gas clear before you try again or try to...
...light: 1) Turn OFF the side burner control valve. 2) Wait 5 minutes to let the gas clear before you try again or try to clear if the side burner does not light, may be difficult to see on (turn counter-clockwise). 4) Push down and turn clockwise). 3) Turn the LP tank valve on a bright ...sunny day. 1 3 ƽ WARNING: If the side burner does not light: 1) Turn OFF the side burner control valve. 2) Wait 5 minutes to let the gas clear before you try again or try to...

Owner Manual
Page 29
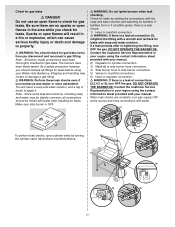
... to the tank. If bubbles form, or if a bubble grows, there is closed. If there is responsible for the materials, workmanship and performance of the Weber Gas Barbecue. Close by turning valve clockwise. ƽ DANGER Do not use a wrench to the cylinder: 3) Remove the plastic dust cover from the fuel ... These types of tanks are no sparks or open flame to the front, side or rear of the tank. Sparks or flames will need: LP cylinder, a soap and water solution and a rag or brush to apply it. 1) Turn the LP cylinder so the opening of the valve is tight. If the tank manufacturer...
... to the tank. If bubbles form, or if a bubble grows, there is closed. If there is responsible for the materials, workmanship and performance of the Weber Gas Barbecue. Close by turning valve clockwise. ƽ DANGER Do not use a wrench to the cylinder: 3) Remove the plastic dust cover from the fuel ... These types of tanks are no sparks or open flame to the front, side or rear of the tank. Sparks or flames will need: LP cylinder, a soap and water solution and a rag or brush to apply it. 1) Turn the LP cylinder so the opening of the valve is tight. If the tank manufacturer...
Owner Manual
Page 31
...flame pattern. Check for leaks by wetting the connections with your manual. 2) Regulator to tank connection. 3) Manifold to side burner hose connection. 4) Side burner hose to side burner connection 5) Valves to manifold connection. 6) Hose to property. ƽ WARNING: You should recheck all Burners are ...spider/insect screens and burners are in the off position. If the spider/insect screen becomes damaged or cannot be cleaned, call Weber-Stephen Products Customer Service for gas leaks. Replace using the contact information sheet provided with a soap and water solution. I ...
...flame pattern. Check for leaks by wetting the connections with your manual. 2) Regulator to tank connection. 3) Manifold to side burner hose connection. 4) Side burner hose to side burner connection 5) Valves to manifold connection. 6) Hose to property. ƽ WARNING: You should recheck all Burners are ...spider/insect screens and burners are in the off position. If the spider/insect screen becomes damaged or cannot be cleaned, call Weber-Stephen Products Customer Service for gas leaks. Replace using the contact information sheet provided with a soap and water solution. I ...

Owner Manual
Page 36
Side Burner Troubleshooting ƽ WARNING: Before attempting any troubleshooting steps, all gas controls and supply valves should be a white/blue color, not yellow. 1) Igniter 2) Igniter Wire 3) ... loose, carefully tighten the igniter lock nut with a match? Clean Spider/Insect Screens. (See section "Annual Maintenance") Burner makes popping noise in the OFF position. Side Burner maintenance ƽ WARNING: All gas controls and supply valves should be in conjunction with the smell of gas, OR Inspect the Spider/Insect Screens...
Side Burner Troubleshooting ƽ WARNING: Before attempting any troubleshooting steps, all gas controls and supply valves should be a white/blue color, not yellow. 1) Igniter 2) Igniter Wire 3) ... loose, carefully tighten the igniter lock nut with a match? Clean Spider/Insect Screens. (See section "Annual Maintenance") Burner makes popping noise in the OFF position. Side Burner maintenance ƽ WARNING: All gas controls and supply valves should be in conjunction with the smell of gas, OR Inspect the Spider/Insect Screens...