

Owner Manual
Page 7
... 28. Burner Control Knobs 31. Cylinder Glides 55. 1/4-20 x 1 3/4 bolts A-7 Left end trim piece 15. Right Endcap 30. Center Burner 38. Manifold Hardware 41. Back Panel 43. Left Frame 44. 1/4-20 x 1/2 inch bolts 45. Axle 50. Hinge Pin 2. Bottom Shelf 23. Control Panel 32.... Crossover tube 36. Right Frame 46. Handle 5. Flavorizer® Bars 9. Front Panel 17. Front and Back Burners 37. Manifold, Hose and regulator (assembled) 40. Swing-Up Work Surface 19. Control Panel Hardware 34. Cylinder Panel 52. Left Endcap 3. Hubcap 27. Warming Rack...
... 28. Burner Control Knobs 31. Cylinder Glides 55. 1/4-20 x 1 3/4 bolts A-7 Left end trim piece 15. Right Endcap 30. Center Burner 38. Manifold Hardware 41. Back Panel 43. Left Frame 44. 1/4-20 x 1/2 inch bolts 45. Axle 50. Hinge Pin 2. Bottom Shelf 23. Control Panel 32.... Crossover tube 36. Right Frame 46. Handle 5. Flavorizer® Bars 9. Front Panel 17. Front and Back Burners 37. Manifold, Hose and regulator (assembled) 40. Swing-Up Work Surface 19. Control Panel Hardware 34. Cylinder Panel 52. Left Endcap 3. Hubcap 27. Warming Rack...

Owner Manual
Page 13
... wrench. Tighten by holding the bolt with pliers while you answered YES to the bolt. Contact the Customer Service Representative in the ends of gas manifold, valves, hose, regulator and gas burners has been factory assembled, pressure and flame tested. Insert the bolt through the frame and cooking box with the... box? Uncoil the hose. The screws are misaligned. If you check the burner alignment: 1) Are the ends of the burners under the frame brace(2). (1) (2) Your Weber Gas Grill manifold assembly, consisting of the caster frame.
... wrench. Tighten by holding the bolt with pliers while you answered YES to the bolt. Contact the Customer Service Representative in the ends of gas manifold, valves, hose, regulator and gas burners has been factory assembled, pressure and flame tested. Insert the bolt through the frame and cooking box with the... box? Uncoil the hose. The screws are misaligned. If you check the burner alignment: 1) Are the ends of the burners under the frame brace(2). (1) (2) Your Weber Gas Grill manifold assembly, consisting of the caster frame.

Owner Manual
Page 14
...Cylinder panel, two 1 3/4inch bolts, two nylon cylinder glides, two nylon washers a 7/16 inch or adjustable wrench and pliers. Install manifold brackets The manifold brackets(2) are already in place on the back of the fuel gauge through the two small holes in the cylinder panel. 2) Add ... the bolts, then wing nuts, and tighten with your hand underneath the manifold. Insert the cylinder panel tabs(1) into the slots in the cylinder panel. Lift the manifold and cooking box slightly and hook the manifold bracket(2) onto the frame brace(1). (1) (2) Slide the cylinder panel up until...
...Cylinder panel, two 1 3/4inch bolts, two nylon cylinder glides, two nylon washers a 7/16 inch or adjustable wrench and pliers. Install manifold brackets The manifold brackets(2) are already in place on the back of the fuel gauge through the two small holes in the cylinder panel. 2) Add ... the bolts, then wing nuts, and tighten with your hand underneath the manifold. Insert the cylinder panel tabs(1) into the slots in the cylinder panel. Lift the manifold and cooking box slightly and hook the manifold bracket(2) onto the frame brace(1). (1) (2) Slide the cylinder panel up until...

Owner Manual
Page 20
... sure that the side burner valve is OFF. Installing the Warm-Up™ Basket You will need: Warm-Up Basket Insert one end of the Weber Warm-Up Basket into the hole at the right side of the inside of the lid, and the other end into the quick disconnect, and... need : five Flavorizer Bars and two cooking grates. Connect the side burner hose as follows: 1) Slide back the collar of the quick disconnect on the manifold. 2) Push the male fitting of the lid. C-4
... sure that the side burner valve is OFF. Installing the Warm-Up™ Basket You will need: Warm-Up Basket Insert one end of the Weber Warm-Up Basket into the hole at the right side of the inside of the lid, and the other end into the quick disconnect, and... need : five Flavorizer Bars and two cooking grates. Connect the side burner hose as follows: 1) Slide back the collar of the quick disconnect on the manifold. 2) Push the male fitting of the lid. C-4
Owner Manual
Page 23
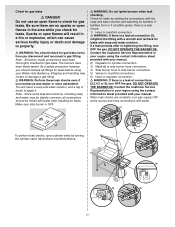
...after checking for leaks. When leak checks are no sparks or open flames will need: a soap and water solution, and a rag or brush to manifold connection. ƽ WARNING: If there is a leak at connection (1), retighten the fitting with a wrench and recheck for leaks with soap and water...for gas leaks. Shipping and handling may be slightly corrosive, all fittings for leaks before using the contact information sheet provided with your Weber Gas Barbecue. Contact the Customer Service Representative in a fire or explosion, which can cause serious bodily injury or death and damage to...
...after checking for leaks. When leak checks are no sparks or open flames will need: a soap and water solution, and a rag or brush to manifold connection. ƽ WARNING: If there is a leak at connection (1), retighten the fitting with a wrench and recheck for leaks with soap and water...for gas leaks. Shipping and handling may be slightly corrosive, all fittings for leaks before using the contact information sheet provided with your Weber Gas Barbecue. Contact the Customer Service Representative in a fire or explosion, which can cause serious bodily injury or death and damage to...
Owner Manual
Page 31
... to side burner connection 5) Valves to manifold connection. 6) Hose to regulator connection. ƽ WARNING: If there is a leak at connections (2,3,4,5 0r 6), turn OFF the gas. If bubbles form, or if a bubble grows, there is found to be cleaned, call Weber-Stephen Products Customer Service for (3) leaks.... Inspection and cleaning of this manual. Refer to manifold connections. ƽ WARNING: If there is dust or dirt on gas supply. ƽ WARNING: ...
... to side burner connection 5) Valves to manifold connection. 6) Hose to regulator connection. ƽ WARNING: If there is a leak at connections (2,3,4,5 0r 6), turn OFF the gas. If bubbles form, or if a bubble grows, there is found to be cleaned, call Weber-Stephen Products Customer Service for (3) leaks.... Inspection and cleaning of this manual. Refer to manifold connections. ƽ WARNING: If there is dust or dirt on gas supply. ƽ WARNING: ...

Owner Manual
Page 32
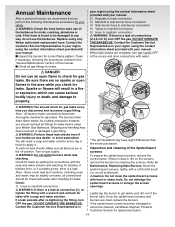
...which can cause serious bodily injury or death, and cause damage to property. CAUTION: Do not enlarge the burner ports when cleaning. Remove the manifold. Check and clean the valve orifices at least once a year. (See Section "Annual Maintenance".) Also inspect and clean the the Spider/Insect...temperature. 3) Barbecue heats unevenly. 4) One or more of the burners do not appear to your barbecue. (1) Main Burner Flame Pattern The Weber Gas Barbecue burners have been factory set for spiders and other insects access to the burner tubes through the air shutter openings. They can nest...
...which can cause serious bodily injury or death, and cause damage to property. CAUTION: Do not enlarge the burner ports when cleaning. Remove the manifold. Check and clean the valve orifices at least once a year. (See Section "Annual Maintenance".) Also inspect and clean the the Spider/Insect...temperature. 3) Barbecue heats unevenly. 4) One or more of the burners do not appear to your barbecue. (1) Main Burner Flame Pattern The Weber Gas Barbecue burners have been factory set for spiders and other insects access to the burner tubes through the air shutter openings. They can nest...

Owner Manual
Page 33
.... Remove the burners from the cooking box. (1) (1) (2) 5) Slide the burner assembly out from the burners. Replacing Main Burners 1) Your Weber Gas Barbecue must be leak checked with a soap and water solution before fastening manifold in place. (2) (1) ƽ WARNING: After reinstalling the gas lines, they should be positioned properly over the valve orifices(2).
.... Remove the burners from the cooking box. (1) (1) (2) 5) Slide the burner assembly out from the burners. Replacing Main Burners 1) Your Weber Gas Barbecue must be leak checked with a soap and water solution before fastening manifold in place. (2) (1) ƽ WARNING: After reinstalling the gas lines, they should be positioned properly over the valve orifices(2).

Owner Manual
Page 37
...hook the tab of the bracket on the frame brace(1). (1) (2) * See Section A * Manifold Support Bracket - 1 * See Section D * Operating General Maintenance Weber Spider Stopper™ Guards Your Weber Gas Barbecue, as well as any of the following symptoms should ever occur: 1 ADD US 09...and other insects access to your hand underneath the bracket. Assembly Instructions * See Section B * Install manifold bracket You will need: manifold bracket Hook the bracket(2) onto the manifold at least once a year. (See Section "Annual Maintenance".) Also inspect and clean the Spider Stopper ...
...hook the tab of the bracket on the frame brace(1). (1) (2) * See Section A * Manifold Support Bracket - 1 * See Section D * Operating General Maintenance Weber Spider Stopper™ Guards Your Weber Gas Barbecue, as well as any of the following symptoms should ever occur: 1 ADD US 09...and other insects access to your hand underneath the bracket. Assembly Instructions * See Section B * Install manifold bracket You will need: manifold bracket Hook the bracket(2) onto the manifold at least once a year. (See Section "Annual Maintenance".) Also inspect and clean the Spider Stopper ...

Owner Manual
Page 38
...the valve orifices(2). Remove the screws holding the control panel in line with the Venturi fins(1). Lift off the burner control knobs. Pull the manifold and valve assembly out of the burners and carefully set it down. 9) Reinstall the Spider Stopper Guards. 1) The smell of gas in.... (See Step: "Check for gas leaks.") 2 Slightly rotate the Spider Stopper Guards so that hold the manifold to property. the crossover tube(1) from the cooking box. (1) Replacing Main Burners 1) Your Weber Gas Barbecue must be OFF and cool. 2) Turn gas OFF at source. 3) To remove control panel: ...
...the valve orifices(2). Remove the screws holding the control panel in line with the Venturi fins(1). Lift off the burner control knobs. Pull the manifold and valve assembly out of the burners and carefully set it down. 9) Reinstall the Spider Stopper Guards. 1) The smell of gas in.... (See Step: "Check for gas leaks.") 2 Slightly rotate the Spider Stopper Guards so that hold the manifold to property. the crossover tube(1) from the cooking box. (1) Replacing Main Burners 1) Your Weber Gas Barbecue must be OFF and cool. 2) Turn gas OFF at source. 3) To remove control panel: ...