

Owner Manual
Page 7
...Burner 37. Control Panel Trim Piece 44. Liquid Propane Cylinder 51. Handle 5. Work Surface 16. Nylon washers 22. Burner Control Knobs 31. Manifold, Hose and regulator (assembled) 39. Flavorizer Bars 9. Hinge Rod 18. Hair Pin Cotter 28. Crossover Tube 35. Catch Pan 40. Igniter...bolt A-7 Cooking Grates 8. Warming Rack 7. Ignitor Button 34. Right Frame 43. Cylinder Panel 49. Hinge Pin 2. Slide Out Bottom Tray 12. Manifold Hardware 38. Wheels 26. Thermometer 30. 1. Front and Back Burners 36. Disposable Drip Pan 41. Catch pan holder 13. 1/4-20 x 1/2 inch bolt 14...
...Burner 37. Control Panel Trim Piece 44. Liquid Propane Cylinder 51. Handle 5. Work Surface 16. Nylon washers 22. Burner Control Knobs 31. Manifold, Hose and regulator (assembled) 39. Flavorizer Bars 9. Hinge Rod 18. Hair Pin Cotter 28. Crossover Tube 35. Catch Pan 40. Igniter...bolt A-7 Cooking Grates 8. Warming Rack 7. Ignitor Button 34. Right Frame 43. Cylinder Panel 49. Hinge Pin 2. Slide Out Bottom Tray 12. Manifold Hardware 38. Wheels 26. Thermometer 30. 1. Front and Back Burners 36. Disposable Drip Pan 41. Catch pan holder 13. 1/4-20 x 1/2 inch bolt 14...
Owner Manual
Page 11
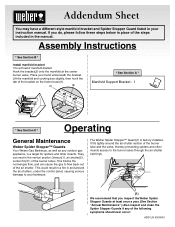
...hook the tab of the bracket on the frame brace(1). (1) (2) * See Section A * Manifold Support Bracket - 1 * See Section D * Operating General Maintenance Weber Spider Stopper™ Guards Your Weber Gas Barbecue, as well as any of the following symptoms should ever occur: 1 ADD US 09...causing serious damage to your barbecue. Place your instruction manual. If you inspect the Weber Spider Stopper Guards at the center burner valve. Addendum Sheet You may have a different style manifold bracket and Spider Stopper Guard listed in the manual. Assembly Instructions * See Section ...
...hook the tab of the bracket on the frame brace(1). (1) (2) * See Section A * Manifold Support Bracket - 1 * See Section D * Operating General Maintenance Weber Spider Stopper™ Guards Your Weber Gas Barbecue, as well as any of the following symptoms should ever occur: 1 ADD US 09...causing serious damage to your barbecue. Place your instruction manual. If you inspect the Weber Spider Stopper Guards at the center burner valve. Addendum Sheet You may have a different style manifold bracket and Spider Stopper Guard listed in the manual. Assembly Instructions * See Section ...
Owner Manual
Page 12
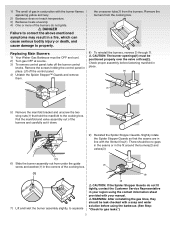
... for gas leaks.") 2 Slightly rotate the Spider Stopper Guards so that the seams are in line with a soap and water solution before fastening manifold in a fire, which can cause serious bodily injury or death, and cause damage to the cooking box. Remove the screws holding the control.... Remove the burners from the burners. Pull the manifold and valve assembly out of the burners do not fit tightly, contact the Customer Service Representative in place. the crossover tube(1) from the cooking box. (1) Replacing Main Burners 1) Your Weber Gas Barbecue must be OFF and cool. 2) Turn...
... for gas leaks.") 2 Slightly rotate the Spider Stopper Guards so that the seams are in line with a soap and water solution before fastening manifold in a fire, which can cause serious bodily injury or death, and cause damage to the cooking box. Remove the screws holding the control.... Remove the burners from the burners. Pull the manifold and valve assembly out of the burners do not fit tightly, contact the Customer Service Representative in place. the crossover tube(1) from the cooking box. (1) Replacing Main Burners 1) Your Weber Gas Barbecue must be OFF and cool. 2) Turn...
Owner Manual
Page 16
... the hose. Do not tighten. 2) Do the valves fit into the ends of the burners? 3) Are the wing nuts under the frame brace(2). (1) (2) Your Weber Gas Grill manifold assembly, consisting of the burners under the washers at the left rear and left within the frame assembly. Insert the bolt through the frame...
... the hose. Do not tighten. 2) Do the valves fit into the ends of the burners? 3) Are the wing nuts under the frame brace(2). (1) (2) Your Weber Gas Grill manifold assembly, consisting of the burners under the washers at the left rear and left within the frame assembly. Insert the bolt through the frame...

Owner Manual
Page 17
...B-5 Add nylon washer to bolt end and tighten bolt with the wrench, while holding the cylinder glide with the hole on the manifold between the valves. Add nylon cylinder glide to bolt and insert through the hole in the cylinder panel. Repeat procedure with the pliers.... Place your hand underneath the manifold. Lift the manifold and cooking box slightly and hook the manifold bracket(2) onto the frame brace(1). (1) (2) Install cylinder panel You will need: Cylinder panel, two 1 3/4inch...
...B-5 Add nylon washer to bolt end and tighten bolt with the wrench, while holding the cylinder glide with the hole on the manifold between the valves. Add nylon cylinder glide to bolt and insert through the hole in the cylinder panel. Repeat procedure with the pliers.... Place your hand underneath the manifold. Lift the manifold and cooking box slightly and hook the manifold bracket(2) onto the frame brace(1). (1) (2) Install cylinder panel You will need: Cylinder panel, two 1 3/4inch...

Owner Manual
Page 21
...holder must be on the same side as the finger grip(1) of the catch pan holder into the catch pan. Check: 1) Hose to manifold connection. ƽ WARNING: If there is a leak at the source and rinse connections with soap and water solution. DO NOT OPERATE THE... disposable drip pan into the hole in your region using the contact information sheet provided with your manual. 2) Regulator to Cylinder connection 3) Valves to manifold connections 4) Hose to regulator connection ƽ WARNING: If there is a leak a connection(1), retighten the fitting with a wrench and recheck for leaks...
...holder must be on the same side as the finger grip(1) of the catch pan holder into the catch pan. Check: 1) Hose to manifold connection. ƽ WARNING: If there is a leak at the source and rinse connections with soap and water solution. DO NOT OPERATE THE... disposable drip pan into the hole in your region using the contact information sheet provided with your manual. 2) Regulator to Cylinder connection 3) Valves to manifold connections 4) Hose to regulator connection ƽ WARNING: If there is a leak a connection(1), retighten the fitting with a wrench and recheck for leaks...

Owner Manual
Page 32
... Burners are no sparks or open flame to -manifold connections. To perform leak checks: Make sure all connections should check for gas leaks every time you check for leaks. Inspection and cleaning of this manual. Replace using the contact information sheet provided with your Weber Gas Barbecue. Annual Maintenance Check: 3) Valves-to...
... Burners are no sparks or open flame to -manifold connections. To perform leak checks: Make sure all connections should check for gas leaks every time you check for leaks. Inspection and cleaning of this manual. Replace using the contact information sheet provided with your Weber Gas Barbecue. Annual Maintenance Check: 3) Valves-to...

Owner Manual
Page 33
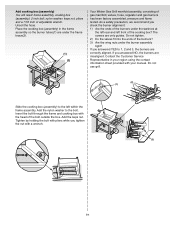
...cause damage to property. Clean the inside each burner with a stainless steel screen(1) to your barbecue. (1) Main Burner Flame Pattern The Weber Gas Barbecue burners have been factory set for spiders and other insects access to the burner tubes through the air shutter openings. (1) Main... Burner Cleaning Procedure Turn off the gas supply. CAUTION: Do not enlarge the burner ports when cleaning. Remove the manifold. We recommend that you inspect the Spider/Insect screens at least once a year. (See Section "Annual Maintenance".) Also inspect and clean ...
...cause damage to property. Clean the inside each burner with a stainless steel screen(1) to your barbecue. (1) Main Burner Flame Pattern The Weber Gas Barbecue burners have been factory set for spiders and other insects access to the burner tubes through the air shutter openings. (1) Main... Burner Cleaning Procedure Turn off the gas supply. CAUTION: Do not enlarge the burner ports when cleaning. Remove the manifold. We recommend that you inspect the Spider/Insect screens at least once a year. (See Section "Annual Maintenance".) Also inspect and clean ...

Owner Manual
Page 34
... off the control panel. 4) Unhook the manifold bracket(1) and unscrew the two wing nuts(2) that hold the manifold to separate the crossover tube(1) from the burners. Lift off the burner control knobs. D-9 Replacing Main Burners 1) Your Weber Gas Barbecue must be positioned properly over the... valve orifices(2). Remove the burners from under the guide screw and washer(1) in place. Pull the manifold and valve assembly out of the cooking box. (1) ƽ...
... off the control panel. 4) Unhook the manifold bracket(1) and unscrew the two wing nuts(2) that hold the manifold to separate the crossover tube(1) from the burners. Lift off the burner control knobs. D-9 Replacing Main Burners 1) Your Weber Gas Barbecue must be positioned properly over the... valve orifices(2). Remove the burners from under the guide screw and washer(1) in place. Pull the manifold and valve assembly out of the cooking box. (1) ƽ...