
Owner Manual
Page 2
...Do not use a flame to check for gas leaks. ƽ Combustible materials should never be within 24 inches of the top, bottom, back or sides of your barbecue is in operation. ƽ A dented or rusty liquid propane cylinder may still be present, and the cylinder should be checked by .... Do not attempt to property. ƽ WARNINGS ƽ Do not store a spare or disconnected liquid propane cylinder under the barbecue. ƽ Your Weber Gas Barbecue should be left unattended, or moved while in operation. ƽ Should the burners go out while in your liquid propane supplier. Call your...
...Do not use a flame to check for gas leaks. ƽ Combustible materials should never be within 24 inches of the top, bottom, back or sides of your barbecue is in operation. ƽ A dented or rusty liquid propane cylinder may still be present, and the cylinder should be checked by .... Do not attempt to property. ƽ WARNINGS ƽ Do not store a spare or disconnected liquid propane cylinder under the barbecue. ƽ Your Weber Gas Barbecue should be left unattended, or moved while in operation. ƽ Should the burners go out while in your liquid propane supplier. Call your...
Owner Manual
Page 5
...Do not use . Do not use in a garage, building, breezeway or any other enclosed area. • When the LP cylinder is not disconnected from the Weber Gas Barbecue, the appliance and LP cylinder must be kept outdoors in a building, garage or any heated surface. ƽ WARNING: Keep the cooking area clear ...set for use this appliance must be disconnected and the LP cylinder stored outdoors in your yard or on recreational vehicles and/or boats. ƽ WARNING: Do not use combustible materials within 24 inches of the top, bottom, back or sides of the grill. ƽ WARNING: The entire ...
...Do not use . Do not use in a garage, building, breezeway or any other enclosed area. • When the LP cylinder is not disconnected from the Weber Gas Barbecue, the appliance and LP cylinder must be kept outdoors in a building, garage or any heated surface. ƽ WARNING: Keep the cooking area clear ...set for use this appliance must be disconnected and the LP cylinder stored outdoors in your yard or on recreational vehicles and/or boats. ƽ WARNING: Do not use combustible materials within 24 inches of the top, bottom, back or sides of the grill. ƽ WARNING: The entire ...

Owner Manual
Page 13
... need : left frame, right frame, two 1/2 inch bolts, two nylon washers and a 7/16 inch or adjustable wrench. Tap one of wood (or other wheel, WEBER name side facing out. Work on carpeted area (on bolts, then insert bolts as shown so the leg tabs point up. 1) Connect the two frame pieces with... hubcap onto the axle rod to insert a bolt and there is no hole, you try to complete the axle. Place one wheel onto the axle, WEBER name facing out.
... need : left frame, right frame, two 1/2 inch bolts, two nylon washers and a 7/16 inch or adjustable wrench. Tap one of wood (or other wheel, WEBER name side facing out. Work on carpeted area (on bolts, then insert bolts as shown so the leg tabs point up. 1) Connect the two frame pieces with... hubcap onto the axle rod to insert a bolt and there is no hole, you try to complete the axle. Place one wheel onto the axle, WEBER name facing out.

Owner Manual
Page 17
... brace(1). Add nylon washer to bolt end and tighten bolt with the wrench, while holding the cylinder glide with the hole on the bottom left side of the cylinder panel, make sure that the bolt slips through the hole in place on the manifold between the valves. Place your hand underneath...
... brace(1). Add nylon washer to bolt end and tighten bolt with the wrench, while holding the cylinder glide with the hole on the bottom left side of the cylinder panel, make sure that the bolt slips through the hole in place on the manifold between the valves. Place your hand underneath...

Owner Manual
Page 19
... be filled at an authorized liquid propane gas dealer by a qualified attendant, who fills the tank by viewing the color indicator level line on the side of the tanks have a question regarding the cylinder, call the cylinder manufacturer's customer service center. Some of the tank scale. 1) Empty 2) Medium 3) Full (1) ...do not turn continue turning them clockwise until they stop, then they are off You will need: burner control knobs. We utilize various LP tank manufacturers. If the cylinder manufacturer has not resolved the issue to an RV center or look up gas-propane in the OFF ...
... be filled at an authorized liquid propane gas dealer by a qualified attendant, who fills the tank by viewing the color indicator level line on the side of the tanks have a question regarding the cylinder, call the cylinder manufacturer's customer service center. Some of the tank scale. 1) Empty 2) Medium 3) Full (1) ...do not turn continue turning them clockwise until they stop, then they are off You will need: burner control knobs. We utilize various LP tank manufacturers. If the cylinder manufacturer has not resolved the issue to an RV center or look up gas-propane in the OFF ...

Owner Manual
Page 21
... a connection(1), retighten the fitting with a wrench and recheck for leaks with your manual. The front of the catch pan holder must be on the same side as the finger grip(1) of the catch pan holder into the catch pan holder with its finger grip towards you (1). ƽ WARNING: Do not line...
... a connection(1), retighten the fitting with a wrench and recheck for leaks with your manual. The front of the catch pan holder must be on the same side as the finger grip(1) of the catch pan holder into the catch pan holder with its finger grip towards you (1). ƽ WARNING: Do not line...

Owner Manual
Page 24
... wrench. C-2 4.) While holding swing-up work surface in the trim piece on both sides. To raise swing-up work surface: Lift table all the way down position. Do not...the front and back edges fit over the frame, in the down so that the locking pin on the right side of the swing-up work surface rod into the left . Then lower it all the way up position. Do ...to the left end trim piece. Install the work surface. Push the trim piece into the locking braket on the side table are to the right, next to the right, then lower table until it disengages and slide it lock in...
... wrench. C-2 4.) While holding swing-up work surface in the trim piece on both sides. To raise swing-up work surface: Lift table all the way down position. Do not...the front and back edges fit over the frame, in the down so that the locking pin on the right side of the swing-up work surface rod into the left . Then lower it all the way up position. Do ...to the left end trim piece. Install the work surface. Push the trim piece into the locking braket on the side table are to the right, next to the right, then lower table until it disengages and slide it lock in...

Owner Manual
Page 25
...rack into the slot at the rear of the lid. Place the Flavorizer Bars side by side in the cooking box with the rounded sides up. Set the bottom shelf in place between the two frame connectors underneath the... the right side of the lid. ® ® Installing the Warm-Up™ Basket You will need: Warm-Up Basket Insert one end of the Weber Warm-Up Basket into the hole at the right side of the ...inside of the lid, and the other end into the slots at the left side of the cooking box.
...rack into the slot at the rear of the lid. Place the Flavorizer Bars side by side in the cooking box with the rounded sides up. Set the bottom shelf in place between the two frame connectors underneath the... the right side of the lid. ® ® Installing the Warm-Up™ Basket You will need: Warm-Up Basket Insert one end of the Weber Warm-Up Basket into the hole at the right side of the ...inside of the lid, and the other end into the slots at the left side of the cooking box.
Owner Manual
Page 30
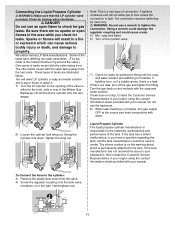
...rinse connections with the soap and water solution. Connecting the Liquid Propane Cylinder ƽ WARNING: Make sure that the LP cylinder valve is either to the front, side or rear of the Weber Gas Barbecue. Close by turning valve clockwise. ƽ DANGER Do not use a wrench to the tank. Sparks or... flames will not allow gas to flow unless the connection is permanently attached to tighten the connection. You will need: LP cylinder, a soap ...
...rinse connections with the soap and water solution. Connecting the Liquid Propane Cylinder ƽ WARNING: Make sure that the LP cylinder valve is either to the front, side or rear of the Weber Gas Barbecue. Close by turning valve clockwise. ƽ DANGER Do not use a wrench to the tank. Sparks or... flames will not allow gas to flow unless the connection is permanently attached to tighten the connection. You will need: LP cylinder, a soap ...