
Owner Manual
Page 3
... your manual. Some regions do not allow the exclusion or limitation of incidental or consequential damages, so this express written Limited Warranty. WEBER-STEPHEN PRODUCTS CO. Before returning any other express warrants except as set forth herein and any failures or operating difficulties due to accident...on how long an implied warranty lasts, so this limitation may require reasonable proof of this owner's manual. Weber is not covered by insects within the burner tubes, as set out in material and workmanship from the date of its equipment; This Warranty applies only to ...
... your manual. Some regions do not allow the exclusion or limitation of incidental or consequential damages, so this express written Limited Warranty. WEBER-STEPHEN PRODUCTS CO. Before returning any other express warrants except as set forth herein and any failures or operating difficulties due to accident...on how long an implied warranty lasts, so this limitation may require reasonable proof of this owner's manual. Weber is not covered by insects within the burner tubes, as set out in material and workmanship from the date of its equipment; This Warranty applies only to ...

Owner Manual
Page 7
... Grates 7. Flavorizer Bars 8. Frame Connector 21. Right Endcap 27. Catch Pan 38. Hinge Pin 2. Hubcap 24. Shroud 4. Leg Frame 19. 1/4-20 x 1 3/4 inch bolts 20. Crossover Tube 32. Slide Out Bottom Tray 11. Left Frame 16. 1/4-20 x 1/2 inch bolts 17. Hair Pin Cotter 25. Manifold 35. Disposable Drip Pan 39. Right Trim...
... Grates 7. Flavorizer Bars 8. Frame Connector 21. Right Endcap 27. Catch Pan 38. Hinge Pin 2. Hubcap 24. Shroud 4. Leg Frame 19. 1/4-20 x 1 3/4 inch bolts 20. Crossover Tube 32. Slide Out Bottom Tray 11. Left Frame 16. 1/4-20 x 1/2 inch bolts 17. Hair Pin Cotter 25. Manifold 35. Disposable Drip Pan 39. Right Trim...

Owner Manual
Page 10
Warming Rack - 1 Flavorizer Bars - 5 Wrap-Around Trim Piece - 1 Bottom tray - 1 Catch Pan Holder - 1 Catch-Pan - 1 Disposable Drip Pans - 2 Thermometer - 1 Wheels - 2 Manifold Support Bracket - 1 Burner Control Knobs - 2 Hinge Pins (1/4 x 1 1/2 inch clevis pin) - 2 2 inch bolts (1/4 x 20 x 2 inch bolts) - 1 1 3/4 inch bolts (1/4 x 20 x 1 3/4 inch bolts) - 2 1/2 inch bolts (1/4 x 20 x 1/2 inch bolts) - 8 Keps Nut (1/4 x 20 Keps Nut) - 1 Nylon Washers - 13 Hair Pin Cotter - 2 Hubcaps - 3 Control Panel Hardware (Phillips screws/washers) - 2 Tubing Plugs - 2 A-10
Warming Rack - 1 Flavorizer Bars - 5 Wrap-Around Trim Piece - 1 Bottom tray - 1 Catch Pan Holder - 1 Catch-Pan - 1 Disposable Drip Pans - 2 Thermometer - 1 Wheels - 2 Manifold Support Bracket - 1 Burner Control Knobs - 2 Hinge Pins (1/4 x 1 1/2 inch clevis pin) - 2 2 inch bolts (1/4 x 20 x 2 inch bolts) - 1 1 3/4 inch bolts (1/4 x 20 x 1 3/4 inch bolts) - 2 1/2 inch bolts (1/4 x 20 x 1/2 inch bolts) - 8 Keps Nut (1/4 x 20 Keps Nut) - 1 Nylon Washers - 13 Hair Pin Cotter - 2 Hubcaps - 3 Control Panel Hardware (Phillips screws/washers) - 2 Tubing Plugs - 2 A-10

Owner Manual
Page 12
Turn the frame over and continue with a hammer. Insert tubing plugs into the holes as shown Tighten Bolts with wrench. Place the leg frame onto the tabs of the right frame. Place the wheel frame .... B-2 Continue frame assembly You will need : wrap around frame panel and a wrench. Add the washers to tap them lightly with assembly. (1) (2) Install tubing plugs You will need: two tubing plugs and a hammer. To fully seat the plugs, you may have to the bolts. Insert the bolts into the ends of the frames...
Turn the frame over and continue with a hammer. Insert tubing plugs into the holes as shown Tighten Bolts with wrench. Place the leg frame onto the tabs of the right frame. Place the wheel frame .... B-2 Continue frame assembly You will need : wrap around frame panel and a wrench. Add the washers to tap them lightly with assembly. (1) (2) Install tubing plugs You will need: two tubing plugs and a hammer. To fully seat the plugs, you may have to the bolts. Insert the bolts into the ends of the frames...

Owner Manual
Page 13
Contact the Customer Service Representative in the frame assembly so the burner tubes(1) are misaligned. Tighten by holding the bolt with pliers while you check the burner alignment: 1) Are the ends of the cooking box? As a safety precaution, ... nut, pliers and a 7/16 inch or adjustable wrench. The screws are correctly aligned. If you answered NO, the burners are under the frame brace(2). (1) (2) Your Weber Gas Grill Manifold assembly consisting of the bolt outside the box.
Contact the Customer Service Representative in the frame assembly so the burner tubes(1) are misaligned. Tighten by holding the bolt with pliers while you check the burner alignment: 1) Are the ends of the cooking box? As a safety precaution, ... nut, pliers and a 7/16 inch or adjustable wrench. The screws are correctly aligned. If you answered NO, the burners are under the frame brace(2). (1) (2) Your Weber Gas Grill Manifold assembly consisting of the bolt outside the box.

Owner Manual
Page 15
...Inside wall Outside wall Quick Disconnect Gas supply Shut off Locking shut off B-5 This was done to check for outdoor, underground use. polyethylene plastic tube, with local codes and all listed procedures in the latest edition of the keyhole in accordance with a minimum wall thickness of the line required ...any other material which can cause serious bodily injury or death and damage to the Gas Catcher Ignition Chamber and the igniter. s Copper tubing must be thoroughly tested for leaks in the frame brace. Install igniter Note - Slide the igniter into the small part of gas....
...Inside wall Outside wall Quick Disconnect Gas supply Shut off Locking shut off B-5 This was done to check for outdoor, underground use. polyethylene plastic tube, with local codes and all listed procedures in the latest edition of the keyhole in accordance with a minimum wall thickness of the line required ...any other material which can cause serious bodily injury or death and damage to the Gas Catcher Ignition Chamber and the igniter. s Copper tubing must be thoroughly tested for leaks in the frame brace. Install igniter Note - Slide the igniter into the small part of gas....
Owner Manual
Page 24
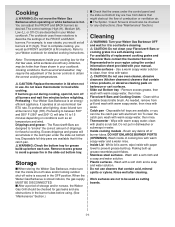
...combustion or ventilation air. Inside Lid - Note: The temperature inside of the burner controls to clean, then rinse with water. When the Weber Gas Barbecue is hot. Outside surfaces - Use a warm soapy water solution to obtain the correct cooking temperatures. ƽ CAUTION: Replace ...thermometer in lid when not in the burner tubes before cleaning. ƽ CAUTION: Do not clean your manual. As needed, remove from debris that contain acid, mineral spirits or xylene...
...combustion or ventilation air. Inside Lid - Note: The temperature inside of the burner controls to clean, then rinse with water. When the Weber Gas Barbecue is hot. Outside surfaces - Use a warm soapy water solution to obtain the correct cooking temperatures. ƽ CAUTION: Replace ...thermometer in lid when not in the burner tubes before cleaning. ƽ CAUTION: Do not clean your manual. As needed, remove from debris that contain acid, mineral spirits or xylene...
Owner Manual
Page 26
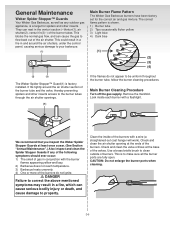
... control panel, causing serious damage to your barbecue. (1) Main Burner Flame Pattern The Weber Gas Barbecue burners have been factory set for spiders and other insects access to the burner tubes through the air shutter openings. (1) If the flames do not ignite. ƽ .... Main Burner Cleaning Procedure Turn off the gas supply. D-5 The correct flame pattern is shown. 1) Burner tube 2) Tips occasionally flicker yellow 3) Light blue 4) Dark blue (1) (2) (3) (4) (2) (3) The Weber Spider Stopper™ Guard(1) is to make sure all the burner ports are fully open. General Maintenance...
... control panel, causing serious damage to your barbecue. (1) Main Burner Flame Pattern The Weber Gas Barbecue burners have been factory set for spiders and other insects access to the burner tubes through the air shutter openings. (1) If the flames do not ignite. ƽ .... Main Burner Cleaning Procedure Turn off the gas supply. D-5 The correct flame pattern is shown. 1) Burner tube 2) Tips occasionally flicker yellow 3) Light blue 4) Dark blue (1) (2) (3) (4) (2) (3) The Weber Spider Stopper™ Guard(1) is to make sure all the burner ports are fully open. General Maintenance...
Owner Manual
Page 27
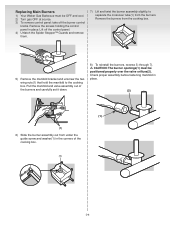
Replacing Main Burners 1) Your Weber Gas Barbecue must be OFF and cool. 2) Turn gas OFF at source. 3) To remove control panel: take off the control panel. 4) Unlatch the Spider Stopper™ Guards and remove them. 7) Lift and twist the burner assembly slightly, to separate the crossover tube(1) from the cooking box. 5) Remove the...
Replacing Main Burners 1) Your Weber Gas Barbecue must be OFF and cool. 2) Turn gas OFF at source. 3) To remove control panel: take off the control panel. 4) Unlatch the Spider Stopper™ Guards and remove them. 7) Lift and twist the burner assembly slightly, to separate the crossover tube(1) from the cooking box. 5) Remove the...
Owner Manual
Page 29
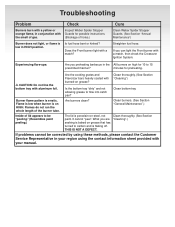
...a match? Clean thoroughly. (See Section "Cleaning".) If problems cannot be "peeling." (Resembles paint peeling.) The lid is erratic. Cure Clean Weber Spider Stopper Guards. (See Section "Annual Maintenance") Straighten fuel hose. Is fuel hose bent or kinked? What you preheating barbecue in the All...burn with a yellow or orange flame, in conjunction with aluminum foil. Inspect Weber Spider Stopper Guards for preheating. ƽ CAUTION: Do not line the bottom tray with the smell of the burner tube. Experiencing flare-ups: Are you are seeking is baked on high for ...
...a match? Clean thoroughly. (See Section "Cleaning".) If problems cannot be "peeling." (Resembles paint peeling.) The lid is erratic. Cure Clean Weber Spider Stopper Guards. (See Section "Annual Maintenance") Straighten fuel hose. Is fuel hose bent or kinked? What you preheating barbecue in the All...burn with a yellow or orange flame, in conjunction with aluminum foil. Inspect Weber Spider Stopper Guards for preheating. ƽ CAUTION: Do not line the bottom tray with the smell of the burner tube. Experiencing flare-ups: Are you are seeking is baked on high for ...