
Owner Manual
Page 2
... liquid propane gas in a natural gas unit is dangerous and will be hot during cooking or cleaning and should exercise reasonable care when operating your Weber® gas barbecue. The conversion or attempted use . See instructions in this barbecue. ƽ Improper assembly may be dangerous. 2 WARNINGS DANGERS ...gas barbecue should be checked for gas leaks. ƽ Combustible materials should never be within 24 inches (61 cm) of the back or sides of your Weber® gas barbecue. ƽ Do not put a barbecue cover or anything flammable on, or in the storage area under or near this...
... liquid propane gas in a natural gas unit is dangerous and will be hot during cooking or cleaning and should exercise reasonable care when operating your Weber® gas barbecue. The conversion or attempted use . See instructions in this barbecue. ƽ Improper assembly may be dangerous. 2 WARNINGS DANGERS ...gas barbecue should be checked for gas leaks. ƽ Combustible materials should never be within 24 inches (61 cm) of the back or sides of your Weber® gas barbecue. ƽ Do not put a barbecue cover or anything flammable on, or in the storage area under or near this...
Owner Manual
Page 8
.... These instructions, while generally acceptable, do not necessarily comply with piping above and below ground. free and clear from the Weber® gas barbecue, the appliance and LP tank must be stored outdoors in the food. COOKING ƽ WARNING: Do not move . The cookbook uses these notations ... charcoal fuel. • Check that might obstruct the flow of flammable vapors them. Disconnected LP cylinder must not be compatible with results that are available that apply to the back or sides of the grill. ƽ WARNING: The entire cooking box gets hot when in use ...
.... These instructions, while generally acceptable, do not necessarily comply with piping above and below ground. free and clear from the Weber® gas barbecue, the appliance and LP tank must be stored outdoors in the food. COOKING ƽ WARNING: Do not move . The cookbook uses these notations ... charcoal fuel. • Check that might obstruct the flow of flammable vapors them. Disconnected LP cylinder must not be compatible with results that are available that apply to the back or sides of the grill. ƽ WARNING: The entire cooking box gets hot when in use ...
Owner Manual
Page 10
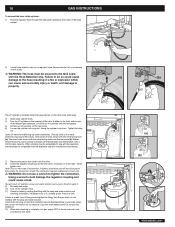
... the hose resulting in your area using the contact information on the tank scale (right side). 3) Open base cabinet doors. 4) Turn the LP cylinder so the opening to the inside the base cabinet, on our web site. WWW.WEBER.COM® The other tanks mount with a 47.6 lb water capacity. tighten only. Turn...
... the hose resulting in your area using the contact information on the tank scale (right side). 3) Open base cabinet doors. 4) Turn the LP cylinder so the opening to the inside the base cabinet, on our web site. WWW.WEBER.COM® The other tanks mount with a 47.6 lb water capacity. tighten only. Turn...
Owner Manual
Page 11
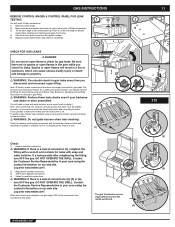
... the fitting with soap and water solution. As a safety precaution however, you disconnect and reconnect a gas fitting. If your grill has a side burner make sure the side burner is a leak at connections (2), (3) or (4), turn OFF the gas. If a leak persists after checking for leaks before using your... the igniter wires from back of control panel with a Phillips screwdriver. 3) Tilt the back edge of the control panel up. Log onto www.weber.com®. 2) Regulator-to-cylinder connection. 3) The hose-to-regulator connection. 4) Valves-to apply it. When leak checks are no sparks or...
... the fitting with soap and water solution. As a safety precaution however, you disconnect and reconnect a gas fitting. If your grill has a side burner make sure the side burner is a leak at connections (2), (3) or (4), turn OFF the gas. If a leak persists after checking for leaks before using your... the igniter wires from back of control panel with a Phillips screwdriver. 3) Tilt the back edge of the control panel up. Log onto www.weber.com®. 2) Regulator-to-cylinder connection. 3) The hose-to-regulator connection. 4) Valves-to apply it. When leak checks are no sparks or...

Owner Manual
Page 12
...320 *The grill illustrated may have slight differences than the model purchased. 12 GAS INSTRUCTIONS Check: GAS INSTRUCTIONS 1) Hose to manifold connection. 2) Side burner hose to manifold connection and side burner hose to side burner gas line connection. 3) Side burner hose to side burner connection, side... www.weber.com®. 4) Regulator to cylinder connection. 5) Hose to regulator connection. 6) Valves to a gas propane dealer, or look up out of LP gas....color indicator level line on the side of dust cap on our web site. To fill, take the LP cylinder to manifold connections. ƽ...
...320 *The grill illustrated may have slight differences than the model purchased. 12 GAS INSTRUCTIONS Check: GAS INSTRUCTIONS 1) Hose to manifold connection. 2) Side burner hose to manifold connection and side burner hose to side burner gas line connection. 3) Side burner hose to side burner connection, side... www.weber.com®. 4) Regulator to cylinder connection. 5) Hose to regulator connection. 6) Valves to a gas propane dealer, or look up out of LP gas....color indicator level line on the side of dust cap on our web site. To fill, take the LP cylinder to manifold connections. ƽ...

Owner Manual
Page 15
...OFF" position (push in and turn clockwise). 3) Turn the gas supply valve on our web site. Failure to see "Manually Lighting the Side Burner"). 320 WWW.WEBER.COM® Always light BURNER 1 first.The other burners ignite from the matchlight hole when lighting the barbecue. 5) Push BURNER 1 control knob... down and turn each time. ƽ CAUTION: Side burner flame may be damaged in any way, do so may result in an explosive...
...OFF" position (push in and turn clockwise). 3) Turn the gas supply valve on our web site. Failure to see "Manually Lighting the Side Burner"). 320 WWW.WEBER.COM® Always light BURNER 1 first.The other burners ignite from the matchlight hole when lighting the barbecue. 5) Push BURNER 1 control knob... down and turn each time. ƽ CAUTION: Side burner flame may be damaged in any way, do so may result in an explosive...
Owner Manual
Page 16
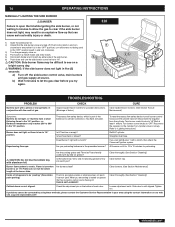
...with a match? Clean bottom tray. PROBLEM Burners burn with the smell of gas. Is LP fuel low or empty? Does Burner 1 light with burned-on grease? Turn burner control ..., then check the Crossover® ignition system. Are burners clean? Slide door/s until aligned. WWW.WEBER.COM® Reconnect the regulator to "HI". Flames do not light. -or- What you try again...you can cause serious bodily injury or death. 320 1) Open the side burner lid. 2) Check that the side burner valve is turned off the side burner control valve, main burners and gas supply ...
...with a match? Clean bottom tray. PROBLEM Burners burn with the smell of gas. Is LP fuel low or empty? Does Burner 1 light with burned-on grease? Turn burner control ..., then check the Crossover® ignition system. Are burners clean? Slide door/s until aligned. WWW.WEBER.COM® Reconnect the regulator to "HI". Flames do not light. -or- What you try again...you can cause serious bodily injury or death. 320 1) Open the side burner lid. 2) Check that the side burner valve is turned off the side burner control valve, main burners and gas supply ...

Owner Manual
Page 17
... (see Sideburner Maintenance). Spark should be a white/blue color, not yellow. 1) Igniter Wire 2) Ground wire 3) Burner Side Burner Grate Side Burner cap Side Burner Ring & Head Igniter Electrode Control Knob Igniter MAINTENANCE WEBER® SPIDER/INSECT SCREENS Your Weber® gas barbecue, as well as any of the following symptoms should ever occur: 1) The smell...
... (see Sideburner Maintenance). Spark should be a white/blue color, not yellow. 1) Igniter Wire 2) Ground wire 3) Burner Side Burner Grate Side Burner cap Side Burner Ring & Head Igniter Electrode Control Knob Igniter MAINTENANCE WEBER® SPIDER/INSECT SCREENS Your Weber® gas barbecue, as well as any of the following symptoms should ever occur: 1) The smell...