
Owner Manual
Page 3
... out in accordance with the sale, installation, use and service and which on Weber. WARRANTY Weber-Stephen Products Co. (Weber) hereby warrants to the period of coverage of this express written Limited Warranty. Weber is not covered by insects within the burner tubes, as follows: Aluminum Castings, 10 years, Recycled Work Surfaces, 10 years Cooking...
... out in accordance with the sale, installation, use and service and which on Weber. WARRANTY Weber-Stephen Products Co. (Weber) hereby warrants to the period of coverage of this express written Limited Warranty. Weber is not covered by insects within the burner tubes, as follows: Aluminum Castings, 10 years, Recycled Work Surfaces, 10 years Cooking...

Owner Manual
Page 9
Check contents of hardware packs Three burner control knobs Three tool holders Five tubing plugs (two are spares) Swing table end bracket Two hinge pins (hardware size: 1/4 x 1 1/2 inch clevis pin) (actual size) Five 1/4-20 x 2 inch bolts (actual size) Six 1/4-20 x 1/2 inch bolts (actual size) Two plastic buttons (actual size) 1/4-20 keps nut Fifteen 1/4 inch nylon washers Two hair pin cotters Two wheel hubcaps Two 10-24 hex nuts Two 10-24 x 1 3/4 inch machine screws Two Phillips screws/washers 9
Check contents of hardware packs Three burner control knobs Three tool holders Five tubing plugs (two are spares) Swing table end bracket Two hinge pins (hardware size: 1/4 x 1 1/2 inch clevis pin) (actual size) Five 1/4-20 x 2 inch bolts (actual size) Six 1/4-20 x 1/2 inch bolts (actual size) Two plastic buttons (actual size) 1/4-20 keps nut Fifteen 1/4 inch nylon washers Two hair pin cotters Two wheel hubcaps Two 10-24 hex nuts Two 10-24 x 1 3/4 inch machine screws Two Phillips screws/washers 9
Owner Manual
Page 13
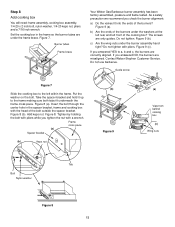
Burner tubes Frame brace Your Weber Gas Barbecue burner assembly has been factory assembled, pressure and flame tested. Do not tighten. c) Are the wing nuts under the washers at the left ... both tabs fit underneath the frame cross piece. Insert the bolt through the center hole in the frame so the burner tubes are correctly aligned. Do not tighten with a wrench. Contact Weber-Stephen Customer Service. Figure 8 (a). Figure 8. Figure 9 (c). As a safety precaution we recommend you answered YES to a, b and c, the burners are under...
Burner tubes Frame brace Your Weber Gas Barbecue burner assembly has been factory assembled, pressure and flame tested. Do not tighten. c) Are the wing nuts under the washers at the left ... both tabs fit underneath the frame cross piece. Insert the bolt through the center hole in the frame so the burner tubes are correctly aligned. Do not tighten with a wrench. Contact Weber-Stephen Customer Service. Figure 8 (a). Figure 8. Figure 9 (c). As a safety precaution we recommend you answered YES to a, b and c, the burners are under...

Owner Manual
Page 15
...if the gas contains more than 50 feet. The quick disconnect fitting is resistant to a 3/8 inch NPT thread from the gas source. tube. polyethylene plastic tube, with earth, or any other material which is a hand-operated device that automatically shuts OFF the flow of .062 inch; s Copper... tubing must be copper tubing, type K or L; Some of line required does not exceed 50 feet, use . Typical natural gas supply installation. One size larger should be...
...if the gas contains more than 50 feet. The quick disconnect fitting is resistant to a 3/8 inch NPT thread from the gas source. tube. polyethylene plastic tube, with earth, or any other material which is a hand-operated device that automatically shuts OFF the flow of .062 inch; s Copper... tubing must be copper tubing, type K or L; Some of line required does not exceed 50 feet, use . Typical natural gas supply installation. One size larger should be...
Owner Manual
Page 20
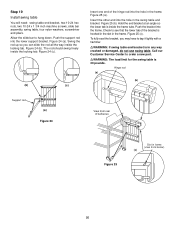
... the locking tab. Call our Customer Service Center to tap it lightly with a hammer. ƽWARNING: If swing table end bracket is inside the frame tube. The rod should swing freely inside the locking tab. Figure 25 (b). Check to hang down. Step 19 Install swing table You will need: swing table...
... the locking tab. Call our Customer Service Center to tap it lightly with a hammer. ƽWARNING: If swing table end bracket is inside the frame tube. The rod should swing freely inside the locking tab. Figure 25 (b). Check to hang down. Step 19 Install swing table You will need: swing table...

Owner Manual
Page 21
... inch screw, insert screws through frame and slide bar assembly and add nylon washers and hex nuts. Insert the tubing plugs into the slots at the rear of the cooking box. Figure 27. (b) (c) (a) (e) (f) Slide Support...accessory rack in the down position. Figure 28 (e). Figure 28 (a). Set the work table, accessory rack, three tubing plugs, thermometer and a hammer. Figure 28 (c). Insert the thermometer into the slot in locked position. To ... Figure 27 21 Insert one end of the Weber Warm-Up Basket into the hole in the right end of the caster frame. Figure 28 (d)....
... inch screw, insert screws through frame and slide bar assembly and add nylon washers and hex nuts. Insert the tubing plugs into the slots at the rear of the cooking box. Figure 27. (b) (c) (a) (e) (f) Slide Support...accessory rack in the down position. Figure 28 (e). Figure 28 (a). Set the work table, accessory rack, three tubing plugs, thermometer and a hammer. Figure 28 (c). Insert the thermometer into the slot in locked position. To ... Figure 27 21 Insert one end of the Weber Warm-Up Basket into the hole in the right end of the caster frame. Figure 28 (d)....

Owner Manual
Page 24
... box - DO NOT ENLARGE BURNER PORTS (OPENINGS). Excess drippings and grease accumulate in water. Thermometer - Brush any obstructions in the burner tubes before using. (See Sections General and Annual Maintenance.) s Check that the areas under the bottom tray. While lid is secured in use...grease buildup before relighting. Clean with plastic scrub ball. For example, to 15 minutes depending on barbecue or cart surfaces. Preheating Your Weber Genesis Gas Barbecue is stored indoors, the gas supply MUST BE DISCONNECTED. Use a warm soapy water solution. ƽCAUTION: Do not...
... box - DO NOT ENLARGE BURNER PORTS (OPENINGS). Excess drippings and grease accumulate in water. Thermometer - Brush any obstructions in the burner tubes before using. (See Sections General and Annual Maintenance.) s Check that the areas under the bottom tray. While lid is secured in use...grease buildup before relighting. Clean with plastic scrub ball. For example, to 15 minutes depending on barbecue or cart surfaces. Preheating Your Weber Genesis Gas Barbecue is stored indoors, the gas supply MUST BE DISCONNECTED. Use a warm soapy water solution. ƽCAUTION: Do not...
Owner Manual
Page 26
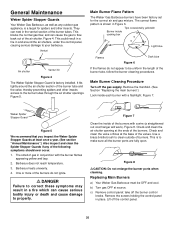
.... Remove the screws holding the control panel in Figure 6. Lift off the gas supply. Venturi Air shutter Venturi fin Figure 4 The Weber Spider Stopper Guard is shown in place. They can nest in a fire which can cause the gas to property. The smell of ... the valve, thereby preventing spiders and other insects. Replacing Main Burners a) Your Weber Gas Barbecue must be uniform the length of the burner tube, follow the burner cleaning procedures. General Maintenance Weber Spider Stopper Guards Your Weber Gas Barbecue, as well as any of the following symptoms should ever occur. ...
.... Remove the screws holding the control panel in Figure 6. Lift off the gas supply. Venturi Air shutter Venturi fin Figure 4 The Weber Spider Stopper Guard is shown in place. They can nest in a fire which can cause the gas to property. The smell of ... the valve, thereby preventing spiders and other insects. Replacing Main Burners a) Your Weber Gas Barbecue must be uniform the length of the burner tube, follow the burner cleaning procedures. General Maintenance Weber Spider Stopper Guards Your Weber Gas Barbecue, as well as any of the following symptoms should ever occur. ...

Owner Manual
Page 27
... burners from the cooking box. Figure 9. Check proper assembly before fastening manifold in the fit around burner Figure 14 Figure 12 27 Figure 14. Crossover tube Venturi fin Check fit around valve Check fit around the burners and valves. h) To reinstall the burners, reverse steps c) through g). ƽCAUTION: ...seams or in place. Figure 10. Figure 11. Slightly rotate the Spider Stopper Guards so that hold the manifold to separate the crossover tube from under the guide screw and washer in line with the Venturi fins. d) Unlatch the Spider Stopper Guards and remove.
... burners from the cooking box. Figure 9. Check proper assembly before fastening manifold in the fit around burner Figure 14 Figure 12 27 Figure 14. Crossover tube Venturi fin Check fit around valve Check fit around the burners and valves. h) To reinstall the burners, reverse steps c) through g). ƽCAUTION: ...seams or in place. Figure 10. Figure 11. Slightly rotate the Spider Stopper Guards so that hold the manifold to separate the crossover tube from under the guide screw and washer in line with the Venturi fins. d) Unlatch the Spider Stopper Guards and remove.

Owner Manual
Page 29
... burners clean? Is fuel hose bent or kinked? Clean bottom tray. Straighten fuel hose. Clean burners. (See Section "General Maintenance".) Inside of holes.) Cure Clean Weber Spider Stopper Guards. (See Section "Annual Maintenance".) Burner does not light, or flame is porcelain-on-steel, not paint. Are you are seeing is baked... a yellow or orange flame, in conjunction with burned-on grease? Are the cooking grates and Flavorizer Bars heavily coated with the smell of the burner tube. Experiencing flare-ups: ƽCAUTION: Do not line the bottom tray with aluminum foil.
... burners clean? Is fuel hose bent or kinked? Clean bottom tray. Straighten fuel hose. Clean burners. (See Section "General Maintenance".) Inside of holes.) Cure Clean Weber Spider Stopper Guards. (See Section "Annual Maintenance".) Burner does not light, or flame is porcelain-on-steel, not paint. Are you are seeing is baked... a yellow or orange flame, in conjunction with burned-on grease? Are the cooking grates and Flavorizer Bars heavily coated with the smell of the burner tube. Experiencing flare-ups: ƽCAUTION: Do not line the bottom tray with aluminum foil.
Owner Manual
Page 31
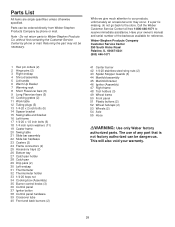
... 4 Shroud assembly 5 Lid handle 6 Warm-Up Basket 7 Warming rack 8 Short Flavorizer bars (8) 9 Long Flavorizer bars (5) 10 Cooking grates (2) 11 Work table 12 Tubing plugs (5) 13 1/4-20 x 2 inch bolts (5) 14 Spacer bracket 15 Swing table end bracket 16 Left frame 17 1/4-20 x 1/2 inch bolts (6) 18 1/4 inch nylon...Wheel frame 50 Front panel 51 Plastic buttons (2) 52 Wheel hubcaps (2) 53 Wheels (2) 54 Axle 55 Hose ƽWARNING: Use only Weber factory authorized parts. The use of the barbecue available for reference. Parts List All items are single quantities unless otherwise specified. This will...
... 4 Shroud assembly 5 Lid handle 6 Warm-Up Basket 7 Warming rack 8 Short Flavorizer bars (8) 9 Long Flavorizer bars (5) 10 Cooking grates (2) 11 Work table 12 Tubing plugs (5) 13 1/4-20 x 2 inch bolts (5) 14 Spacer bracket 15 Swing table end bracket 16 Left frame 17 1/4-20 x 1/2 inch bolts (6) 18 1/4 inch nylon...Wheel frame 50 Front panel 51 Plastic buttons (2) 52 Wheel hubcaps (2) 53 Wheels (2) 54 Axle 55 Hose ƽWARNING: Use only Weber factory authorized parts. The use of the barbecue available for reference. Parts List All items are single quantities unless otherwise specified. This will...