
Owner Manual
Page 2
... may be hazardous and should be checked by children. ƽ You should never be used by your Weber Gas Barbecue. ƽ Do not put a barbecue cover or anything flammable on a regular basis. ƽ LP gas is out. ƽ Do not enlarge valve orifices or burner ports when cleaning the valves or...manual. ƽ After a period of storage, and/or nonuse, the Weber Gas Barbecue should be checked for gas leaks. ƽ Combustible materials should never be within 24 inches of the top, bottom, back or sides of natural gas in an LP unit or LP gas in a natural gas unit is in operation. ƽ Use...
... may be hazardous and should be checked by children. ƽ You should never be used by your Weber Gas Barbecue. ƽ Do not put a barbecue cover or anything flammable on a regular basis. ƽ LP gas is out. ƽ Do not enlarge valve orifices or burner ports when cleaning the valves or...manual. ƽ After a period of storage, and/or nonuse, the Weber Gas Barbecue should be checked for gas leaks. ƽ Combustible materials should never be within 24 inches of the top, bottom, back or sides of natural gas in an LP unit or LP gas in a natural gas unit is in operation. ƽ Use...
Owner Manual
Page 6
...materials within 24 inches of the top, bottom, back or sides of children. s Do not use your Weber Gas Barbecue. Do not leave unattended. s Do not use this appliance must not be stored outdoors in or on your Weber Gas Barbecue with charcoal fuel. For Installation in a well-ventilated...installation of combustion or ventilation air. Operating area ƽWARNING: Only use with you if you can be turned OFF at the LP tank when the Weber Gas Barbecue is stored indoors, the gas supply must be dangerous. s Keep any other enclosed area. Portability means you move....
...materials within 24 inches of the top, bottom, back or sides of children. s Do not use your Weber Gas Barbecue. Do not leave unattended. s Do not use this appliance must not be stored outdoors in or on your Weber Gas Barbecue with charcoal fuel. For Installation in a well-ventilated...installation of combustion or ventilation air. Operating area ƽWARNING: Only use with you if you can be turned OFF at the LP tank when the Weber Gas Barbecue is stored indoors, the gas supply must be dangerous. s Keep any other enclosed area. Portability means you move....

Owner Manual
Page 10
Put one end of wood (or other wheel, WEBER side out. Tap on bolts, insert bolts as shown so the leg tabs point up. Note - Slip the two frame pieces together with the tabs inside. ..., right frame, two 1/4-20 x 1/2 inch bolts, two nylon washers and a 7/16 inch wrench. Place one wheel on the block of the axle on the axle, WEBER side toward the hubcap. Add the other protected surface). ER WE B ER WE B Step 3 Assemble frame You will need : left frame around.) Frame tabs Figure 1 (a) Leg...
Put one end of wood (or other wheel, WEBER side out. Tap on bolts, insert bolts as shown so the leg tabs point up. Note - Slip the two frame pieces together with the tabs inside. ..., right frame, two 1/4-20 x 1/2 inch bolts, two nylon washers and a 7/16 inch wrench. Place one wheel on the block of the axle on the axle, WEBER side toward the hubcap. Add the other protected surface). ER WE B ER WE B Step 3 Assemble frame You will need : left frame around.) Frame tabs Figure 1 (a) Leg...

Owner Manual
Page 12
Figure 6. Push the casters firmly into the inserts in the frame and insert the plastic buttons through the front panel and frame. Turn frame assembly right side up. Plastic buttons Figure 5 View from rear of the caster legs. Step 6 Insert casters You will need : frame assembly and two casters. Step 7 Add front panel You will need : front panel and two plastic buttons. Align the panel with the holes in the ends of barbecue Figure 6 12 Figure 5.
Figure 6. Push the casters firmly into the inserts in the frame and insert the plastic buttons through the front panel and frame. Turn frame assembly right side up. Plastic buttons Figure 5 View from rear of the caster legs. Step 6 Insert casters You will need : frame assembly and two casters. Step 7 Add front panel You will need : front panel and two plastic buttons. Align the panel with the holes in the ends of barbecue Figure 6 12 Figure 5.

Owner Manual
Page 15
If the igniter works loose, carefully tighten the igniter lock nut with an adjustable wrench or pliers. (a) E E F F View from front left side of the fuel scale assembly through the large part of the keyhole. The igniter lock nut is on the left View from front right Figure ...
If the igniter works loose, carefully tighten the igniter lock nut with an adjustable wrench or pliers. (a) E E F F View from front left side of the fuel scale assembly through the large part of the keyhole. The igniter lock nut is on the left View from front right Figure ...

Owner Manual
Page 19
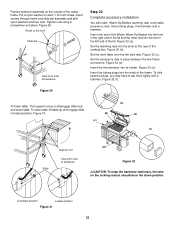
... line bottom tray with its finger grip towards you . The front of the catch pan holder must be on front edge of bottom tray Front side of catch pan holder Figure 23 Hook the ends of the catch pan holder into the catch pan holder with aluminum foil. Bottom tray Figure... Figure 22 Slide the bottom tray onto the mounting rails under the cooking box with finger grip toward you . 19 Set the long Flavorizer Bars side to side in the cooking box. Figure 24. Slide the catch pan into the hole in the cooking box. Figure 22. Set the cooking grates onto...
... line bottom tray with its finger grip towards you . The front of the catch pan holder must be on front edge of bottom tray Front side of catch pan holder Figure 23 Hook the ends of the catch pan holder into the catch pan holder with aluminum foil. Bottom tray Figure... Figure 22 Slide the bottom tray onto the mounting rails under the cooking box with finger grip toward you . 19 Set the long Flavorizer Bars side to side in the cooking box. Figure 24. Slide the catch pan into the hole in the cooking box. Figure 22. Set the cooking grates onto...
Owner Manual
Page 22
Figure 30. Insert one end of the Weber Warm-Up Basket into the hole in the right end of the lid and the other end into the ends of the frame. Figure 32 (f). ... on the outside of barbecue (d) Figure 32 ƽCAUTION: To keep the barbecue stationary, the tabs on the locking casters should be in the left side rails. Figure 32 (d). Insert the tubing plugs into the slot in the down position. Notch to the front Slide bar View from rear of the...
Figure 30. Insert one end of the Weber Warm-Up Basket into the hole in the right end of the lid and the other end into the ends of the frame. Figure 32 (f). ... on the outside of barbecue (d) Figure 32 ƽCAUTION: To keep the barbecue stationary, the tabs on the locking casters should be in the left side rails. Figure 32 (d). Insert the tubing plugs into the slot in the down position. Notch to the front Slide bar View from rear of the...