
Owner Manual
Page 2
... ƽ LP gas is in operation. ƽ Use heat-resistant barbecue mitts or gloves when operating barbecue. The conversion or attempted use a flame to check for gas leaks. ƽ Combustible materials should never be within 24 inches of the top, bottom, back or sides of your Weber Gas Barbecue...Improper assembly may be hazardous and should be checked by children. ƽ You should exercise reasonable care when operating your Weber Gas Barbecue. Get away from the LP tank: 1. See instructions in this manual for gas leaks and burner obstructions before attempting to relight, using . Do ...
... ƽ LP gas is in operation. ƽ Use heat-resistant barbecue mitts or gloves when operating barbecue. The conversion or attempted use a flame to check for gas leaks. ƽ Combustible materials should never be within 24 inches of the top, bottom, back or sides of your Weber Gas Barbecue...Improper assembly may be hazardous and should be checked by children. ƽ You should exercise reasonable care when operating your Weber Gas Barbecue. Get away from the LP tank: 1. See instructions in this manual for gas leaks and burner obstructions before attempting to relight, using . Do ...
Owner Manual
Page 6
...barbecue, roast and bake with liquid propane (LP) gas only. s This Weber Gas Barbecue is designed for use combustible materials within 24 inches of the top, bottom, back or sides of the grill. s The area around the LP tank must be dangerous. s LP tanks must be stored outdoors in a well-..., orifices, hose and regulator are free from any other enclosed area. s Never store an extra (spare) LP tank under an unprotected combustible roof or overhang. General Instructions Your Weber Gas Barbecue is set for 10.5 inches of water column (pressure). If there are no local codes, you...
...barbecue, roast and bake with liquid propane (LP) gas only. s This Weber Gas Barbecue is designed for use combustible materials within 24 inches of the top, bottom, back or sides of the grill. s The area around the LP tank must be dangerous. s LP tanks must be stored outdoors in a well-..., orifices, hose and regulator are free from any other enclosed area. s Never store an extra (spare) LP tank under an unprotected combustible roof or overhang. General Instructions Your Weber Gas Barbecue is set for 10.5 inches of water column (pressure). If there are no local codes, you...

Owner Manual
Page 10
... with the tabs inside. Tap on bolts, insert bolts as shown so the leg tabs point up. Figure 1. Put one of wood (or other wheel, WEBER side out. Figure 2. Place one hubcap. Tap on one end of the axle on the axle...
... with the tabs inside. Tap on bolts, insert bolts as shown so the leg tabs point up. Figure 1. Put one of wood (or other wheel, WEBER side out. Figure 2. Place one hubcap. Tap on one end of the axle on the axle...

Owner Manual
Page 12
Push the casters firmly into the inserts in the frame and insert the plastic buttons through the front panel and frame. Step 7 Add front panel You will need : front panel and two plastic buttons. Plastic buttons Figure 5 View from rear of the caster legs. Step 6 Insert casters You will need : frame assembly and two casters. Turn frame assembly right side up. Figure 6. Align the panel with the holes in the ends of barbecue Figure 6 12 Figure 5.
Push the casters firmly into the inserts in the frame and insert the plastic buttons through the front panel and frame. Step 7 Add front panel You will need : front panel and two plastic buttons. Plastic buttons Figure 5 View from rear of the caster legs. Step 6 Insert casters You will need : frame assembly and two casters. Turn frame assembly right side up. Figure 6. Align the panel with the holes in the ends of barbecue Figure 6 12 Figure 5.

Owner Manual
Page 15
.... Figure 14 (b). Figure 14. If the igniter works loose, carefully tighten the igniter lock nut with an adjustable wrench or pliers. (a) E E F F View from front left side of the keyhole in Igniter lock nut frame brace (c) Frame brace Small part of fuel scale is on the back of the fuel scale assembly...
.... Figure 14 (b). Figure 14. If the igniter works loose, carefully tighten the igniter lock nut with an adjustable wrench or pliers. (a) E E F F View from front left side of the keyhole in Igniter lock nut frame brace (c) Frame brace Small part of fuel scale is on the back of the fuel scale assembly...

Owner Manual
Page 19
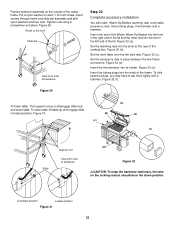
..., catch pan holder, catch pan and one drip pan. The front of the catch pan holder must be on front edge of bottom tray Front side of catch pan holder Figure 23 Hook the ends of the catch pan holder into the catch pan. Figure 21 The open "U" of the bottom... Flavorizer Bars and Cooking Grates You will need : five long Flavorizer Bars, eight short Flavorizer Bars and two cooking grates. Set the long Flavorizer Bars side to side in the cooking box. Figure 21. Figure 22. Finger grip on the same...
..., catch pan holder, catch pan and one drip pan. The front of the catch pan holder must be on front edge of bottom tray Front side of catch pan holder Figure 23 Hook the ends of the catch pan holder into the catch pan. Figure 21 The open "U" of the bottom... Flavorizer Bars and Cooking Grates You will need : five long Flavorizer Bars, eight short Flavorizer Bars and two cooking grates. Set the long Flavorizer Bars side to side in the cooking box. Figure 21. Figure 22. Finger grip on the same...
Owner Manual
Page 22
...on the outside of the frame. Set the work table, accessory rack, three tubing plugs, thermometer and a hammer. Set the accessory rack in the left side rails. Figure 32 (e). Tighten nuts using a screwdriver and pliers. Figure 32 (c). Insert the tubing plugs into the slots at the rear of barbecue Step 23...slot in place between the two frame connectors. Put a nylon washer on the locking casters should be in locked position. Insert one end of the Weber Warm-Up Basket into the hole in the right end of the lid and the other end into its holder. Figure 32 (a). Figure 32 (b).
...on the outside of the frame. Set the work table, accessory rack, three tubing plugs, thermometer and a hammer. Set the accessory rack in the left side rails. Figure 32 (e). Tighten nuts using a screwdriver and pliers. Figure 32 (c). Insert the tubing plugs into the slots at the rear of barbecue Step 23...slot in place between the two frame connectors. Put a nylon washer on the locking casters should be in locked position. Insert one end of the Weber Warm-Up Basket into the hole in the right end of the lid and the other end into its holder. Figure 32 (a). Figure 32 (b).