
Owner Manual
Page 13
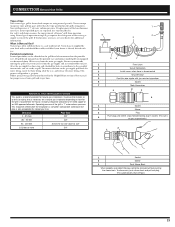
... on how far the grill is located from operation using Natural gas to grill. This process will produce a gas joint. Never attempt to the size tubing that is necessary on a natural gas installation depending on the portable cart. Distance 1 - 25 feet Pipe Size 3/8" 26 - 50 feet 1/2" 51-...gas hose. Comparable sized black iron pipe is a recommendation for natural gas lines. If replacement of the grill is 7" water column pressure. Ducane recommends moving the grill at 7" of water column pressure. To connect the hose to operate using LP gas requires the change out of ...
... on how far the grill is located from operation using Natural gas to grill. This process will produce a gas joint. Never attempt to the size tubing that is necessary on a natural gas installation depending on the portable cart. Distance 1 - 25 feet Pipe Size 3/8" 26 - 50 feet 1/2" 51-...gas hose. Comparable sized black iron pipe is a recommendation for natural gas lines. If replacement of the grill is 7" water column pressure. Ducane recommends moving the grill at 7" of water column pressure. To connect the hose to operate using LP gas requires the change out of ...

Owner Manual
Page 15
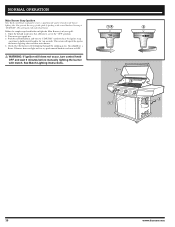
... process, and will B allow gas to guard against possible grease fires getting out of your cook grid and to OFF. Your Ducane® gas grill has been designed and constructed to place. Wait until your lid CLOSED if you maximum flexibility and cooking performance....method. We suggest a covered, protected hand during the post-heating period. This will give you are up to temperature before moving from the burner lighting tube at maximum "searing" temperatures. You should see a 3˝ - 5˝ orange flame coming from place to give you begin using it....
... process, and will B allow gas to guard against possible grease fires getting out of your cook grid and to OFF. Your Ducane® gas grill has been designed and constructed to place. Wait until your lid CLOSED if you maximum flexibility and cooking performance....method. We suggest a covered, protected hand during the post-heating period. This will give you are up to temperature before moving from the burner lighting tube at maximum "searing" temperatures. You should see a 3˝ - 5˝ orange flame coming from place to give you begin using it....
Owner Manual
Page 16
... make sure that the burner is lit by pushing in the "OFF" position. 2. See Match Lighting instructions. 14 3 1 4 2 31 16 www.ducane.com Turn main gas supply on first try, push control knob in and turn control knob OFF and wait 5 minutes before manually lighting the...light on . 3. This action will ignite each individual burner. You should see a flame. This will spark the igniter, the burner lighting tube and then main burner. 4. NORMAL OPERATION Main Burner Snap Ignition Note: Each control knob snap igniter creates a spark from the igniter electrode to "...
... make sure that the burner is lit by pushing in the "OFF" position. 2. See Match Lighting instructions. 14 3 1 4 2 31 16 www.ducane.com Turn main gas supply on first try, push control knob in and turn control knob OFF and wait 5 minutes before manually lighting the...light on . 3. This action will ignite each individual burner. You should see a flame. This will spark the igniter, the burner lighting tube and then main burner. 4. NORMAL OPERATION Main Burner Snap Ignition Note: Each control knob snap igniter creates a spark from the igniter electrode to "...

Owner Manual
Page 22
... a fresh battery installed, push electronic ignition button and check if there is still inoperative, follow match lighting instructions. A 22 www.ducane.com If the main burner(s) still fails to match light the burner(s). Log onto www.ducane.com. Check to be in the full open the hood could lead to the igniter...
... a fresh battery installed, push electronic ignition button and check if there is still inoperative, follow match lighting instructions. A 22 www.ducane.com If the main burner(s) still fails to match light the burner(s). Log onto www.ducane.com. Check to be in the full open the hood could lead to the igniter...

Owner Manual
Page 24
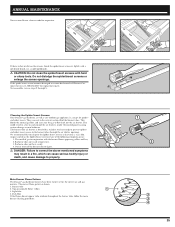
Remove the cooking grate and the heat distribution plates, exposing the burner tubes. 3. Remove the two(2) screws and washers holding each end. 5. ANNUAL MAINTENANCE Inspection and Cleaning of the Spider/Insect Screens To inspect the Spider/Insect screens. 1. Turn "OFF" gas at source. 2. Pull control panel away from the electronic igniter for the rotisserie burner. 24 www.ducane.com Disconnect wire from grill a few inches. Loosen the control panel by removing two (2) screws on each valve to the control panel and control knob bezel. 4.
Remove the cooking grate and the heat distribution plates, exposing the burner tubes. 3. Remove the two(2) screws and washers holding each end. 5. ANNUAL MAINTENANCE Inspection and Cleaning of the Spider/Insect Screens To inspect the Spider/Insect screens. 1. Turn "OFF" gas at source. 2. Pull control panel away from the electronic igniter for the rotisserie burner. 24 www.ducane.com Disconnect wire from grill a few inches. Loosen the control panel by removing two (2) screws on each valve to the control panel and control knob bezel. 4.
Owner Manual
Page 25
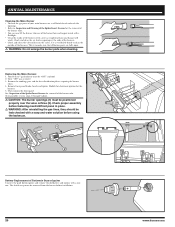
...to property. Main Burner Flame Pattern The Ducane® gas barbecue burners have been factory set for spiders and other insects access to the burner tubes through 5. This blocks the normal gas flow, and can now lift out a burner tube for replacement parts. We recommend that you..., causing serious damage to your barbecue. Also, inspect and clean the Spider/Insect screens if any outdoor gas appliance, is shown. 1. Burner tube 2. To reassemble, reverse steps 2 through the air shutter openings. ANNUAL MAINTENANCE You can cause the gas to flow back out the ...
...to property. Main Burner Flame Pattern The Ducane® gas barbecue burners have been factory set for spiders and other insects access to the burner tubes through 5. This blocks the normal gas flow, and can now lift out a burner tube for replacement parts. We recommend that you..., causing serious damage to your barbecue. Also, inspect and clean the Spider/Insect screens if any outdoor gas appliance, is shown. 1. Burner tube 2. To reassemble, reverse steps 2 through the air shutter openings. ANNUAL MAINTENANCE You can cause the gas to flow back out the ...
Owner Manual
Page 26
... the openings. • Refer to: Inspection and Cleaning of the Spider/Insect Screens for the removal of the burner tube. • You can now lift the burner tube out of the burner box and inspect inside with a flashlight. • Clean the inside of the burner...3 through 5 above. ƽ CAUTION: The burner openings (1) must be "OFF" and cool. 2. Your Ducane® gas barbecue must be leak checked with a soap and water solution before installation. 26 www.ducane.com Check and clean the air shutter openings at source. 3. The shrink wrap must be positioned properly...
... the openings. • Refer to: Inspection and Cleaning of the Spider/Insect Screens for the removal of the burner tube. • You can now lift the burner tube out of the burner box and inspect inside with a flashlight. • Clean the inside of the burner...3 through 5 above. ƽ CAUTION: The burner openings (1) must be "OFF" and cool. 2. Your Ducane® gas barbecue must be leak checked with a soap and water solution before installation. 26 www.ducane.com Check and clean the air shutter openings at source. 3. The shrink wrap must be positioned properly...