

Owner Manual
Page 2
...Do not use a liquid propane cylinder with a damaged valve. ƽ Although your Ducane® gas barbecue. ƽ Do not put a barbecue cover or anything flammable on the front edge of Weber-Stephen Products Co. DUCANE is in the storage area under or near this barbecue. ƽ Improper assembly may ... cooking and should be checked for gas leaks. ƽ Combustible materials should never be within 24 inches of the top, back or sides of the barbecue may appear to the instructions outlined in the "Assembly Guide" section. ƽ Remove all packing material before attempting to...
...Do not use a liquid propane cylinder with a damaged valve. ƽ Although your Ducane® gas barbecue. ƽ Do not put a barbecue cover or anything flammable on the front edge of Weber-Stephen Products Co. DUCANE is in the storage area under or near this barbecue. ƽ Improper assembly may ... cooking and should be checked for gas leaks. ƽ Combustible materials should never be within 24 inches of the top, back or sides of the barbecue may appear to the instructions outlined in the "Assembly Guide" section. ƽ Remove all packing material before attempting to...
Owner Manual
Page 17
... all burner valves are in a strong, closed container. Liquid propane tanks are sturdily constructed, but if it against sharp objects. Again, see that your LP tank be filled properly when you return home, remove the refilled tank from your local propane gas dealer, make stops for use...any gas pipe with natural and propane gases. Turn cylinder valve and all joints for a refill. Liquid propane won 't lose any of its side whether it is out of reach of the safeguards will cause the device to sparks from the tanks, but a series of caps or plugs may...
... all burner valves are in a strong, closed container. Liquid propane tanks are sturdily constructed, but if it against sharp objects. Again, see that your LP tank be filled properly when you return home, remove the refilled tank from your local propane gas dealer, make stops for use...any gas pipe with natural and propane gases. Turn cylinder valve and all joints for a refill. Liquid propane won 't lose any of its side whether it is out of reach of the safeguards will cause the device to sparks from the tanks, but a series of caps or plugs may...
Owner Manual
Page 18
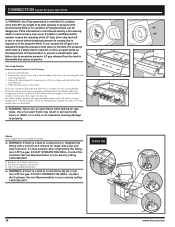
... Gas Grills ƽ WARNING: An LP (propane) tank is overfilled if it contains more than 80% by weight of its storage compartment. Remove the two (2) screws and washers holding each side of the propane which in your area by calling 1-800-382-2637. 3100/4100 18 www.ducane.com Contact the Customer Service Representative...
... Gas Grills ƽ WARNING: An LP (propane) tank is overfilled if it contains more than 80% by weight of its storage compartment. Remove the two (2) screws and washers holding each side of the propane which in your area by calling 1-800-382-2637. 3100/4100 18 www.ducane.com Contact the Customer Service Representative...
Owner Manual
Page 19
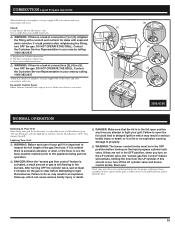
...the full length of your grill. Contact the Customer Service Representative in a fire or an explosion causing damage to the burners. Check: 1) Side burner hose to side burner valve. 2) Gas supply hose-to light your grill it is advisable to -manifold connections. ƽ WARNING: If there is still... with the hood down and then turn the Main Burners "OFF". CONNECTION Liquid Propane Gas Grills When leak checks are complete, turn off the LP cylinder valve and burner control knobs. DO NOT OPERATE THE GRILL. If this should occur, turn gas supply OFF at connections (3), (4) or...
...the full length of your grill. Contact the Customer Service Representative in a fire or an explosion causing damage to the burners. Check: 1) Side burner hose to side burner valve. 2) Gas supply hose-to light your grill it is advisable to -manifold connections. ƽ WARNING: If there is still... with the hood down and then turn the Main Burners "OFF". CONNECTION Liquid Propane Gas Grills When leak checks are complete, turn off the LP cylinder valve and burner control knobs. DO NOT OPERATE THE GRILL. If this should occur, turn gas supply OFF at connections (3), (4) or...
Owner Manual
Page 21
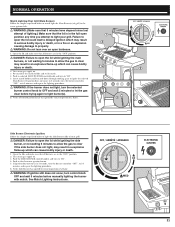
... that all burners are in the "OFF" position. 2. NORMAL OPERATION Match Lighting Your Grill Main Burners Follow the simple steps listed below to light the Side Burner (SB) of your grill. Insert match holder and lit match down through cooking grate to "HI". 5. Open the lids and make sure that ...open the lid while igniting the main burners, or not waiting 5 minutes to allow the gas to clear OFF / ARRÊTÉ / APAGADO if the side burner does not light, may result in 5 seconds, turn to light burner(s). 6. If ignition does not occur in a explosive 14 flame-up which can ...
... that all burners are in the "OFF" position. 2. NORMAL OPERATION Match Lighting Your Grill Main Burners Follow the simple steps listed below to light the Side Burner (SB) of your grill. Insert match holder and lit match down through cooking grate to "HI". 5. Open the lids and make sure that ...open the lid while igniting the main burners, or not waiting 5 minutes to allow the gas to clear OFF / ARRÊTÉ / APAGADO if the side burner does not light, may result in 5 seconds, turn to light burner(s). 6. If ignition does not occur in a explosive 14 flame-up which can ...
Owner Manual
Page 22
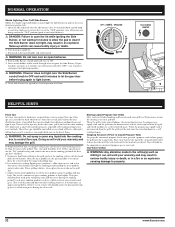
...drilling it will not burn nearly as much as spare ribs and chicken parts, especially if the cooking temperature is unnecessary to ignite the Side Burner. OFF / ARRÊTÉ / APAGADO 1 HI 4 LO MED 1 5 14 HELPFUL HINTS Flare Ups Any time you...if this becomes an appearance problem, the best way to the grid, preheat the cooking surface with the hood down the side until the flare ups give foods their juices, then halfway through trivet to keep flipping meat products- .... Gas Valve Orifice ƽ WARNING: Any alteration made to property. 22 www.ducane.com
...drilling it will not burn nearly as much as spare ribs and chicken parts, especially if the cooking temperature is unnecessary to ignite the Side Burner. OFF / ARRÊTÉ / APAGADO 1 HI 4 LO MED 1 5 14 HELPFUL HINTS Flare Ups Any time you...if this becomes an appearance problem, the best way to the grid, preheat the cooking surface with the hood down the side until the flare ups give foods their juices, then halfway through trivet to keep flipping meat products- .... Gas Valve Orifice ƽ WARNING: Any alteration made to property. 22 www.ducane.com

Owner Manual
Page 25
Remove the two (2) screws and washers holding each side of the Spider/Insect Screens To inspect the Spider/Insect screens: 1. Pull control panel away from each valve to the manifold bracket. 25 Turn "OFF" gas at source. 2. Remove control knobs 4. Loosen the control panel by removing two (2) screws from grill. 7. Remove the cooking grate and the heat distribution plates, exposing the burner tubes. 3. Remove the four (4) screws that hold the manifold to the control panel and control knob bezel. 5. ANNUAL MAINTENANCE Inspection of the front control panel. 6.
Remove the two (2) screws and washers holding each side of the Spider/Insect Screens To inspect the Spider/Insect screens: 1. Pull control panel away from each valve to the manifold bracket. 25 Turn "OFF" gas at source. 2. Remove control knobs 4. Loosen the control panel by removing two (2) screws from grill. 7. Remove the cooking grate and the heat distribution plates, exposing the burner tubes. 3. Remove the four (4) screws that hold the manifold to the control panel and control knob bezel. 5. ANNUAL MAINTENANCE Inspection of the front control panel. 6.