
User Manual
Page 1
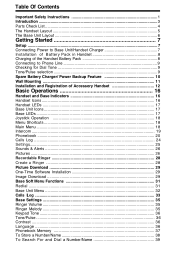
... Layout 6 Getting Started 7 Setup ...7 Connecting Power to Base Unit/Handset Charger 7 Installation of Battery Pack in Handset 8 Charging of the Handset Battery Pack 8 Connecting to Phone Line 9 Checking for Dial Tone 9 Tone/Pulse selection 9 Spare Battery Charger/ Power Backup Feature 10 Wall Mounting ...11 Installation and Registration of Accessory Handset 12...
... Layout 6 Getting Started 7 Setup ...7 Connecting Power to Base Unit/Handset Charger 7 Installation of Battery Pack in Handset 8 Charging of the Handset Battery Pack 8 Connecting to Phone Line 9 Checking for Dial Tone 9 Tone/Pulse selection 9 Spare Battery Charger/ Power Backup Feature 10 Wall Mounting ...11 Installation and Registration of Accessory Handset 12...

User Manual
Page 5
In Canada, call VTech Communications, Inc. This manual is designed to a maximum of supporting up to 2 people can be conferenced on a call , or two extensions can be conferenced on a call, while two other extensions can be talking internally, using your phone. We strongly recommend you with the i 5836 cordless telephone. To order additional...
In Canada, call VTech Communications, Inc. This manual is designed to a maximum of supporting up to 2 people can be conferenced on a call , or two extensions can be conferenced on a call, while two other extensions can be talking internally, using your phone. We strongly recommend you with the i 5836 cordless telephone. To order additional...

User Manual
Page 8
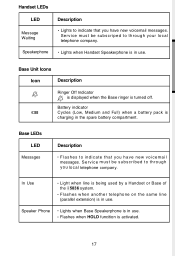
1 9 2 10 3 11 4 5 12 6 13 7 8 14 1. Clear 4. Softkeys 12. LCD Display 3. Redial 8. Telephone Jack 16. Mute 9. Speaker Phone * 13. In Use 5. Message LED 10. Spare Battery Release Button 6 Antenna 2. Hold 7. Spare Battery Drawer 18. Flash 6. Intercom 11. Dialing Keys (0-9, , #) 14. Volume Keys 15. DC Connector 17.
1 9 2 10 3 11 4 5 12 6 13 7 8 14 1. Clear 4. Softkeys 12. LCD Display 3. Redial 8. Telephone Jack 16. Mute 9. Speaker Phone * 13. In Use 5. Message LED 10. Spare Battery Release Button 6 Antenna 2. Hold 7. Spare Battery Drawer 18. Flash 6. Intercom 11. Dialing Keys (0-9, , #) 14. Volume Keys 15. DC Connector 17.
User Manual
Page 10
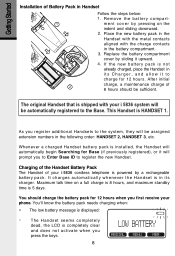
... needs charging when: • The low battery message is displayed: • The Handset seems completely dead, the LCD is HANDSET 1. Getting Started Installation of your phone. Place the new battery pack in the Handset with the metal contacts aligned with your i 5836 system will be sufficient. Replace the battery compartment cover...
... needs charging when: • The low battery message is displayed: • The Handset seems completely dead, the LCD is HANDSET 1. Getting Started Installation of your phone. Place the new battery pack in the Handset with the metal contacts aligned with your i 5836 system will be sufficient. Replace the battery compartment cover...
User Manual
Page 11
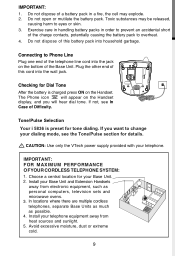
...a battery pack in a fire, the cell may be released, causing harm to overheat. 4. Plug the other end of Difficulty. CAUTION: Use only the VTech power supply provided with your telephone equipment away from electronic equipment, such as possible. 4. Do not dispose of this cord into the jack on the...Tone/Pulse Selection Your i 5836 is preset for Dial Tone After the battery is charged press ON on the Handset display, and you want to Phone Line Plug one end of the Base Unit. Connecting to change your Base Unit. 2. Install your Base Unit and Extension Handsets away from heat ...
...a battery pack in a fire, the cell may be released, causing harm to overheat. 4. Plug the other end of Difficulty. CAUTION: Use only the VTech power supply provided with your telephone equipment away from electronic equipment, such as possible. 4. Do not dispose of this cord into the jack on the...Tone/Pulse Selection Your i 5836 is preset for Dial Tone After the battery is charged press ON on the Handset display, and you want to Phone Line Plug one end of the Base Unit. Connecting to change your Base Unit. 2. Install your Base Unit and Extension Handsets away from heat ...

User Manual
Page 14
... Handset consists of the following : Charger Wall Belt Clip Handset Charger Mounting Bracket Handset Software CD- Your i 5836 system can operate up to rooms where a phone jack isn't available!
... Handset consists of the following : Charger Wall Belt Clip Handset Charger Mounting Bracket Handset Software CD- Your i 5836 system can operate up to rooms where a phone jack isn't available!

User Manual
Page 18
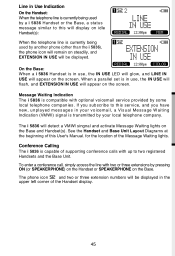
... Indicator • Indicates that the Base and Handset 2 are on an outside call. • Appears in use. It replaces phone on icon during phone on mode and parallel set in idle or phone on modes to it, indicating which extensions are using the line. Intercom Indicator • On steady with one or more...
... Indicator • Indicates that the Base and Handset 2 are on an outside call. • Appears in use. It replaces phone on icon during phone on mode and parallel set in idle or phone on modes to it, indicating which extensions are using the line. Intercom Indicator • On steady with one or more...
User Manual
Page 19
... being used by a Handset or Base of the i 5836 system. • Flashes when another telephone on the same line (parallel extension) is in use . Speaker Phone • Lights when Base Speakerphone is turned off. Handset LEDs LED Description Message Waiting • Lights to indicate that you have new voicemail messages. Service...
... being used by a Handset or Base of the i 5836 system. • Flashes when another telephone on the same line (parallel extension) is in use . Speaker Phone • Lights when Base Speakerphone is turned off. Handset LEDs LED Description Message Waiting • Lights to indicate that you have new voicemail messages. Service...
User Manual
Page 20
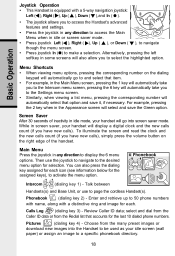
... will automatically take you to the Intercom menu screen, pressing the 6 key will automatically select that accounts for the last 10 dialed phone numbers. Choose from the Redial list that option and save the Green option. Talk between Handsets(s) and Base Unit, or use the... Down ( ), to navigate though the menu screen. • Press joystick In ( ) to make a selection. Calls Log (dialing key 3) - Enter and retrieve up to 50 phone numbers with name, along with a 5-way navigation joystick: Left ( ), Right ( ), Up ( ), Down ( ),and In ( ). • The joystick allows you to access...
... will automatically take you to the Intercom menu screen, pressing the 6 key will automatically select that accounts for the last 10 dialed phone numbers. Choose from the Redial list that option and save the Green option. Talk between Handsets(s) and Base Unit, or use the... Down ( ), to navigate though the menu screen. • Press joystick In ( ) to make a selection. Calls Log (dialing key 3) - Enter and retrieve up to 50 phone numbers with name, along with a 5-way navigation joystick: Left ( ), Right ( ), Up ( ), Down ( ),and In ( ). • The joystick allows you to access...

User Manual
Page 23
.... In order for details. • If you do not wish to assign a distinctive ring tone or image, press SAVE now. • If you wish the phone to alert you to calls from this number by pressing the 1 key or press the joystick twice. For Recordable Ringer, please refer to page 28..., press OK. • The screen will then be prompted to Enter Name. efault . • Press the joystick or to sample the ringer options. - NOTE: When phone book is full, pressing NEW, Phonebook is Full displays and an error tone sounds. • You will display: NOTE: If you do not wish to...
.... In order for details. • If you do not wish to assign a distinctive ring tone or image, press SAVE now. • If you wish the phone to alert you to calls from this number by pressing the 1 key or press the joystick twice. For Recordable Ringer, please refer to page 28..., press OK. • The screen will then be prompted to Enter Name. efault . • Press the joystick or to sample the ringer options. - NOTE: When phone book is full, pressing NEW, Phonebook is Full displays and an error tone sounds. • You will display: NOTE: If you do not wish to...

User Manual
Page 27
... returns you want to change the time. Register (dialing key 4) - You will be displayed on the bottom of the Handset screen. Choosing YES clears all phone numbers stored in or press the SAVE softkey. 25 This option allows you sure? This options will set the time to the icon. There are...
... returns you want to change the time. Register (dialing key 4) - You will be displayed on the bottom of the Handset screen. Choosing YES clears all phone numbers stored in or press the SAVE softkey. 25 This option allows you sure? This options will set the time to the icon. There are...

User Manual
Page 32
... directory. Additional image samples can be deleted and replaced by new ones. Within a few seconds, you have completed the image editing process, press Send to Phone and your computer (using the large connector) and Handset (using the small connector). You have a total of time. You can record 14 total images in...
... directory. Additional image samples can be deleted and replaced by new ones. Within a few seconds, you have completed the image editing process, press Send to Phone and your computer (using the large connector) and Handset (using the small connector). You have a total of time. You can record 14 total images in...

User Manual
Page 35
..., you to get the benefits of the most telephone service providers. scroll 33 In addition, the calling party may intentionally block their name and/or phone number from the Base As new Caller ID/Call Waiting ID records are subscription services, provided by most recently received call will alert you can... ID information of these features. Reviewing Caller ID from being sent. Calls Log Caller ID - If, for every call as new. After you answer the phone (Caller ID).
..., you to get the benefits of the most telephone service providers. scroll 33 In addition, the calling party may intentionally block their name and/or phone number from the Base As new Caller ID/Call Waiting ID records are subscription services, provided by most recently received call will alert you can... ID information of these features. Reviewing Caller ID from being sent. Calls Log Caller ID - If, for every call as new. After you answer the phone (Caller ID).

User Manual
Page 43
From the Base Unit • Press SPEAKERPHONE. Dial the phone number. -OR- • Dial the phone number first; then press SPEAKERPHONE. • Press SPEAKERPHONE to end your call. 41 From the Base Unit • Press SPEAKERPHONE or any key except OFF, ... your call. Answering Calls From the Handset • Pressing any of the dialing keys (0-9, * , #). • Press SPEAKERPHONE to use the Handset Speakerphone feature). Dial the phone number. -OR- • Dial the phone number first; Making Calls From the Handset • Press ON (or, SPEAKERPHONE to end your call.
From the Base Unit • Press SPEAKERPHONE. Dial the phone number. -OR- • Dial the phone number first; then press SPEAKERPHONE. • Press SPEAKERPHONE to end your call. 41 From the Base Unit • Press SPEAKERPHONE or any key except OFF, ... your call. Answering Calls From the Handset • Pressing any of the dialing keys (0-9, * , #). • Press SPEAKERPHONE to use the Handset Speakerphone feature). Dial the phone number. -OR- • Dial the phone number first; Making Calls From the Handset • Press ON (or, SPEAKERPHONE to end your call.

User Manual
Page 45
... call is placed on hold. You have 30 seconds to return to the call before it is dropped. NOTE: Base will display alternately. The phone will display Call On Hold Ring Back! NOTE: The Handset will ring to remind you have 30 seconds to return to the call is preset... held . ERPHONE LED will ring to indicate a call , press either the MUTE softkey on the Handset or the MUTE softkey on hold . The phone will display CALL ON HOLD RING BACK! The SPEAK- The Handset will disable the microphone. To return to normal twoway conversation. No frequency enhancement (Your...
... call is placed on hold. You have 30 seconds to return to the call before it is dropped. NOTE: Base will display alternately. The phone will display Call On Hold Ring Back! NOTE: The Handset will ring to remind you have 30 seconds to return to the call is preset... held . ERPHONE LED will ring to indicate a call , press either the MUTE softkey on the Handset or the MUTE softkey on hold . The phone will display CALL ON HOLD RING BACK! The SPEAK- The Handset will disable the microphone. To return to normal twoway conversation. No frequency enhancement (Your...
User Manual
Page 47
...will appear on the screen. Conference Calling The i 5836 is capable of supporting conference calls with optional voicemail service provided by another phone (other than the i 5836), the phone icon will remain on steadily, and EXTENSION IN USE will be displayed in the upper left corner of the Handset display. 45 The... phone icon and two or three extension numbers will appear on the screen. To enter a conference call, simply access the line with two or three ...
...will appear on the screen. Conference Calling The i 5836 is capable of supporting conference calls with optional voicemail service provided by another phone (other than the i 5836), the phone icon will remain on steadily, and EXTENSION IN USE will be displayed in the upper left corner of the Handset display. 45 The... phone icon and two or three extension numbers will appear on the screen. To enter a conference call, simply access the line with two or three ...
User Manual
Page 50
... may be too far from the telephone jack and connect a different phone. The phone doesn't work at 1-800-267-7377. at all the suggestions above. • If you have difficulty after trying these suggestions, call VTech Telecommunications Canada Ltd. Try moving the Base Unit to the Base, ...or relocate the Base Unit. • The layout of the other phones. Ringer Control in . • Make sure the telephone line cord...
... may be too far from the telephone jack and connect a different phone. The phone doesn't work at 1-800-267-7377. at all the suggestions above. • If you have difficulty after trying these suggestions, call VTech Telecommunications Canada Ltd. Try moving the Base Unit to the Base, ...or relocate the Base Unit. • The layout of the other phones. Ringer Control in . • Make sure the telephone line cord...
User Manual
Page 51
... Base volume control, raise the volume to the Base. 2. CL is set the day and time. If you still hear other calls while using your phone: • Disconnect your local telephone company.
... Base volume control, raise the volume to the Base. 2. CL is set the day and time. If you still hear other calls while using your phone: • Disconnect your local telephone company.
User Manual
Page 58
... inspection authority or electrician as appropriate. Any repairs or alterations made by an authorized Canadian maintenance facility designated by the FCC and IC. Your Cordless Phone is designed to disconnect the equipment.
... inspection authority or electrician as appropriate. Any repairs or alterations made by an authorized Canadian maintenance facility designated by the FCC and IC. Your Cordless Phone is designed to disconnect the equipment.

User Manual
Page 59
....5 grams (excluding Battery Pack) Charger: 292 grams Base: 396 grams POWER REQUIREMENTS Handset: 2.4V 1400mAh NiMH Battery Pack Base: 7 VDC @ 900mA Charger: 6 VDC @ 300mA MEMORY Phone Book: 50 Memory locations; up to 32 digits per location CID: 50 Memory locations SPECIFICATIONS ARE TYPICAL AND MAY CHANGE WITHOUT NOTICE. 57
....5 grams (excluding Battery Pack) Charger: 292 grams Base: 396 grams POWER REQUIREMENTS Handset: 2.4V 1400mAh NiMH Battery Pack Base: 7 VDC @ 900mA Charger: 6 VDC @ 300mA MEMORY Phone Book: 50 Memory locations; up to 32 digits per location CID: 50 Memory locations SPECIFICATIONS ARE TYPICAL AND MAY CHANGE WITHOUT NOTICE. 57


