
User Manual
Page 1
User's Manual BLISTER THE VELOCIRAPTORTM © 2013 VTech Printed in China 91-009642-000 US
User's Manual BLISTER THE VELOCIRAPTORTM © 2013 VTech Printed in China 91-009642-000 US

User Manual
Page 2
...my wild life as a dinosaur! Maybe you all about to hear me make awesome sounds! You're going to check out the rest of the VTech® Switch & Go Dinos® crew! Your pal, Blister the Velociraptor™ And remember, with me you can you help me do other cool things, too! Not ...only can help me do some dino switchin', high-flying fun! For more fun, be sure to love playing ...
...my wild life as a dinosaur! Maybe you all about to hear me make awesome sounds! You're going to check out the rest of the VTech® Switch & Go Dinos® crew! Your pal, Blister the Velociraptor™ And remember, with me you can you help me do other cool things, too! Not ...only can help me do some dino switchin', high-flying fun! For more fun, be sure to love playing ...

User Manual
Page 3
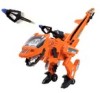
... keep up with me as tough as any dino. you - Volume Button Style Button Launch Button LCD Screen Searchlight Button Sound Button Talk Button Propeller Button ON/OFF Switch 2 I 'm fast and ferocious with my searchlight shining down from above. Introduction INTRODUCTION My name is Blister the VelociraptorTM, and I'm looking for it to hide...
... keep up with me as tough as any dino. you - Volume Button Style Button Launch Button LCD Screen Searchlight Button Sound Button Talk Button Propeller Button ON/OFF Switch 2 I 'm fast and ferocious with my searchlight shining down from above. Introduction INTRODUCTION My name is Blister the VelociraptorTM, and I'm looking for it to hide...

User Manual
Page 4
... the user's manual as tape, plastic sheets, packaging locks and tags are not part of the unit. Getting Started INCLUDED IN THIS PACKAGE • One VTech® SWITCH & GO DINOS®: Blister the VelociraptorTM • One user's manual WARNING: All packing materials, such as it contains important information.
... the user's manual as tape, plastic sheets, packaging locks and tags are not part of the unit. Getting Started INCLUDED IN THIS PACKAGE • One VTech® SWITCH & GO DINOS®: Blister the VelociraptorTM • One user's manual WARNING: All packing materials, such as it contains important information.

User Manual
Page 5
zinc) or rechargeable (Ni-Cd, Ni-MH), or new and used batteries. • Do not use damaged batteries. • Insert batteries with the correct polarity. • Do not short-circuit the battery terminals. • Remove exhausted batteries from the toy before charging (if removable). • Rechargeable batteries are only to be charged under adult supervision. 4 Battery Notice BATTERY NOTICE • Use new alkaline batteries for maximum performance. • Use only batteries of the same or equivalent type as recommended. • Do not mix different types of batteries in fire. •...
zinc) or rechargeable (Ni-Cd, Ni-MH), or new and used batteries. • Do not use damaged batteries. • Insert batteries with the correct polarity. • Do not short-circuit the battery terminals. • Remove exhausted batteries from the toy before charging (if removable). • Rechargeable batteries are only to be charged under adult supervision. 4 Battery Notice BATTERY NOTICE • Use new alkaline batteries for maximum performance. • Use only batteries of the same or equivalent type as recommended. • Do not mix different types of batteries in fire. •...
User Manual
Page 6
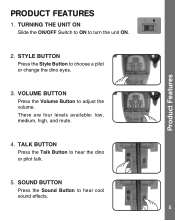
Product Features PRODUCT FEATURES 1. STYLE BUTTON Press the Style Button to turn the unit ON. 2. TURNING THE UNIT ON Slide the ON/OFF Switch to ON to choose a pilot or change the dino eyes. 3. SOUND BUTTON Press the Sound Button to adjust the volume. There are four levels available: low, medium, high, and mute. 4. VOLUME BUTTON Press the Volume Button to hear cool sound effects. 5 TALK BUTTON Press the Talk Button to hear the dino or pilot talk. 5.
Product Features PRODUCT FEATURES 1. STYLE BUTTON Press the Style Button to turn the unit ON. 2. TURNING THE UNIT ON Slide the ON/OFF Switch to ON to choose a pilot or change the dino eyes. 3. SOUND BUTTON Press the Sound Button to adjust the volume. There are four levels available: low, medium, high, and mute. 4. VOLUME BUTTON Press the Volume Button to hear cool sound effects. 5 TALK BUTTON Press the Talk Button to hear the dino or pilot talk. 5.

User Manual
Page 7
LAUNCH BUTTON Press the Launch Button to spin the propeller. 9. To preserve battery life, the unit will automatically power-off after several minutes without input. 6 PROPELLER BUTTON Press the Propeller Button to launch the rocket. 8. MOTION SENSOR Move the helicopter through the air to hear fun flying sounds! 10.TURNING THE UNIT OFF/ AUTOMATIC SHUT-OFF Slide the ON/OFF switch to OFF or hold the Talk Button for a few seconds to turn the unit OFF. SEARCHLIGHT BUTTON Press the Searchlight Button to turn on the searchlight. 7. Product Features 6.
LAUNCH BUTTON Press the Launch Button to spin the propeller. 9. To preserve battery life, the unit will automatically power-off after several minutes without input. 6 PROPELLER BUTTON Press the Propeller Button to launch the rocket. 8. MOTION SENSOR Move the helicopter through the air to hear fun flying sounds! 10.TURNING THE UNIT OFF/ AUTOMATIC SHUT-OFF Slide the ON/OFF switch to OFF or hold the Talk Button for a few seconds to turn the unit OFF. SEARCHLIGHT BUTTON Press the Searchlight Button to turn on the searchlight. 7. Product Features 6.

User Manual
Page 8
Fold the wings up as far as it 's facing towards the dino's head. 7 Lift the tail up . 3. Flip the legs down . 4. Turn the feet down . 5. it forward so that it will go. Helicopter shape. 2. Fold up the propeller and turn 6. HOW TO SWITCH THE HELICOPTER TO A DINO How to Switch 1.
Fold the wings up as far as it 's facing towards the dino's head. 7 Lift the tail up . 3. Flip the legs down . 4. Turn the feet down . 5. it forward so that it will go. Helicopter shape. 2. Fold up the propeller and turn 6. HOW TO SWITCH THE HELICOPTER TO A DINO How to Switch 1.

User Manual
Page 9
it rests within the tail. Move the head down so that of the steps above. 8 Unfold the arms. 10. Flip the propeller down and the 12. How to Switch 9. rocket launcher up. Note: To change the dino back into a helicopter, reverse the order of the tail back. Move the arms down. 11. Turn the rear wing at the end 8. Dinosaur shape. 7.
it rests within the tail. Move the head down so that of the steps above. 8 Unfold the arms. 10. Flip the propeller down and the 12. How to Switch 9. rocket launcher up. Note: To change the dino back into a helicopter, reverse the order of the tail back. Move the arms down. 11. Turn the rear wing at the end 8. Dinosaur shape. 7.

User Manual
Page 10
TROUBLESHOOTING If for a few minutes, then replace the batteries. 4. Turn the unit ON. Keep the unit out of time. 4. Care & Maintenance / Troubleshooting CARE & MAINTENANCE 1. Do not drop the unit on hard surfaces and do not expose the unit to play again. 5. The unit should now be happy to help you. 9 or 1-877-352-8697 in Canada, and a service representative will be ready to moisture or water. Please turn the unit OFF. 2. Keep the unit clean by removing the batteries. 3. If the product still does not work, replace with a slightly damp cloth. 2. Interrupt the power ...
TROUBLESHOOTING If for a few minutes, then replace the batteries. 4. Turn the unit ON. Keep the unit out of time. 4. Care & Maintenance / Troubleshooting CARE & MAINTENANCE 1. Do not drop the unit on hard surfaces and do not expose the unit to play again. 5. The unit should now be happy to help you. 9 or 1-877-352-8697 in Canada, and a service representative will be ready to moisture or water. Please turn the unit OFF. 2. Keep the unit clean by removing the batteries. 3. If the product still does not work, replace with a slightly damp cloth. 2. Interrupt the power ...

User Manual
Page 11
These limits are designed to Part 15 of the following measures: • Reorient or relocate the receiving antenna • Increase the separation between the equipment and receiver • Connect the equipment into an outlet on , the user is no guarantee that to which the receiver is connected • Consult the dealer or an experienced radio/TV technician for help Caution: changes or modifications not expressly approved by one or more of the FCC Rules. Note THIS DEVICE COMPLIES WITH PART 15 OF THE FCC RULES. However, there is encouraged to try to correct the interference by the ...
These limits are designed to Part 15 of the following measures: • Reorient or relocate the receiving antenna • Increase the separation between the equipment and receiver • Connect the equipment into an outlet on , the user is no guarantee that to which the receiver is connected • Consult the dealer or an experienced radio/TV technician for help Caution: changes or modifications not expressly approved by one or more of the FCC Rules. Note THIS DEVICE COMPLIES WITH PART 15 OF THE FCC RULES. However, there is encouraged to try to correct the interference by the ...