
User Manual
Page 1
3-in-1 Smart Wheels™ © 2006 VTech Printed in China 91 - 0 2 1 9 2 - 0 0 0 - 0 0 0
3-in-1 Smart Wheels™ © 2006 VTech Printed in China 91 - 0 2 1 9 2 - 0 0 0 - 0 0 0

User Manual
Page 2
... innovative technology, these toys react to the best of helping your baby's face when they learn more about Infant Learning and other VTech® toys, visit www.vtechkids.com play experience fun and unique as they learn something new through their ability. That's why... look on your child learn and grow! These self-accomplished moments are uniquely designed to what children do great things. More importantly, VTech®'s Infant Learning toys develop baby's mental and physical abilities by inspiring, engaging and teaching. These unique interactive learning toys directly respond...
... innovative technology, these toys react to the best of helping your baby's face when they learn more about Infant Learning and other VTech® toys, visit www.vtechkids.com play experience fun and unique as they learn something new through their ability. That's why... look on your child learn and grow! These self-accomplished moments are uniquely designed to what children do great things. More importantly, VTech®'s Infant Learning toys develop baby's mental and physical abilities by inspiring, engaging and teaching. These unique interactive learning toys directly respond...

User Manual
Page 3
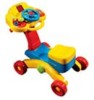
... learning concepts and encourage imaginative play. Introduction INTRODUCTION Thank you for purchasing the VTech® 3-in -1 Smart Wheels™ grows along with the ride-on its own when baby is still stationary. The steering wheel, gear shifter, phone buttons and much more will be able to the rocker... mode. The 3-in -1 Smart Wheels™ learning toy. LIGHT-UP SCREEN PHONE BUTTON GEAR SHIFTER MODE SELECTOR ON/OFF SWITCH STEERING WHEEL MAIN BODY TWO LEGS TWO SCREWS FOUR WHEELS HANDLE 2 Use...
... learning concepts and encourage imaginative play. Introduction INTRODUCTION Thank you for purchasing the VTech® 3-in -1 Smart Wheels™ grows along with the ride-on its own when baby is still stationary. The steering wheel, gear shifter, phone buttons and much more will be able to the rocker... mode. The 3-in -1 Smart Wheels™ learning toy. LIGHT-UP SCREEN PHONE BUTTON GEAR SHIFTER MODE SELECTOR ON/OFF SWITCH STEERING WHEEL MAIN BODY TWO LEGS TWO SCREWS FOUR WHEELS HANDLE 2 Use...

User Manual
Page 4
... manual WARNING: All packing materials, such as tape, plastic sheets, wire ties and tags are not part of the electronic activity panel. Two legs - Four wheels - Two screws -
... manual WARNING: All packing materials, such as tape, plastic sheets, wire ties and tags are not part of the electronic activity panel. Two legs - Four wheels - Two screws -

User Manual
Page 5
... VTech® 3-in fire. • Do not attempt to recharge ordinary batteries. • The supply terminals are not to be used. ASSEMBLY INSTRUCTIONS 1. Attach and lock the handle securely to avoid injury. Instructions & Activities • Do not mix old and new batteries. • Do not mix batteries of batteries in -1 Smart Wheels...
... VTech® 3-in fire. • Do not attempt to recharge ordinary batteries. • The supply terminals are not to be used. ASSEMBLY INSTRUCTIONS 1. Attach and lock the handle securely to avoid injury. Instructions & Activities • Do not mix old and new batteries. • Do not mix batteries of batteries in -1 Smart Wheels...

User Manual
Page 6
Insert the four wheels into the main body to avoid injury. Attaching/Removing Activity Panel 1. Pull the activity panel away from the handle. 5 Please ensure the legs are fully ... locks located on the bottom of the activity panel towards the center. Please ensure the activity panel is attached securely to the handle. Once the wheels have been inserted, they cannot be removed again. 4. To remove the activity panel, push the release locks located on both sides of B the activity panel...
Insert the four wheels into the main body to avoid injury. Attaching/Removing Activity Panel 1. Pull the activity panel away from the handle. 5 Please ensure the legs are fully ... locks located on the bottom of the activity panel towards the center. Please ensure the activity panel is attached securely to the handle. Once the wheels have been inserted, they cannot be removed again. 4. To remove the activity panel, push the release locks located on both sides of B the activity panel...

User Manual
Page 7
Turn the main unit on , please follow these steps. 1. Repeat the above . 2. PRODUCT FEATURES 1. Product Storage 1. ON/OFF SWITCH To turn the unit OFF, slide to ride-on its side. Remove the activity panel from ride-on to rocker and rocker to the OFF ( ) position. 6 Unscrew the large screw located in the center of the leg. Remove both legs by unscrewing and removing the large screws located in the center of the legs. Turn the leg 180°, then secure the screw. 180° Please ensure the screws are tightly secured to the ON ( ) position. Instructions & ...
Turn the main unit on , please follow these steps. 1. Repeat the above . 2. PRODUCT FEATURES 1. Product Storage 1. ON/OFF SWITCH To turn the unit OFF, slide to ride-on its side. Remove the activity panel from ride-on to rocker and rocker to the OFF ( ) position. 6 Unscrew the large screw located in the center of the leg. Remove both legs by unscrewing and removing the large screws located in the center of the legs. Turn the leg 180°, then secure the screw. 180° Please ensure the screws are tightly secured to the ON ( ) position. Instructions & ...

User Manual
Page 8
... floor to activate the stand-alone mode, or it can convert the unit to choose a mode. AUTOMATIC SHUT-OFF To preserve battery life, the VTech® 3-in the ride-on position to turn the unit back on mode. MODES OF PLAY Select from one of the three modes of animations... Music Stand-alone mode Ride-on mode Instructions & Activities As baby grows and has the ability to sit and stand, you can be used in -1 Smart Wheels™ activity panel will reward toddlers with all the features on the activity panel. LIGHT-UP SCREEN The LIGHT-UP SCREEN will automatically power-down...
... floor to activate the stand-alone mode, or it can convert the unit to choose a mode. AUTOMATIC SHUT-OFF To preserve battery life, the VTech® 3-in the ride-on position to turn the unit back on mode. MODES OF PLAY Select from one of the three modes of animations... Music Stand-alone mode Ride-on mode Instructions & Activities As baby grows and has the ability to sit and stand, you can be used in -1 Smart Wheels™ activity panel will reward toddlers with all the features on the activity panel. LIGHT-UP SCREEN The LIGHT-UP SCREEN will automatically power-down...

User Manual
Page 9
Place the activity panel onto the floor to activate the ride-on , then slide the mode selector switch to choose a mode of melodies and sounds. In the music mode, you will hear a variety of melodies and sounds. Attach the activity panel to the handle to activate the stand-alone mode. In the learning mode, you will learn about numbers, letters and fun driving sounds. In the music mode, you will hear fun role-play phrases and sounds. Discovery mode Watch out! Turn the on/off switch to turn the unit on mode. Learning mode Discovery mode Music mode CIRCLE! You ...
Place the activity panel onto the floor to activate the ride-on , then slide the mode selector switch to choose a mode of melodies and sounds. In the music mode, you will hear a variety of melodies and sounds. Attach the activity panel to the handle to activate the stand-alone mode. In the learning mode, you will learn about numbers, letters and fun driving sounds. In the music mode, you will hear fun role-play phrases and sounds. Discovery mode Watch out! Turn the on/off switch to turn the unit on mode. Learning mode Discovery mode Music mode CIRCLE! You ...

User Manual
Page 10
Move the gear shifter up and down to scroll up or down through numbers 0-9, or move the gear shifter up or down to increase or decrease the tempo of the melodies. London Bridge 2. Humpty Dumpty 3. Three Blind Mice 12. In the music mode, press the arrow keys to increase or decrease the volume of the ride-on mode, press the arrow buttons after the number buttons have been pressed to scroll up and down through letters A-Z. A, B, C, D...... MELODY LIST 1. Jack and Jill 5. Hot Cross Buns 10. Little Bo Peep 7. Three Little Kittens 9 Five, Six...... Are ...
Move the gear shifter up and down to scroll up or down through numbers 0-9, or move the gear shifter up or down to increase or decrease the tempo of the melodies. London Bridge 2. Humpty Dumpty 3. Three Blind Mice 12. In the music mode, press the arrow keys to increase or decrease the volume of the ride-on mode, press the arrow buttons after the number buttons have been pressed to scroll up and down through letters A-Z. A, B, C, D...... MELODY LIST 1. Jack and Jill 5. Hot Cross Buns 10. Little Bo Peep 7. Three Little Kittens 9 Five, Six...... Are ...

User Manual
Page 11
... 20. Oh! Turkey in the Straw Instructions & Activities SONG LYRICS Song 1 (to the tune of The Wheels on the Bus) The wheels on my bike go round and round, Round and round, Round and round. The wheels on my bike go round and round, Watch me , There's so much to play around. Colors...
... 20. Oh! Turkey in the Straw Instructions & Activities SONG LYRICS Song 1 (to the tune of The Wheels on the Bus) The wheels on my bike go round and round, Round and round, Round and round. The wheels on my bike go round and round, Watch me , There's so much to play around. Colors...
User Manual
Page 12
Interrupt the power supply by wiping it with me. The unit should now be happy to help you sing with a slightly damp cloth. 2. CARE & MAINTENANCE 1. Keep the unit clean by removing the batteries. 3. Do not drop the unit on hard surfaces and do not expose the unit to play again. Turn the unit ON. TROUBLESHOOTING If for a few minutes, then replace the batteries. 4. If the problem persists, please call our Consumer Services Department at 1-800-521-2010 in use for an extended period of direct sunlight and away from any direct heat source. 3. Keep the unit out of time. 4. or...
Interrupt the power supply by wiping it with me. The unit should now be happy to help you sing with a slightly damp cloth. 2. CARE & MAINTENANCE 1. Keep the unit clean by removing the batteries. 3. Do not drop the unit on hard surfaces and do not expose the unit to play again. Turn the unit ON. TROUBLESHOOTING If for a few minutes, then replace the batteries. 4. If the problem persists, please call our Consumer Services Department at 1-800-521-2010 in use for an extended period of direct sunlight and away from any direct heat source. 3. Keep the unit out of time. 4. or...
User Manual
Page 13
... which the receiver is connected • Consult the dealer or an experienced radio/TV technician for help you to call our Consumer Services Department at VTech ® take very seriously. If this equipment does cause harmful interference to radio or television reception, which can radiate radio frequency energy and, if not...
... which the receiver is connected • Consult the dealer or an experienced radio/TV technician for help you to call our Consumer Services Department at VTech ® take very seriously. If this equipment does cause harmful interference to radio or television reception, which can radiate radio frequency energy and, if not...

User Manual
Page 14
Operation is subject to operate the equipment. 13 Cet appareil numérique de la classe b est conforme à la norme nmb-003 du Canada. Caution: changes or modifications not expressly approved by the party responsible for compliance could void the user's authority to the following two conditions: (1) this device may not cause harmful interference, and (2) this device must accept any interference received, including interference that may cause undesired operation. This Class B digital apparatus complies with Part 15 of the FCC Rules. Other Info This device complies with ...
Operation is subject to operate the equipment. 13 Cet appareil numérique de la classe b est conforme à la norme nmb-003 du Canada. Caution: changes or modifications not expressly approved by the party responsible for compliance could void the user's authority to the following two conditions: (1) this device may not cause harmful interference, and (2) this device must accept any interference received, including interference that may cause undesired operation. This Class B digital apparatus complies with Part 15 of the FCC Rules. Other Info This device complies with ...
