
User Manual English
Page 2
... to constitute a risk of time. • Refer all instructions. • Do not use attachments/accessories specified by the manufacturer. • se only with the cart, stand, tripod, bracket, or table specified by qualified service personnel only. The manufacturer's warranty does not cover user abuse or improper installations. • The power cord...
... to constitute a risk of time. • Refer all instructions. • Do not use attachments/accessories specified by the manufacturer. • se only with the cart, stand, tripod, bracket, or table specified by qualified service personnel only. The manufacturer's warranty does not cover user abuse or improper installations. • The power cord...
User Manual English
Page 66
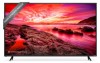
S ecifications B Screen Si e ie able Area Dimensions Stand Dimensions o Stand Weight Stand o Stand LCD Bac light Refresh Rate Clear Action aximum Resolution Dynamic Contrast Ratio ixel itch ie ing Angle D I In uts Com onent ideo In uts USB ...
S ecifications B Screen Si e ie able Area Dimensions Stand Dimensions o Stand Weight Stand o Stand LCD Bac light Refresh Rate Clear Action aximum Resolution Dynamic Contrast Ratio ixel itch ie ing Angle D I In uts Com onent ideo In uts USB ...

User Manual English
Page 67
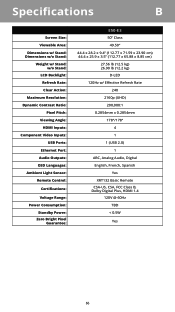
B Screen Si e ie able Area Dimensions Stand Dimensions o Stand Weight Stand o Stand LCD Bac light Refresh Rate aximum Resolution ixel itch ie ing Angle D I In uts Com onent ideo In uts USB orts Ethernet ort Audio Out ...
B Screen Si e ie able Area Dimensions Stand Dimensions o Stand Weight Stand o Stand LCD Bac light Refresh Rate aximum Resolution ixel itch ie ing Angle D I In uts Com onent ideo In uts USB orts Ethernet ort Audio Out ...

User Manual English
Page 68
B Screen Si e ie able Area Dimensions Stand Dimensions o Stand Weight Stand o Stand LCD Bac light Active LED ones Refresh Rate Clear Action aximum Resolution Dynamic Contrast Ratio ixel itch ie ing Angle D I In uts Com onent ideo ...
B Screen Si e ie able Area Dimensions Stand Dimensions o Stand Weight Stand o Stand LCD Bac light Active LED ones Refresh Rate Clear Action aximum Resolution Dynamic Contrast Ratio ixel itch ie ing Angle D I In uts Com onent ideo ...

User Manual English
Page 69
B Screen Si e ie able Area Dimensions Stand Dimensions o Stand Weight Stand o Stand LCD Bac light Refresh Rate aximum Resolution Dynamic Contrast Ratio ixel itch ie ing Angle D I In uts Com onent ideo In uts USB orts Ethernet ...
B Screen Si e ie able Area Dimensions Stand Dimensions o Stand Weight Stand o Stand LCD Bac light Refresh Rate aximum Resolution Dynamic Contrast Ratio ixel itch ie ing Angle D I In uts Com onent ideo In uts USB orts Ethernet ...
User Manual English
Page 70
B Screen Si e ie able Area Dimensions Stand Dimensions o Stand Weight Stand o Stand LCD Bac light Refresh Rate aximum Resolution Dynamic Contrast Ratio ixel itch ie ing Angle D I In uts Com onent ideo In uts USB orts Ethernet ...
B Screen Si e ie able Area Dimensions Stand Dimensions o Stand Weight Stand o Stand LCD Bac light Refresh Rate aximum Resolution Dynamic Contrast Ratio ixel itch ie ing Angle D I In uts Com onent ideo In uts USB orts Ethernet ...
User Manual English
Page 71
B Screen Si e ie able Area Dimensions Stand Dimensions o Stand Weight Stand o Stand LCD Bac light Active LED ones Refresh Rate aximum Resolution Dynamic Contrast Ratio Clear Action ixel itch ie ing Angle D I In uts Com onent ideo ...
B Screen Si e ie able Area Dimensions Stand Dimensions o Stand Weight Stand o Stand LCD Bac light Active LED ones Refresh Rate aximum Resolution Dynamic Contrast Ratio Clear Action ixel itch ie ing Angle D I In uts Com onent ideo ...
User Manual English
Page 72
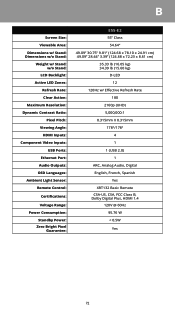
S, CSA, FCC Class B, Dolby Digital Plus, HDMI 1. 120V @ 60Hz 95.76 W < 0.5W es 72 B Screen Si e ie able Area Dimensions Stand Dimensions o Stand Weight Stand o Stand LCD Bac light Active LED ones Refresh Rate Clear Action aximum Resolution Dynamic Contrast Ratio ixel itch ie ing Angle D I In uts Com onent ideo ...
S, CSA, FCC Class B, Dolby Digital Plus, HDMI 1. 120V @ 60Hz 95.76 W < 0.5W es 72 B Screen Si e ie able Area Dimensions Stand Dimensions o Stand Weight Stand o Stand LCD Bac light Active LED ones Refresh Rate Clear Action aximum Resolution Dynamic Contrast Ratio ixel itch ie ing Angle D I In uts Com onent ideo ...

User Manual English
Page 73
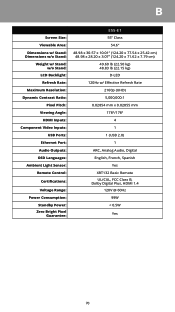
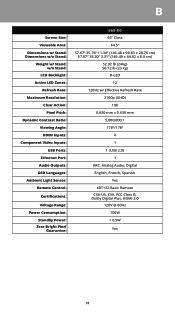
S, CSA, FCC Class B, Dolby Digital Plus, HDMI 1. 120V @ 60Hz 74.7 W < 0.5W es 73 B Screen Si e ie able Area Dimensions Stand Dimensions o Stand Weight Stand o Stand LCD Bac light Refresh Rate aximum Resolution Clear Action ixel itch Dynamic Contrast Ratio ie ing Angle D I In uts Com onent ideo In uts USB ...
S, CSA, FCC Class B, Dolby Digital Plus, HDMI 1. 120V @ 60Hz 74.7 W < 0.5W es 73 B Screen Si e ie able Area Dimensions Stand Dimensions o Stand Weight Stand o Stand LCD Bac light Refresh Rate aximum Resolution Clear Action ixel itch Dynamic Contrast Ratio ie ing Angle D I In uts Com onent ideo In uts USB ...
User Manual English
Page 74
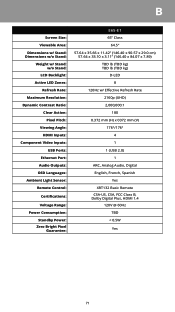
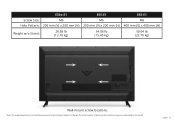
S, CSA, FCC Class B, Dolby Digital Plus, HDMI 2.0 120V @ 60Hz 106W < 0.5W es 74 B Screen Si e ie able Area Dimensions Stand Dimensions o Stand Weight Stand o Stand LCD Bac light Active LED ones Refresh Rate aximum Resolution Clear Action ixel itch Dynamic Contrast Ratio ie ing Angle D I In uts Com onent ideo ... orts Ethernet ort Audio Out uts OSD Languages Ambient Light Sensor Remote Control Certifications oltage Range o er Consum tion Standby o er ero Bright ixel uarantee E65-E0 65" Class 64.5" 57.67" 35.76" 11.34" (146.48 x 90.83 x 28.75 cm) 57.67" 33.20" 3.31" (146.48 x 84...
S, CSA, FCC Class B, Dolby Digital Plus, HDMI 2.0 120V @ 60Hz 106W < 0.5W es 74 B Screen Si e ie able Area Dimensions Stand Dimensions o Stand Weight Stand o Stand LCD Bac light Active LED ones Refresh Rate aximum Resolution Clear Action ixel itch Dynamic Contrast Ratio ie ing Angle D I In uts Com onent ideo ... orts Ethernet ort Audio Out uts OSD Languages Ambient Light Sensor Remote Control Certifications oltage Range o er Consum tion Standby o er ero Bright ixel uarantee E65-E0 65" Class 64.5" 57.67" 35.76" 11.34" (146.48 x 90.83 x 28.75 cm) 57.67" 33.20" 3.31" (146.48 x 84...
Quickstart Guide English
Page 2
... apparatus has been exposed to avoid injury from the apparatus. • Only use attachments/accessories specified by the manufacturer. • Use only with the cart, stand, tripod, bracket, or table specified by the manufacturer, or sold with dry cloth. • Do not block any way, such as a radiator, heater, oven, amplifier...
... apparatus has been exposed to avoid injury from the apparatus. • Only use attachments/accessories specified by the manufacturer. • Use only with the cart, stand, tripod, bracket, or table specified by the manufacturer, or sold with dry cloth. • Do not block any way, such as a radiator, heater, oven, amplifier...
Quickstart Guide English
Page 4
... This is your basic remote 6 Inserting and replacing batteries 7 Using your smartphone or tablet as a remote 8 Minimum Recommended Requirements 9 Installing the Display Stands 10 First-Time Setup...12 Pairing your mobile device 16 Pairing Via Wi-Fi...17 Getting started with Google Cast 18 How to cast content... 19 Getting started with the VIZIO SmartCast app 20 Account Setup...20 Selecting a Cast device 21 Basic Display functions 22 Category Pages...23 Wall-mounting the Display 24 ...
... This is your basic remote 6 Inserting and replacing batteries 7 Using your smartphone or tablet as a remote 8 Minimum Recommended Requirements 9 Installing the Display Stands 10 First-Time Setup...12 Pairing your mobile device 16 Pairing Via Wi-Fi...17 Getting started with Google Cast 18 How to cast content... 19 Getting started with the VIZIO SmartCast app 20 Account Setup...20 Selecting a Cast device 21 Basic Display functions 22 Category Pages...23 Wall-mounting the Display 24 ...

Quickstart Guide English
Page 5
Package Contents Home Theater Display Display Stands 4 x Phillips Screws VIZIO INSTALLATION GUIDE Please read this guide before using the product. Multi-Language Basic Remote Installation Guide w/Batteries Power Cable English - 5
Package Contents Home Theater Display Display Stands 4 x Phillips Screws VIZIO INSTALLATION GUIDE Please read this guide before using the product. Multi-Language Basic Remote Installation Guide w/Batteries Power Cable English - 5
Quickstart Guide English
Page 10
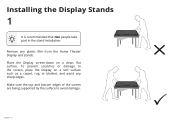
To prevent scratches or damage to avoid damage. Make sure the top and bottom edges of the screen are being supported by the surface to the screen, place the Display on a clean, flat surface. English - 10 Î P Remove any sharp edges. Installing the Display Stands 1 It is recommended that two people take part in the stand installation. Place the Display screen-down on a soft surface such as a carpet, rug, or blanket, and avoid any plastic film from the Home Theater Display and stands.
To prevent scratches or damage to avoid damage. Make sure the top and bottom edges of the screen are being supported by the surface to the screen, place the Display on a clean, flat surface. English - 10 Î P Remove any sharp edges. Installing the Display Stands 1 It is recommended that two people take part in the stand installation. Place the Display screen-down on a soft surface such as a carpet, rug, or blanket, and avoid any plastic film from the Home Theater Display and stands.

Quickstart Guide English
Page 11
The actual number of ports and their locations may be subject to the Display with two (2) Phillips screws (included). Note: The image shown here is for illustrative purposes only and may vary, depending on a stable, level surface. When you are identical.) Secure each stand to change. English - 11 Insert the screws into the base of the Display. (The stands are finished, place the Display on the model. 2 Insert the stands into the back of the Display and tighten them using a Phillips screwdriver.
The actual number of ports and their locations may be subject to the Display with two (2) Phillips screws (included). Note: The image shown here is for illustrative purposes only and may vary, depending on a stable, level surface. When you are identical.) Secure each stand to change. English - 11 Insert the screws into the base of the Display. (The stands are finished, place the Display on the model. 2 Insert the stands into the back of the Display and tighten them using a Phillips screwdriver.
Quickstart Guide English
Page 24
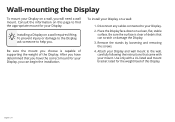
... the Display. 3. English - 24 Wall-mounting the Display To mount your Display on a wall requires lifting. Place the Display face-down on a wall: 1. Remove the stands by loosening and removing the screws. 4. Attach your Display and wall mount to the wall, carefully following the instructions that can begin the installation. To...
... the Display. 3. English - 24 Wall-mounting the Display To mount your Display on a wall requires lifting. Place the Display face-down on a wall: 1. Remove the stands by loosening and removing the screws. 4. Attach your Display and wall mount to the wall, carefully following the instructions that can begin the installation. To...
Quickstart Guide English
Page 25
English - 25 Note: The image shown here is for illustrative purposes only and may vary, depending on the model. The actual number of ports and their locations may be subject to change. Screw Size: Hole Pattern: E50x-E1 M6 200 mm (V) x 200 mm (H) E55-E1 M6 200 mm (V) x 200 mm (H) E65-E1 M6 400 mm (V) x 400 mm (H) Weight w/o Stand: 26.68 lb (12.10 kg) 34.06 lb (15.45 kg) 50.04 lb (22.70 kg) Wall-mount screw locations.
English - 25 Note: The image shown here is for illustrative purposes only and may vary, depending on the model. The actual number of ports and their locations may be subject to change. Screw Size: Hole Pattern: E50x-E1 M6 200 mm (V) x 200 mm (H) E55-E1 M6 200 mm (V) x 200 mm (H) E65-E1 M6 400 mm (V) x 400 mm (H) Weight w/o Stand: 26.68 lb (12.10 kg) 34.06 lb (15.45 kg) 50.04 lb (22.70 kg) Wall-mount screw locations.


