
User Manual
Page 2
... APP INSTALL...7 Connecting Your IP Camera with the Vivitar CaptureCam2 Mobile Application 8 INTRODUCTION ...8 INITIAL SETUP: CONNECTING YOUR CAMERA TO THE APP ...9 Using CaptureCam2 ...13 HOME SCREEN ...13 LIVE CAMERA VIEW - FULL SCREEN...19 CAPTURED DATA ...22 SETTINGS ...Troubleshooting...28 Technical Support...30 Sakar Warranty Card...30 1 TABLE OF CONTENTS Introduction ...2 Features ...2 What's Included...3 Parts of the Camera ...4 Initial Camera Setup...5 INSTALLING THE MEMORY CARD ...5 TURNING ON AND USING THE CAPTURE CAM ...5 CAMERA RESTART...6 INDICATOR LIGHT ...6 Initial Mobile Device...
... APP INSTALL...7 Connecting Your IP Camera with the Vivitar CaptureCam2 Mobile Application 8 INTRODUCTION ...8 INITIAL SETUP: CONNECTING YOUR CAMERA TO THE APP ...9 Using CaptureCam2 ...13 HOME SCREEN ...13 LIVE CAMERA VIEW - FULL SCREEN...19 CAPTURED DATA ...22 SETTINGS ...Troubleshooting...28 Technical Support...30 Sakar Warranty Card...30 1 TABLE OF CONTENTS Introduction ...2 Features ...2 What's Included...3 Parts of the Camera ...4 Initial Camera Setup...5 INSTALLING THE MEMORY CARD ...5 TURNING ON AND USING THE CAPTURE CAM ...5 CAMERA RESTART...6 INDICATOR LIGHT ...6 Initial Mobile Device...
User Manual
Page 4
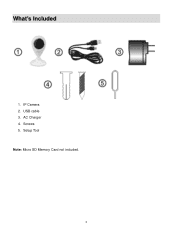
AC Charger 4. USB cable 3. Screws 5. Setup Tool Note: Micro SD Memory Card not included. 3 IP Camera 2. What's Included 1.
AC Charger 4. USB cable 3. Screws 5. Setup Tool Note: Micro SD Memory Card not included. 3 IP Camera 2. What's Included 1.

User Manual
Page 6
... as shown in your Capture Cam. Gently press the Micro SD Card until you can connect the USB cable from the power source. 5 Initial Camera Setup INSTALLING THE MEMORY CARD Make sure a Micro SD Memory card (up to 32 GB) has been properly inserted into a power socket. Micro SD Memory card...
... as shown in your Capture Cam. Gently press the Micro SD Card until you can connect the USB cable from the power source. 5 Initial Camera Setup INSTALLING THE MEMORY CARD Make sure a Micro SD Memory card (up to 32 GB) has been properly inserted into a power socket. Micro SD Memory card...

User Manual
Page 7
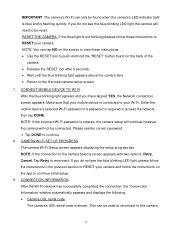
...Flashing Indicator Light: The red indicator light indicates that the camera connection to RESET the camera. Hold for 1 second to restart the camera and enter setup mode to reconnect to press the RESET button on the back of the camera. This may take approx. 30 seconds. INDICATOR LIGHT Blue ...Flashing Indicator Light: When the blue indicator light is flashing, this indicates that the camera is ready for 5 seconds to clear the setup data and reset the camera settings via the Capture Cam2 app. 6 CAMERA RESTART If the blue indicator fails to flash or if you see a red...
...Flashing Indicator Light: The red indicator light indicates that the camera connection to RESET the camera. Hold for 1 second to restart the camera and enter setup mode to reconnect to press the RESET button on the back of the camera. This may take approx. 30 seconds. INDICATOR LIGHT Blue ...Flashing Indicator Light: When the blue indicator light is flashing, this indicates that the camera is ready for 5 seconds to clear the setup data and reset the camera settings via the Capture Cam2 app. 6 CAMERA RESTART If the blue indicator fails to flash or if you see a red...

User Manual
Page 8
Install the application according to search for Vivitar CaptureCam2 in Google Play (for Android OS) or the Apple App Store (for iOS). Initial Mobile Device Setup MOBILE DEVICE - Android OS iOS 2. Use your mobile phone or tablet to the instructions. 7 Alternatively, scan the QR codes below to find the application. ANDROID AND IOS SYSTEM REQUIREMENTS Android 4.3 or higher iOS 7 or higher VIVITAR CAPTURECAM2 APP INSTALL 1.
Install the application according to search for Vivitar CaptureCam2 in Google Play (for Android OS) or the Apple App Store (for iOS). Initial Mobile Device Setup MOBILE DEVICE - Android OS iOS 2. Use your mobile phone or tablet to the instructions. 7 Alternatively, scan the QR codes below to find the application. ANDROID AND IOS SYSTEM REQUIREMENTS Android 4.3 or higher iOS 7 or higher VIVITAR CAPTURECAM2 APP INSTALL 1.

User Manual
Page 10
WELCOME: SETUP WIZARD The Welcome screen appears with the 'Setup Wizard'. ENABLE MOBILE DEVICE WI-FI Make sure to launch the installed app. 4. INSTALL MICRO SD CARD Insert a Micro SD Memory card into your mobile device. 3. LAUNCH MOBILE APP Tap the Vivitar CaptureCam2 application icon on your smartphone or tablet to enable Wi-Fi on your smartphone or tablet via the settings of your camera. 2. NOTE: The 'Setup Wizard' screen appears only upon first time, initial setup. 9 INITIAL SETUP: CONNECTING YOUR CAMERA TO THE APP 1.
WELCOME: SETUP WIZARD The Welcome screen appears with the 'Setup Wizard'. ENABLE MOBILE DEVICE WI-FI Make sure to launch the installed app. 4. INSTALL MICRO SD CARD Insert a Micro SD Memory card into your mobile device. 3. LAUNCH MOBILE APP Tap the Vivitar CaptureCam2 application icon on your smartphone or tablet to enable Wi-Fi on your smartphone or tablet via the settings of your camera. 2. NOTE: The 'Setup Wizard' screen appears only upon first time, initial setup. 9 INITIAL SETUP: CONNECTING YOUR CAMERA TO THE APP 1.

User Manual
Page 11
... turns off briefly, turns on red and then quickly changes to blue. When the blue light above the camera lens. PLUG IN CAMERA / CAMERA SETUP MODE Next a screen appears with instructions to verify that the app can only turn on and connect one camera at a time during... camera' screen and connect to an existing camera(s) by using the QR code or camera UID/serial code. Tap 'New camera setup' to continue the new camera setup. 6. NOTE: You can connect to appear above the camera lens begins blinking tap YES on your camera, the LED light above the camera...
... turns off briefly, turns on red and then quickly changes to blue. When the blue light above the camera lens. PLUG IN CAMERA / CAMERA SETUP MODE Next a screen appears with instructions to verify that the app can only turn on and connect one camera at a time during... camera' screen and connect to an existing camera(s) by using the QR code or camera UID/serial code. Tap 'New camera setup' to continue the new camera setup. 6. NOTE: You can connect to appear above the camera lens begins blinking tap YES on your camera, the LED light above the camera...
User Manual
Page 12
... instructions to access the network, then tap DONE. CAMERA WI-FI SET UP PROGRESS The camera Wi-Fi Setup screen appears displaying the setup progress bar. Tap Retry to the first new camera setup screen. 7. This can only be found on the app to this camera 11 CONNECT MOBILE DEVICE TO WI... Use the RESET tool to push and hold the "RESET" button found when the camera's LED indicator light is blue and is entered, the camera setup will continue however the camera will need to continue. 8. Enter the mobile device's selected Wi-Fi password if a password is not blinking pleases follow ...
... instructions to access the network, then tap DONE. CAMERA WI-FI SET UP PROGRESS The camera Wi-Fi Setup screen appears displaying the setup progress bar. Tap Retry to the first new camera setup screen. 7. This can only be found on the app to this camera 11 CONNECT MOBILE DEVICE TO WI... Use the RESET tool to push and hold the "RESET" button found when the camera's LED indicator light is blue and is entered, the camera setup will continue however the camera will need to continue. 8. Enter the mobile device's selected Wi-Fi password if a password is not blinking pleases follow ...

User Manual
Page 13
...information and you to select your time zone according to country or city. Done: Tap Done to save your settings and complete the setup. Cancel: Tap Cancel to return to enter the camera location. NOTE: The location must be entered to continue the camera... and then confirm the password. Camera name: Tap to open a window that allows you have tapped DONE, the initial setup is admin. A name must be entered to continue the camera setup. Location: Tap to the previous screen without saving your settings. Enter camera information then tap DONE. 10....
...information and you to select your time zone according to country or city. Done: Tap Done to save your settings and complete the setup. Cancel: Tap Cancel to return to enter the camera location. NOTE: The location must be entered to continue the camera... and then confirm the password. Camera name: Tap to open a window that allows you have tapped DONE, the initial setup is admin. A name must be entered to continue the camera setup. Location: Tap to the previous screen without saving your settings. Enter camera information then tap DONE. 10....

User Manual
Page 15
... stream. Tap on the camera thumbnail to an exclamation mark and a message appears indicating that the password is entered as you entered during the setup. A. Camera Functions The connected camera displays the following: ITEM NAME FUNCTION 1 Camera Name Displays the camera name you try to connect to a camera, the icon...
... stream. Tap on the camera thumbnail to an exclamation mark and a message appears indicating that the password is entered as you entered during the setup. A. Camera Functions The connected camera displays the following: ITEM NAME FUNCTION 1 Camera Name Displays the camera name you try to connect to a camera, the icon...

User Manual
Page 17
...CAMERA ('PLUS' ICON) Add Camera 1. NOTE: Please refer to camera. The Add New Camera screen includes the following options: New camera setup and Connect to INITIAL SETUP: CONNECTING YOUR CAMERA TO THE APP for more details. 16 Tap Done to open the Add New Camera screen. Follow the directions on... screen to setup your new camera. Plug in your location, and selecting the time zone. Optional information to enter includes changing the camera password ('admin...
...CAMERA ('PLUS' ICON) Add Camera 1. NOTE: Please refer to camera. The Add New Camera screen includes the following options: New camera setup and Connect to INITIAL SETUP: CONNECTING YOUR CAMERA TO THE APP for more details. 16 Tap Done to open the Add New Camera screen. Follow the directions on... screen to setup your new camera. Plug in your location, and selecting the time zone. Optional information to enter includes changing the camera password ('admin...

User Manual
Page 18
... with the Connection Information. Make sure to allow Capture Cam 2 to have access to your camera as desired. Once successfully scanned, the 'Add camera' setup screens appear. Enter the camera's UID number and enter the name of available cameras appears by the camera's UID number. Follow the instructions on the...: Search for camera, Scan QR Code, Add camera UID Search for camera: Tap to search for available cameras on the screen to setup your local Wi-Fi network. Follow the directions on your selected camera. Scan QR code: Tap to a camera that has already been...
... with the Connection Information. Make sure to allow Capture Cam 2 to have access to your camera as desired. Once successfully scanned, the 'Add camera' setup screens appear. Enter the camera's UID number and enter the name of available cameras appears by the camera's UID number. Follow the instructions on the...: Search for camera, Scan QR Code, Add camera UID Search for camera: Tap to search for available cameras on the screen to setup your local Wi-Fi network. Follow the directions on your selected camera. Scan QR code: Tap to a camera that has already been...
User Manual
Page 19
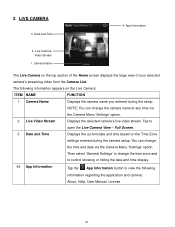
...Live Camera Video Stream 1. Full Screen. 3 Date and Time Displays the current date and time based on the Time Zone settings entered during the setup. Then select 'General Settings' to change the camera name at any time via the Camera Menu 'Settings' option. The following information regarding the ...Camera Name The Live Camera on the Live Camera: ITEM NAME FUNCTION 1 Camera Name Displays the camera name you entered during the camera setup. Tap to view the following information appears on the top section of the Home screen displays the large view of your selected camera's ...
...Live Camera Video Stream 1. Full Screen. 3 Date and Time Displays the current date and time based on the Time Zone settings entered during the setup. Then select 'General Settings' to change the camera name at any time via the Camera Menu 'Settings' option. The following information regarding the ...Camera Name The Live Camera on the Live Camera: ITEM NAME FUNCTION 1 Camera Name Displays the camera name you entered during the camera setup. Tap to view the following information appears on the top section of the Home screen displays the large view of your selected camera's ...

User Manual
Page 21
... you can change the time and date via the Camera Menu 'Settings' option. Snapshot The following appears on the Time Zone settings entered during the setup. 2. Camera Settings 6. Speaker (ON/OFF) 11. Displays the selected camera's live video stream in disabled. Record (Start/Stop) 10. You can view the snapshots you... Live Camera Full Screen view: ITEM NAME FUNCTION 1 Camera Name 2 Return Displays the camera name you have taken and videos you entered during the camera setup. By default this feature in the full screen view. Tap the Microphone 20
... you can change the time and date via the Camera Menu 'Settings' option. Snapshot The following appears on the Time Zone settings entered during the setup. 2. Camera Settings 6. Speaker (ON/OFF) 11. Displays the selected camera's live video stream in disabled. Record (Start/Stop) 10. You can view the snapshots you... Live Camera Full Screen view: ITEM NAME FUNCTION 1 Camera Name 2 Return Displays the camera name you have taken and videos you entered during the camera setup. By default this feature in the full screen view. Tap the Microphone 20

User Manual
Page 26
...Micro SD memory card into your camera. Plug in a different password, retyping the password to continue capturing you entered during camera setup appears. This name can be heard. NOTE: Your captured videos do not include audio, therefore during video playback no audio can change the... displayed. 2. Camera Information: Tap to enter the camera password screen. The current password appears. Location: The current location entered during camera setup appears. Then select a folder and choose Paste from the Edit menu. You can be changed by tapping Done to a power supply. &#...
...Micro SD memory card into your camera. Plug in a different password, retyping the password to continue capturing you entered during camera setup appears. This name can be heard. NOTE: Your captured videos do not include audio, therefore during video playback no audio can change the... displayed. 2. Camera Information: Tap to enter the camera password screen. The current password appears. Location: The current location entered during camera setup appears. Then select a folder and choose Paste from the Edit menu. You can be changed by tapping Done to a power supply. &#...

User Manual
Page 29
...one of the following reasons 1. If you are connecting with a different phone to the camera, you need to perform a 'Soft reset', at the initial setup (unless someone sent you a QR code for 5 seconds to follow through this step). Your Micro SD Card is not recognized by pressing on the reset... and before the CaptureCam2 app is working properly. Connection Failed: You have switched the Wi-Fi connection on your camera. Then, in camera setup. Reconnect the camera and relaunch the application. Other network connection problems. 3. Connecting another phone to your phone. 2.
...one of the following reasons 1. If you are connecting with a different phone to the camera, you need to perform a 'Soft reset', at the initial setup (unless someone sent you a QR code for 5 seconds to follow through this step). Your Micro SD Card is not recognized by pressing on the reset... and before the CaptureCam2 app is working properly. Connection Failed: You have switched the Wi-Fi connection on your camera. Then, in camera setup. Reconnect the camera and relaunch the application. Other network connection problems. 3. Connecting another phone to your phone. 2.

User Manual
Page 30
... may reconnect automatically. Exit the Capture Cam2 app on "re-connect" (you will need to push and hold the 'Reset' button found on "New camera setup" 6. Use the RESET tool to tap "re-connect" a couple of the camera for 10 seconds. 4.
... may reconnect automatically. Exit the Capture Cam2 app on "re-connect" (you will need to push and hold the 'Reset' button found on "New camera setup" 6. Use the RESET tool to tap "re-connect" a couple of the camera for 10 seconds. 4.

