
User Manual
Page 1
All rights reserved. IPC 112 Capture Cam User Manual © 2009-2015 Sakar International, Inc. Windows and the Windows logo are the property of Microsoft Corporation. All other trademarks are registered trademarks of their respective companies.
All rights reserved. IPC 112 Capture Cam User Manual © 2009-2015 Sakar International, Inc. Windows and the Windows logo are the property of Microsoft Corporation. All other trademarks are registered trademarks of their respective companies.

User Manual
Page 2
... Camera ...4 Initial Camera Setup...5 INSTALLING THE MEMORY CARD ...5 TURNING ON AND USING THE CAPTURE CAM ...5 CAMERA RESTART...6 INDICATOR LIGHT ...6 Initial Mobile Device Setup ...7 MOBILE DEVICE - ANDROID AND IOS SYSTEM REQUIREMENTS...7 VIVITAR CAPTURECAM2 APP INSTALL...7 Connecting Your IP Camera with the Vivitar CaptureCam2 Mobile Application 8 INTRODUCTION ...8 INITIAL SETUP: CONNECTING YOUR CAMERA TO THE APP...
... Camera ...4 Initial Camera Setup...5 INSTALLING THE MEMORY CARD ...5 TURNING ON AND USING THE CAPTURE CAM ...5 CAMERA RESTART...6 INDICATOR LIGHT ...6 Initial Mobile Device Setup ...7 MOBILE DEVICE - ANDROID AND IOS SYSTEM REQUIREMENTS...7 VIVITAR CAPTURECAM2 APP INSTALL...7 Connecting Your IP Camera with the Vivitar CaptureCam2 Mobile Application 8 INTRODUCTION ...8 INITIAL SETUP: CONNECTING YOUR CAMERA TO THE APP...

User Manual
Page 3
... are not included and need to be purchased separately. Introduction Thank you need to stream live video, record in HD and capture still images and videos remotely is included with your Vivitar IPC 112 Capture Cam. Features Stream Live Video Record in HD IR Night Vision Motion Detection Still Image...
... are not included and need to be purchased separately. Introduction Thank you need to stream live video, record in HD and capture still images and videos remotely is included with your Vivitar IPC 112 Capture Cam. Features Stream Live Video Record in HD IR Night Vision Motion Detection Still Image...

User Manual
Page 6
See SD icon next to insert the Micro SD Memory card before plugging in the illustration above. TURNING ON AND USING THE CAPTURE CAM Connect one minute, indicating that the camera is powered on the camera for reference. 2. Alternatively you hear a slight clicking sound. The LED power ...light indicator blinks blue after about one end of your computer as shown in your Capture Cam. Insert the Micro SD memory card into the Micro SD Card slot as a power source. NOTE: Make sure to the slot on . To ...
See SD icon next to insert the Micro SD Memory card before plugging in the illustration above. TURNING ON AND USING THE CAPTURE CAM Connect one minute, indicating that the camera is powered on the camera for reference. 2. Alternatively you hear a slight clicking sound. The LED power ...light indicator blinks blue after about one end of your computer as shown in your Capture Cam. Insert the Micro SD memory card into the Micro SD Card slot as a power source. NOTE: Make sure to the slot on . To ...

User Manual
Page 7
.... CAMERA RESTART If the blue indicator fails to flash or if you see a red light, you have already set up the camera before via the Capture Cam2 application (Add New Camera). - Press the RESET button for 5 seconds to Wi-Fi when you need to press the RESET button on the back... button for 1 second to restart the camera and enter setup mode to reconnect to clear the setup data and reset the camera settings via the Capture Cam2 app. 6 Hold for setup. Blue Steady Indicator Light: When the blue indicator light is steady, this indicates that the camera connection to Wi...
.... CAMERA RESTART If the blue indicator fails to flash or if you see a red light, you have already set up the camera before via the Capture Cam2 application (Add New Camera). - Press the RESET button for 5 seconds to Wi-Fi when you need to press the RESET button on the back... button for 1 second to restart the camera and enter setup mode to reconnect to clear the setup data and reset the camera settings via the Capture Cam2 app. 6 Hold for setup. Blue Steady Indicator Light: When the blue indicator light is steady, this indicates that the camera connection to Wi...

User Manual
Page 9
Connecting Your IP Camera with the Vivitar CaptureCam2 Mobile Application INTRODUCTION The Vivitar CaptureCam2 application allows you to: Register and connect a new camera in minutes. Remotely monitor up to four cameras using the application from anywhere....pictures and record videos remotely. Remotely view recorded videos and download the videos from your camera's SD card to your computer. View your captured photos that are saved directly to your iOS and Android devices. Adjust camera settings from your app. Allow other people to access your...
Connecting Your IP Camera with the Vivitar CaptureCam2 Mobile Application INTRODUCTION The Vivitar CaptureCam2 application allows you to: Register and connect a new camera in minutes. Remotely monitor up to four cameras using the application from anywhere....pictures and record videos remotely. Remotely view recorded videos and download the videos from your camera's SD card to your computer. View your captured photos that are saved directly to your iOS and Android devices. Adjust camera settings from your app. Allow other people to access your...

User Manual
Page 15
... the camera thumbnail to Wi-Fi and active (ON). NOTE: If the camera connection is incorrect and to select and view the camera's streaming live capture in the Live Camera display on the top section of the Home screen. Displays the camera's current status: The camera is not connected to Wi...
... the camera thumbnail to Wi-Fi and active (ON). NOTE: If the camera connection is incorrect and to select and view the camera's streaming live capture in the Live Camera display on the top section of the Home screen. Displays the camera's current status: The camera is not connected to Wi...

User Manual
Page 16
...; Share Camera: Sends an email message with the QR code and camera UID that allows quick and easy remote connectivity from other handsets. Captured data: Opens the Captured Data screen. Settings: Opens the Camera Settings screen. Remove camera: Removes camera from the Cameras list and from the app. The...
...; Share Camera: Sends an email message with the QR code and camera UID that allows quick and easy remote connectivity from other handsets. Captured data: Opens the Captured Data screen. Settings: Opens the Camera Settings screen. Remove camera: Removes camera from the Cameras list and from the app. The...

User Manual
Page 18
Make sure to allow Capture Cam 2 to have access to complete the connection. 17 Tap Done to your camera as desired. Once successfully scanned, the 'Add camera' setup screens appear. ...
Make sure to allow Capture Cam 2 to have access to complete the connection. 17 Tap Done to your camera as desired. Once successfully scanned, the 'Add camera' setup screens appear. ...

User Manual
Page 21
...By default this feature in the full screen view. Full Screen 1. Camera Name 8. Tap the back button to return to the previous screen. 3 Captured Data Tap the Captured Data button to speak via the mobile app, and those near the camera can change the camera name at any time via the Camera... Menu 'Settings' option. You can view the snapshots you have taken and videos you to open the Capture Data screen where you can change the time zone and to view in full screen landscape view without the app controls. App Information 9. Record ...
...By default this feature in the full screen view. Full Screen 1. Camera Name 8. Tap the back button to return to the previous screen. 3 Captured Data Tap the Captured Data button to speak via the mobile app, and those near the camera can change the camera name at any time via the Camera... Menu 'Settings' option. You can view the snapshots you have taken and videos you to open the Capture Data screen where you can change the time zone and to view in full screen landscape view without the app controls. App Information 9. Record ...
User Manual
Page 23
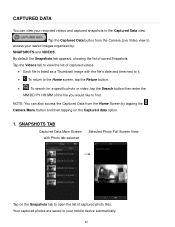
...by : SNAPSHOTS and VIDEOS By default the Snapshots tab appears, showing the list of saved Snapshots. Your captured photos are saved to your recorded videos and captured snapshots in the Captured Data view. NOTE: You can view your mobile device automatically. 22 Tap the Videos tab to view ...Each file is listed as a Thumbnail image with Photo tab selected Selected Photo Full Screen View Tap on the Captured data option. 1. CAPTURED DATA You can also access the Captured Data from the Camera Live Video view to access your saved images organized by tapping the Camera Menu button ...
...by : SNAPSHOTS and VIDEOS By default the Snapshots tab appears, showing the list of saved Snapshots. Your captured photos are saved to your recorded videos and captured snapshots in the Captured Data view. NOTE: You can view your mobile device automatically. 22 Tap the Videos tab to view ...Each file is listed as a Thumbnail image with Photo tab selected Selected Photo Full Screen View Tap on the Captured data option. 1. CAPTURED DATA You can also access the Captured Data from the Camera Live Video view to access your saved images organized by tapping the Camera Menu button ...
User Manual
Page 24
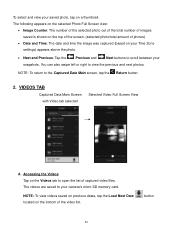
... Videos tab to open the list of the video list. The videos are saved to your snapshots. Accessing the Videos Tap on the bottom of captured video files. NOTE: To return to view the previous and next photos. button 23 The following appears on the selected Photo Full Screen view: ... is shown on the top of the screen. (selected photo/total amount of photos) Date and Time: The date and time the image was captured (based on a thumbnail. To select and view your saved photo, tap on your Time Zone settings) appears above the photo. Next and Previous: Tap...
... Videos tab to open the list of the video list. The videos are saved to your snapshots. Accessing the Videos Tap on the bottom of captured video files. NOTE: To return to view the previous and next photos. button 23 The following appears on the selected Photo Full Screen view: ... is shown on the top of the screen. (selected photo/total amount of photos) Date and Time: The date and time the image was captured (based on a thumbnail. To select and view your saved photo, tap on your Time Zone settings) appears above the photo. Next and Previous: Tap...
User Manual
Page 25
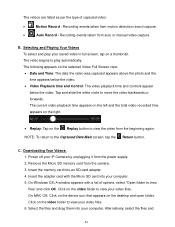
...folder to view your video files. 6. Click on the video folder to view your video files. Tap and slide the white circle to the Captured Data Main screen, tap the Return button. Insert the memory card into your computer. 5. Alternatively, select the files and 24 Downloading Your Videos...: 1. Insert the adapter card with a list of captured video: Motion Record - The videos are listed as per the type of options, select "Open folder to view the video from motion ...
...folder to view your video files. 6. Click on the video folder to view your video files. Tap and slide the white circle to the Captured Data Main screen, tap the Return button. Insert the memory card into your computer. 5. Alternatively, select the files and 24 Downloading Your Videos...: 1. Insert the adapter card with a list of captured video: Motion Record - The videos are listed as per the type of options, select "Open folder to view the video from motion ...

User Manual
Page 26
...; Insert your Micro SD memory card into your camera. Plug in your IP Camera to a power supply. Launch the Vivitar CaptureCam2 application. The following Camera Setting information and options appear: 1. Camera name: The name that you live streaming video with your IP Camera ... video player available on your computer. You can be changed by tapping on the Settings button to open the Settings screen. NOTE: Your captured videos do not include audio, therefore during video playback no audio can be changed by typing in a different location name. 5. Location: The...
...; Insert your Micro SD memory card into your camera. Plug in your IP Camera to a power supply. Launch the Vivitar CaptureCam2 application. The following Camera Setting information and options appear: 1. Camera name: The name that you live streaming video with your IP Camera ... video player available on your computer. You can be changed by tapping on the Settings button to open the Settings screen. NOTE: Your captured videos do not include audio, therefore during video playback no audio can be changed by typing in a different location name. 5. Location: The...
User Manual
Page 27
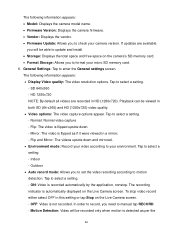
Normal: Normal video capture - Indoor - If updates are recorded in this setting or tap Stop on the Live Camera screen. - The following information appears: Model: Displays the camera .... - Flip: The video is detected as if it were viewed in both SD (64-x360) and HD (1280x720) video quality. Video options: The video capture options appear. Outdoor Auto record mode: Allows you need to check your micro SD memory card. 6. Tap to select a setting. - SD 640x360 - To stop...
Normal: Normal video capture - Indoor - If updates are recorded in this setting or tap Stop on the Live Camera screen. - The following information appears: Model: Displays the camera .... - Flip: The video is detected as if it were viewed in both SD (64-x360) and HD (1280x720) video quality. Video options: The video capture options appear. Outdoor Auto record mode: Allows you need to check your micro SD memory card. 6. Tap to select a setting. - SD 640x360 - To stop...

User Manual
Page 29
Disconnect the camera from the device then plug into power source. Unplug the USB cable from the power supply. Exit the Capture Cam2 app on your phone and cannot connect to follow through this step). If the above solution does not work , reset your phone. 2. Reconnect the ...
Disconnect the camera from the device then plug into power source. Unplug the USB cable from the power supply. Exit the Capture Cam2 app on your phone and cannot connect to follow through this step). If the above solution does not work , reset your phone. 2. Reconnect the ...

User Manual
Page 30
...Snapshot taken during video recording on your phone and select the Wi-Fi network you wish to connect to iPhone. Launch the Capture Cam2 app on your phone. Exit the Capture Cam2 app on your phone. 2. Wait 1 minute until the blue light is not saved to . 3. Your camera should ...connect. Create an album manually on "re-connect" (you may reconnect automatically. If you have switched the Wi-Fi connection on your iPhone named Capture Cam2. connected the camera to different Wi-Fi networks. 1. Note: App can perform slower while the phone and the camera are connected to initially...
...Snapshot taken during video recording on your phone and select the Wi-Fi network you wish to connect to iPhone. Launch the Capture Cam2 app on your phone. Exit the Capture Cam2 app on your phone. 2. Wait 1 minute until the blue light is not saved to . 3. Your camera should ...connect. Create an album manually on "re-connect" (you may reconnect automatically. If you have switched the Wi-Fi connection on your iPhone named Capture Cam2. connected the camera to different Wi-Fi networks. 1. Note: App can perform slower while the phone and the camera are connected to initially...