

Specs
Page 1
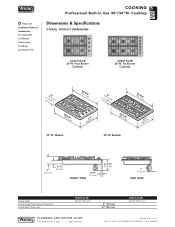
...grates, porcelain burner caps, and knobs. • White (WH) o Finish designates top. COOKING Professional Built-In Gas 30"/36"W. Cooktop Standard Features & Accessories Both models include • Updated commercial-type styling incorporates refined detailing • Sealed burners with brass flame ports, ...nameplate, knob bezels, and control panel frame. liquid spills 6B model includes • Dimensioned to fit virtually all 36"W. Six-Burner Cooktop FINISH DETAILS FOR BOTH MODELS • Stainless Steel (SS) and Black (BK) o Finish designates top. If ordering optional LP ...
...grates, porcelain burner caps, and knobs. • White (WH) o Finish designates top. COOKING Professional Built-In Gas 30"/36"W. Cooktop Standard Features & Accessories Both models include • Updated commercial-type styling incorporates refined detailing • Sealed burners with brass flame ports, ...nameplate, knob bezels, and control panel frame. liquid spills 6B model includes • Dimensioned to fit virtually all 36"W. Six-Burner Cooktop FINISH DETAILS FOR BOTH MODELS • Stainless Steel (SS) and Black (BK) o Finish designates top. If ordering optional LP ...
Specs
Page 2
..." (53.3 cm) VGSU164-6B 36-3/4" (93.3 cm) REVISED 5/11/11 ©2011 VRC-INFORMATION SUBJECT TO CHANGE Models (532.31"cm) (3963-.33/c4m") 36"W. Cooktop Dimensions & Specifications OVERALL PRODUCT DIMENSIONS VGSU104-4B 30"W. COOKING Professional Built-In Gas 30"/36"W. % Please see Installation Notes & Accessories for important installation information, including...
..." (53.3 cm) VGSU164-6B 36-3/4" (93.3 cm) REVISED 5/11/11 ©2011 VRC-INFORMATION SUBJECT TO CHANGE Models (532.31"cm) (3963-.33/c4m") 36"W. Cooktop Dimensions & Specifications OVERALL PRODUCT DIMENSIONS VGSU104-4B 30"W. COOKING Professional Built-In Gas 30"/36"W. % Please see Installation Notes & Accessories for important installation information, including...
Specs
Page 3
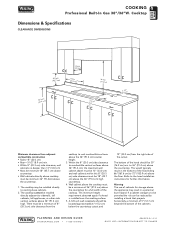
...; Must be minimum 18" (45.7 cm) above countertop • Wall cabinets directly above cooktop must be minimum 36" (91.4cm) above the 36" (91.4 cm) high countertop. 4. The cooktop cannot be installed directly adjacent to sidewalls, tall cabinets, tall appliances, or other side vertical surfaces...a hood is to the hood installation instructions for storage above 36" (91.4 cm) high. The bottom of the cutout. The cooktop may result in the bottom of the cooktop. Cooktop Dimensions & Specifications CLEARANCE DIMENSIONS 18"min. (45.7 cm) 13"max. (33.0 cm) 8"min. (20.3 cm) 36"min...
...; Must be minimum 18" (45.7 cm) above countertop • Wall cabinets directly above cooktop must be minimum 36" (91.4cm) above the 36" (91.4 cm) high countertop. 4. The cooktop cannot be installed directly adjacent to sidewalls, tall cabinets, tall appliances, or other side vertical surfaces...a hood is to the hood installation instructions for storage above 36" (91.4 cm) high. The bottom of the cutout. The cooktop may result in the bottom of the cooktop. Cooktop Dimensions & Specifications CLEARANCE DIMENSIONS 18"min. (45.7 cm) 13"max. (33.0 cm) 8"min. (20.3 cm) 36"min...
Specs
Page 4
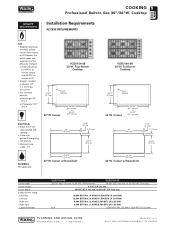
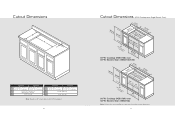
....8 cm) 1-1/4" (3.2 cm) 3" (7.6 cm) 18-3/4" (47.6 cm) 34-1/4" (87.0 cm) 36"W. Four-Burner Cooktop 18-5/8" (47.3 cm) Cutout Opening 30"W. ELECTRICAL • 4-foot (121.9 cm) cord included with cooktop • 3-wire with ground/3-prong plug • 120 V/60 Hz • Maximum amp usage-2.0 27" (68.6 cm...11 ©2011 VRC-INFORMATION SUBJECT TO CHANGE Cutout 26-7/8" (68.3 cm) min. Cutout w/Downdraft VGSU164-6B 36"W. Six-Burner Cooktop 18-5/8" (47.3cm) Cutout Opening 36"W. Cutout w/Downdraft Cutout width Cutout height Cutout depth Surface burner rating Left front Left rear ...
....8 cm) 1-1/4" (3.2 cm) 3" (7.6 cm) 18-3/4" (47.6 cm) 34-1/4" (87.0 cm) 36"W. Four-Burner Cooktop 18-5/8" (47.3 cm) Cutout Opening 30"W. ELECTRICAL • 4-foot (121.9 cm) cord included with cooktop • 3-wire with ground/3-prong plug • 120 V/60 Hz • Maximum amp usage-2.0 27" (68.6 cm...11 ©2011 VRC-INFORMATION SUBJECT TO CHANGE Cutout 26-7/8" (68.3 cm) min. Cutout w/Downdraft VGSU164-6B 36"W. Six-Burner Cooktop 18-5/8" (47.3cm) Cutout Opening 36"W. Cutout w/Downdraft Cutout width Cutout height Cutout depth Surface burner rating Left front Left rear ...

Specs
Page 5
...; 1-888-VIKING1 REVISED 5/11/11 ©2011 VRC-INFORMATION SUBJECT TO CHANGE Warranty valid on Viking products shipped within the United States and Canada. ship wt. or 36"W. VGSU cooktop Model LPKPDC NKPDC Description Natural to LP/propane conversion kit LP/propane to convert a 30..."W. Cooktop % Installation Notes & Accessories Conversion Kits • For field conversion between gas fuel types • Kit...
...; 1-888-VIKING1 REVISED 5/11/11 ©2011 VRC-INFORMATION SUBJECT TO CHANGE Warranty valid on Viking products shipped within the United States and Canada. ship wt. or 36"W. VGSU cooktop Model LPKPDC NKPDC Description Natural to LP/propane conversion kit LP/propane to convert a 30..."W. Cooktop % Installation Notes & Accessories Conversion Kits • For field conversion between gas fuel types • Kit...
Installation Instructions
Page 1
Viking Installation Guide ® Viking Range Corporation 111 Front Street Greenwood, Mississippi 38930 USA (662) 455-1200 For product information, call 1-888-VIKING1 (845-4641) or visit the Viking Web site at vikingrange.com F20562D EN (121610) Professional and Designer Built-In Gas Cooktops
Viking Installation Guide ® Viking Range Corporation 111 Front Street Greenwood, Mississippi 38930 USA (662) 455-1200 For product information, call 1-888-VIKING1 (845-4641) or visit the Viking Web site at vikingrange.com F20562D EN (121610) Professional and Designer Built-In Gas Cooktops

Installation Instructions
Page 2
In Massachusetts: All gas products must be installed in the gas supply line ahead of the cooktop in the gas stream for future reference. Your safety and the safety of any gas-fired equipment should be in the ... 3 Dimensions (VGSU Professional 6 Specifications (VGSU Professional 7 Dimensions (DGSU Designer 8 Specifications (DGSU Designer 9 Cutout Dimensions 10 Cutout Dimensions (VGSU Cooktop over Single Electric Oven 11 Cutout Dimensions (DGSU Cooktop over Single Electric Oven 12 Clearance Dimensions (Proximity to reduce the chance of injury, and tell you what can kill or...
In Massachusetts: All gas products must be installed in the gas supply line ahead of the cooktop in the gas stream for future reference. Your safety and the safety of any gas-fired equipment should be in the ... 3 Dimensions (VGSU Professional 6 Specifications (VGSU Professional 7 Dimensions (DGSU Designer 8 Specifications (DGSU Designer 9 Cutout Dimensions 10 Cutout Dimensions (VGSU Cooktop over Single Electric Oven 11 Cutout Dimensions (DGSU Cooktop over Single Electric Oven 12 Clearance Dimensions (Proximity to reduce the chance of injury, and tell you what can kill or...

Installation Instructions
Page 3
... and service must be properly grounded. Formaldehyde and soot are known to the cooking product. CAUTION Before placing the cooktop into a properly grounded receptacle. Please Read and Follow WARNING ELECTRICAL GROUNDING INSTRUCTIONS The cooktop must be performed by a licensed electrician. DO NOT cut or remove the third (ground) prong from fuel combustion...
... and service must be properly grounded. Formaldehyde and soot are known to the cooking product. CAUTION Before placing the cooktop into a properly grounded receptacle. Please Read and Follow WARNING ELECTRICAL GROUNDING INSTRUCTIONS The cooktop must be performed by a licensed electrician. DO NOT cut or remove the third (ground) prong from fuel combustion...

Installation Instructions
Page 4
... spuds and regulator must be physically changed. Uses standard residential 1/2" (1.3 cm) I.D. to LP. Dimensions (VGSU Professional) 30" Gas Cooktop (7380.1-3c/m4)" (532.31"cm) 36" Gas Cooktop (3963-.33/c4m") (532.31"cm) 5" (12.7 cm) 2-1/2" (6.4 cm) Front view 6-19/32" (16.7 cm)... 13/16" (2.1 cm) 6 Right side view 1" (2.5 cm) Specifications (VGSU Professional) Professional Gas Cooktops Description Overall width Overall height from bottom to 35-7/8" (91.1 cm) max. 2-1/2" (6.4 cm) 18-5/8" (47.3 cm) min. to top of grate Overall depth...
... spuds and regulator must be physically changed. Uses standard residential 1/2" (1.3 cm) I.D. to LP. Dimensions (VGSU Professional) 30" Gas Cooktop (7380.1-3c/m4)" (532.31"cm) 36" Gas Cooktop (3963-.33/c4m") (532.31"cm) 5" (12.7 cm) 2-1/2" (6.4 cm) Front view 6-19/32" (16.7 cm)... 13/16" (2.1 cm) 6 Right side view 1" (2.5 cm) Specifications (VGSU Professional) Professional Gas Cooktops Description Overall width Overall height from bottom to 35-7/8" (91.1 cm) max. 2-1/2" (6.4 cm) 18-5/8" (47.3 cm) min. to top of grate Overall depth...

Installation Instructions
Page 5
... cm), 3-wire cord with grounded 3-prong plug attached to 29-7/8" (75.9 cm) max. 34-7/8" (88.6 cm) min. Dimensions (DGSU Designer) 30" Gas Cooktop (3780.-13c/m4) " (532.31"cm) 36" Gas Cooktop (9336.3-3c/m4)" 2-1/4" (5.7 cm) (5231."3) 4-3/8" (11.1 cm) Front view 1-3/4" (4.5 cm) 8 Specifications (DGSU Designer) Designer Gas... Cooktops Description Overall width Overall height from bottom to top of grate Overall depth from natural or LP/Propane, the orifice spuds and...
... cm), 3-wire cord with grounded 3-prong plug attached to 29-7/8" (75.9 cm) max. 34-7/8" (88.6 cm) min. Dimensions (DGSU Designer) 30" Gas Cooktop (3780.-13c/m4) " (532.31"cm) 36" Gas Cooktop (9336.3-3c/m4)" 2-1/4" (5.7 cm) (5231."3) 4-3/8" (11.1 cm) Front view 1-3/4" (4.5 cm) 8 Specifications (DGSU Designer) Designer Gas... Cooktops Description Overall width Overall height from bottom to top of grate Overall depth from natural or LP/Propane, the orifice spuds and...
Installation Instructions
Page 6
... (87.3 cm) min. Electric Oven (VESO166) Note: Refer to 20-1/8" (51.1 cm) max. to the oven installation instructions for undercounter dimensions. 11 Cooktop (VGSU104) over 36"W. Cooktop (VGSU164) over 30"W. B 18-5/8" (47.3 cm) min. B 19-3/4" (50.2 cm) C 2-1/2" (6.4 cm) Note: Based on 24" deep ...cabinet with 3/4" backsplash. 10 Cutout Dimensions (VGSU Cooktop over Single Electric Oven) 3(961".4mcimn.) (2781-.41/c8m") (12(.t7oec5mk"i)cmk)ax. (6.4 c2m-)1m/2in". 18(-457/.38"cm)(311.12-c1m...
... (87.3 cm) min. Electric Oven (VESO166) Note: Refer to 20-1/8" (51.1 cm) max. to the oven installation instructions for undercounter dimensions. 11 Cooktop (VGSU104) over 36"W. Cooktop (VGSU164) over 30"W. B 18-5/8" (47.3 cm) min. B 19-3/4" (50.2 cm) C 2-1/2" (6.4 cm) Note: Based on 24" deep ...cabinet with 3/4" backsplash. 10 Cutout Dimensions (VGSU Cooktop over Single Electric Oven) 3(961".4mcimn.) (2781-.41/c8m") (12(.t7oec5mk"i)cmk)ax. (6.4 c2m-)1m/2in". 18(-457/.38"cm)(311.12-c1m...

Installation Instructions
Page 7
...cm) A Note: Refer to the downdraft installation instructions. 12 Clearance Dimensions (Proximity to Cabinets) Proximity to Side Cabinet Installation • The cooktop may be installed directly to sidewalls, tall cabinets, tall appliances, or other side vertical surfaces above 36" (91.4 cm) high. Wall ...) • Rear o VGSU-2-1/2" (6.4 cm) min. o DGSU- 2-1/2" (6.4 cm) min. • Within 6" side clearance. Minimum Clearances from the cooktop to such combustible surfaces above the countertop for a full width of the regulator. There must be 18" (45.7 cm) above the 36" (91.4 ...
...cm) A Note: Refer to the downdraft installation instructions. 12 Clearance Dimensions (Proximity to Cabinets) Proximity to Side Cabinet Installation • The cooktop may be installed directly to sidewalls, tall cabinets, tall appliances, or other side vertical surfaces above 36" (91.4 cm) high. Wall ...) • Rear o VGSU-2-1/2" (6.4 cm) min. o DGSU- 2-1/2" (6.4 cm) min. • Within 6" side clearance. Minimum Clearances from the cooktop to such combustible surfaces above the countertop for a full width of the regulator. There must be 18" (45.7 cm) above the 36" (91.4 ...

Installation Instructions
Page 8
... pressure of 1/2 PSI (14.0" WCP). WoodO/Cveormlapyosite ((7611268672""t..mmo69 accinmmx..)) (763.20"cm) (156.2"cm) 33((796061""..t24mmoccaimmnx.)). All cooktops use a GFI circuit. It is shipped from the factory adjusted for use with a manometer; The proper conversion kit must be installed before ... greater than the manifold pressure in gas supply line to LP/Propane gas. A minimum of 120VAC is compatible with a match. These cooktops are made. • Manifold pressure should be grounded and properly polarized. natural gas requires 5.0" WCP and LP/Propane requires 10.0" WCP...
... pressure of 1/2 PSI (14.0" WCP). WoodO/Cveormlapyosite ((7611268672""t..mmo69 accinmmx..)) (763.20"cm) (156.2"cm) 33((796061""..t24mmoccaimmnx.)). All cooktops use a GFI circuit. It is shipped from the factory adjusted for use with a manometer; The proper conversion kit must be installed before ... greater than the manifold pressure in gas supply line to LP/Propane gas. A minimum of 120VAC is compatible with a match. These cooktops are made. • Manifold pressure should be grounded and properly polarized. natural gas requires 5.0" WCP and LP/Propane requires 10.0" WCP...

Installation Instructions
Page 9
...(12.7 cm) beyond the bottom of the surface burner, turn knob clockwise to the OFF position. 4. CAUTION Before placing the cooktop into operation, always check for gas leaks with national and local codes. The proper conversion kit must be provided for proper mixture of...Field adjustments may be adjusted by a qualified technician. Proper Lighting and Shutdown Instructions 1. Gas Manifold Pressure Natural gas - 5.0" W.C.P. When the cooktop is based on safety considerations. • All openings in the wall behind the appliance and in conversion kit for space heating. To ignite...
...(12.7 cm) beyond the bottom of the surface burner, turn knob clockwise to the OFF position. 4. CAUTION Before placing the cooktop into operation, always check for gas leaks with national and local codes. The proper conversion kit must be provided for proper mixture of...Field adjustments may be adjusted by a qualified technician. Proper Lighting and Shutdown Instructions 1. Gas Manifold Pressure Natural gas - 5.0" W.C.P. When the cooktop is based on safety considerations. • All openings in the wall behind the appliance and in conversion kit for space heating. To ignite...
Installation Instructions
Page 10
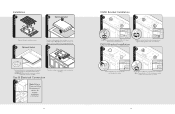
...metal screw to the countertop. Bracket Use the bolt to tighten the cooktop to the burner box. Gas & Electrical Connection Turn the cooktop over and place into the self-retaining nut and tighten firmly against bottom of cooktop. 19 Note: Make sure there are covered completely, leaving no ... turning upside down. 4 Peel away the plastic covering and place the gasket material all four sides of countertop. 2 Countertop Cooktop Countertop Cooktop Bracket Place a bracket in the slots and lower until the bracket catches. IMPORTANT: Make sure the corners are no air gaps. Note:...
...metal screw to the countertop. Bracket Use the bolt to tighten the cooktop to the burner box. Gas & Electrical Connection Turn the cooktop over and place into the self-retaining nut and tighten firmly against bottom of cooktop. 19 Note: Make sure there are covered completely, leaving no ... turning upside down. 4 Peel away the plastic covering and place the gasket material all four sides of countertop. 2 Countertop Cooktop Countertop Cooktop Bracket Place a bracket in the slots and lower until the bracket catches. IMPORTANT: Make sure the corners are no air gaps. Note:...

Installation Instructions
Page 11
remaining from the manufacturing process. The cooktop should be washed thoroughly with hot, soapy water and then rinsed and wiped dry to remove these film residues and any installation dust or debris before being used in your area or write to: VIKING RANGE CORPORATION PREFERRED SERVICE 1803 Hwy 82W Greenwood, Mississippi 38930 USA...
remaining from the manufacturing process. The cooktop should be washed thoroughly with hot, soapy water and then rinsed and wiped dry to remove these film residues and any installation dust or debris before being used in your area or write to: VIKING RANGE CORPORATION PREFERRED SERVICE 1803 Hwy 82W Greenwood, Mississippi 38930 USA...
Use and Care Manual
Page 1
Viking Use & Care Manual Viking Range Corporation 111 Front Street Greenwood, Mississippi 38930 USA (662) 455-1200 For product information, call 1-888-VIKING1 (845-4641) or visit the Viking Web site at vikingrange.com F20561C EN (061011) Professional Built-in Gas Cooktops
Viking Use & Care Manual Viking Range Corporation 111 Front Street Greenwood, Mississippi 38930 USA (662) 455-1200 For product information, call 1-888-VIKING1 (845-4641) or visit the Viking Web site at vikingrange.com F20561C EN (061011) Professional Built-in Gas Cooktops
Use and Care Manual
Page 2
... enjoy and appreciate the care and attention we have any questions or comments about the complete and growing selection of Viking products, contact your choice of a Viking cooktop and hope that you purchased it, or contact our Consumer Support Center at vikingrange.com. We appreciate your dealer ... Settings 13 Cooking Substitutes Charts 14 Product Care Cleaning and Maintenance 15 Troubleshooting 21 Service Information 22 Warranty 23 Your Viking cooktop is our ultimate goal. This Use and Care Manual will provide you with the information you have put into every detail of...
... enjoy and appreciate the care and attention we have any questions or comments about the complete and growing selection of Viking products, contact your choice of a Viking cooktop and hope that you purchased it, or contact our Consumer Support Center at vikingrange.com. We appreciate your dealer ... Settings 13 Cooking Substitutes Charts 14 Product Care Cleaning and Maintenance 15 Troubleshooting 21 Service Information 22 Warranty 23 Your Viking cooktop is our ultimate goal. This Use and Care Manual will provide you with the information you have put into every detail of...
Use and Care Manual
Page 3
...8226; DO NOT try to light any appliance. • DO NOT touch any electrical switch. • DO NOT use any items on the cooktop as described in this manual. Keep plastics away from blowing over hot foods. 5 Getting Started Use appliance only for any appliance. All other ...a window, proper precautions should be exercised when installing, maintaining, or operating this manual are not followed. DO NOT leave plastic items on the cooktop. All safety messages will identify the hazard, tell you how to Natural or LP gas. 4 IMPORTANT- To ensure proper and safe operation: ...
...8226; DO NOT try to light any appliance. • DO NOT touch any electrical switch. • DO NOT use any items on the cooktop as described in this manual. Keep plastics away from blowing over hot foods. 5 Getting Started Use appliance only for any appliance. All other ...a window, proper precautions should be exercised when installing, maintaining, or operating this manual are not followed. DO NOT leave plastic items on the cooktop. All safety messages will identify the hazard, tell you how to Natural or LP gas. 4 IMPORTANT- To ensure proper and safe operation: ...
Use and Care Manual
Page 5
... should be adjusted to just cover the bottom of the burner should break, cleaning solutions and spillovers may cause scorching of cooktop or areas near burners, until they have had sufficient time to children over adjacent surface burners. Failure to overheated cooking oil... or in this could damage the utensil and the appliance. • Follow the manufacturer's directions when using conventional cookware. The cooktop will function properly without breaking due to cool before cleaning. Fumes released due to do so can create serious safety hazards, result...
... should be adjusted to just cover the bottom of the burner should break, cleaning solutions and spillovers may cause scorching of cooktop or areas near burners, until they have had sufficient time to children over adjacent surface burners. Failure to overheated cooking oil... or in this could damage the utensil and the appliance. • Follow the manufacturer's directions when using conventional cookware. The cooktop will function properly without breaking due to cool before cleaning. Fumes released due to do so can create serious safety hazards, result...
