Specs
Page 1
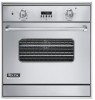
... VGSO100 30"W. Single Oven • Brushed finished vertical/horizontal trim and stainless steel handle (with chrome-plated brackets) • Brass Trim Option (BR)-nameplate, window trim, door handle/brackets and knob bezels. ORDERING INSTRUCTIONS First specify model number, and then color code (VGSO100SS). If ordering optional ...), Oyster Gray (OG), Golden Mist (GM), Lemonade (LE), Sage (SA), Mint Julep (MJ), Sea Glass (SE), Iridescent Blue (IB), Viking Blue (VB), Pumpkin (PM), Racing Red (RR), Apple Red (AR), Burgundy (BU), Plum (PL), Chocolate (CH), and Cobalt Blue (CB). ft.- 23...
... VGSO100 30"W. Single Oven • Brushed finished vertical/horizontal trim and stainless steel handle (with chrome-plated brackets) • Brass Trim Option (BR)-nameplate, window trim, door handle/brackets and knob bezels. ORDERING INSTRUCTIONS First specify model number, and then color code (VGSO100SS). If ordering optional ...), Oyster Gray (OG), Golden Mist (GM), Lemonade (LE), Sage (SA), Mint Julep (MJ), Sea Glass (SE), Iridescent Blue (IB), Viking Blue (VB), Pumpkin (PM), Racing Red (RR), Apple Red (AR), Burgundy (BU), Plum (PL), Chocolate (CH), and Cobalt Blue (CB). ft.- 23...
Specs
Page 2
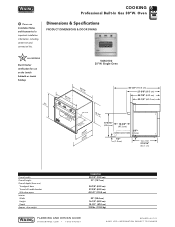
... Installation Notes and Accessories for use on the Jewish Sabbath or Jewish holidays (783.71"cm) VGSO100 30"W. Single Oven (2794-.91/c2m") (2668-.37/c8m") 43-1/2" (110.5 cm) 27-3/8" (69.5 cm) 24-7/8" (63.2 cm) 23-1/2" (60.0 cm) (331.73-c1m/)4" Gas inlet 21-(554/....
... Installation Notes and Accessories for use on the Jewish Sabbath or Jewish holidays (783.71"cm) VGSO100 30"W. Single Oven (2794-.91/c2m") (2668-.37/c8m") 43-1/2" (110.5 cm) 27-3/8" (69.5 cm) 24-7/8" (63.2 cm) 23-1/2" (60.0 cm) (331.73-c1m/)4" Gas inlet 21-(554/....
Specs
Page 3
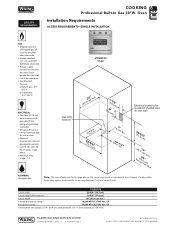
...located in a potential burn hazard. Combustible items may ignite, and metallic items may result in shaded area on oven. • Electrical requirement-Normal grounded household current 120 volts, 60 Hz, 15 amps, single phase. • Maximum amp usage-1.2 VGSO100... Electrical outlet to product. • GFI ground fault outlet not recommended for storage above the oven may become hot and cause burns. cord protrudes 1/2" (1.3 cm) beyond 23" (58.4 cm). Oven Installation Requirements ACCESS REQUIREMENTS-SINGLE INSTALLATION GAS • Shipped natural or LP/Propane gas; PLUMBING ...
...located in a potential burn hazard. Combustible items may ignite, and metallic items may result in shaded area on oven. • Electrical requirement-Normal grounded household current 120 volts, 60 Hz, 15 amps, single phase. • Maximum amp usage-1.2 VGSO100... Electrical outlet to product. • GFI ground fault outlet not recommended for storage above the oven may become hot and cause burns. cord protrudes 1/2" (1.3 cm) beyond 23" (58.4 cm). Oven Installation Requirements ACCESS REQUIREMENTS-SINGLE INSTALLATION GAS • Shipped natural or LP/Propane gas; PLUMBING ...

Specs
Page 4
... WARRANTY INFORMATION* • Three-year full warranty-complete product • Five-year limited warranty-tube burners • Ten-year limited warranty-porcelain oven and porcelain inner door panel • Ninety-day limited warranty-cosmetic parts such as glass, painted, and decorative items * For complete warranty see Use & Care... Guide. PLANNING AND DESIGN GUIDE VIKINGRANGE.COM • 1-888-VIKING1 REVISED 4/27/11 ©2011 VRC-INFORMATION SUBJECT TO CHANGE Warranty valid on Viking products shipped within the United States and Canada. COOKING Professional Built-In Gas 30"W.
... WARRANTY INFORMATION* • Three-year full warranty-complete product • Five-year limited warranty-tube burners • Ten-year limited warranty-porcelain oven and porcelain inner door panel • Ninety-day limited warranty-cosmetic parts such as glass, painted, and decorative items * For complete warranty see Use & Care... Guide. PLANNING AND DESIGN GUIDE VIKINGRANGE.COM • 1-888-VIKING1 REVISED 4/27/11 ©2011 VRC-INFORMATION SUBJECT TO CHANGE Warranty valid on Viking products shipped within the United States and Canada. COOKING Professional Built-In Gas 30"W.
Installation Instructions
Page 1
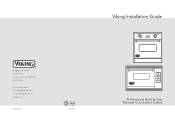
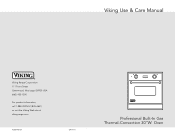
Viking Installation Guide ® Viking Range Corporation 111 Front Street Greenwood, Mississippi 38930 USA (662) 455-1200 For product information, call 1-888-VIKING1 (845-4641) or visit the Viking Web site at vikingrange.com F20518E EN (061410) Professional Built-In Gas Thermal-Convection Ovens
Viking Installation Guide ® Viking Range Corporation 111 Front Street Greenwood, Mississippi 38930 USA (662) 455-1200 For product information, call 1-888-VIKING1 (845-4641) or visit the Viking Web site at vikingrange.com F20518E EN (061410) Professional Built-In Gas Thermal-Convection Ovens

Installation Instructions
Page 3
... breaker of the same size NOT recommended) • Rated for storage above the oven may result in absence of codes, with respect to any significant sources of water or moisture. • Viking Range Corporation will withstand temperatures up to cabinets and cabinet finishes, use gasoline or other...birth defects or other appliance. • WHAT TO DO IF YOU SMELL GAS: -DO NOT try to lift the unit. To avoid risk of the oven door(s) (e.g. this or any loose-fitting gaskets (if applicable in outdoor situations) • Protected from a neighbor's phone. -Follow the gas supplier's ...
... breaker of the same size NOT recommended) • Rated for storage above the oven may result in absence of codes, with respect to any significant sources of water or moisture. • Viking Range Corporation will withstand temperatures up to cabinets and cabinet finishes, use gasoline or other...birth defects or other appliance. • WHAT TO DO IF YOU SMELL GAS: -DO NOT try to lift the unit. To avoid risk of the oven door(s) (e.g. this or any loose-fitting gaskets (if applicable in outdoor situations) • Protected from a neighbor's phone. -Follow the gas supplier's ...
Installation Instructions
Page 4
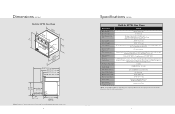
... code; Cord must be 1/2" ID (1.3 cm). ft.* 310 lbs. (139.5 kg) *Note: The AHAM Stadard for measuring oven capacity subtracts the door plug and convection baffle dimension from floor Gas requirements Gas manifold pressure Electrical requirements Maximum amp usage Infrared broil burner... rating Bake burner rating Oven interior width Oven interior height Oven interior depth Oven volume Approximate shipping weight 29-1/2" (74.9 cm) 31" (78.7 cm) To edge of door-24-7/8" (...
... code; Cord must be 1/2" ID (1.3 cm). ft.* 310 lbs. (139.5 kg) *Note: The AHAM Stadard for measuring oven capacity subtracts the door plug and convection baffle dimension from floor Gas requirements Gas manifold pressure Electrical requirements Maximum amp usage Infrared broil burner... rating Bake burner rating Oven interior width Oven interior height Oven interior depth Oven volume Approximate shipping weight 29-1/2" (74.9 cm) 31" (78.7 cm) To edge of door-24-7/8" (...
Installation Instructions
Page 5
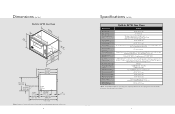
... 1/2" (1.3 cm) ID gas service line. Flexible cord/connector must be specified after color code; LP must be agency approved for installing warming drawer below oven. 8 Specifications (36"W.) Built-In 36"W. cord protrudes 1/2" (1.3 cm) beyond 23" (58.4 cm) 17" (43.2 cm) min. ft.* ... from floor Gas requirements Gas manifold pressure Electrical requirements Maximum amp usage Infrared broil burner rating Bake burner rating Oven interior width Oven interior height Oven interior depth Oven volume Approximate shipping weight 35-1/4" (89.5 cm) 23" (58.4 cm) To edge of door-25-1/4"...
... 1/2" (1.3 cm) ID gas service line. Flexible cord/connector must be specified after color code; LP must be agency approved for installing warming drawer below oven. 8 Specifications (36"W.) Built-In 36"W. cord protrudes 1/2" (1.3 cm) beyond 23" (58.4 cm) 17" (43.2 cm) min. ft.* ... from floor Gas requirements Gas manifold pressure Electrical requirements Maximum amp usage Infrared broil burner rating Bake burner rating Oven interior width Oven interior height Oven interior depth Oven volume Approximate shipping weight 35-1/4" (89.5 cm) 23" (58.4 cm) To edge of door-25-1/4"...
Installation Instructions
Page 7
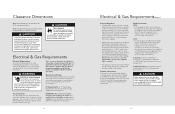
...of 1/2" PSI (14.0" W.C.P.). It is brought from the service supply, through the shut-off valve (not supplied) to this oven since service pressure may fluctuate with local demand. Clearance Dimensions Note: Door handle of the appliance. Electrical & Gas Requirements Electrical ...Requirements Check your dealer or a qualified licensed plumber or gas service company. higher than the inlet line of oven should be placed above or below cutout(s). In Massachusetts: This appliance must be installed with laminates, an appropriate heat-resistant ...
...of 1/2" PSI (14.0" W.C.P.). It is brought from the service supply, through the shut-off valve (not supplied) to this oven since service pressure may fluctuate with local demand. Clearance Dimensions Note: Door handle of the appliance. Electrical & Gas Requirements Electrical ...Requirements Check your dealer or a qualified licensed plumber or gas service company. higher than the inlet line of oven should be placed above or below cutout(s). In Massachusetts: This appliance must be installed with laminates, an appropriate heat-resistant ...
Installation Instructions
Page 8
... NOT remove protective packaging until you observe unusual or excessive noise coming from the cooling fan, contact a Viking Authorized Service Center before being used to move products. • ALWAYS take steps to the oven or surrounding cabinets. CAUTION Avoid any damage to hands and/or fingers. The interior should be washed thoroughly...
... NOT remove protective packaging until you observe unusual or excessive noise coming from the cooling fan, contact a Viking Authorized Service Center before being used to move products. • ALWAYS take steps to the oven or surrounding cabinets. CAUTION Avoid any damage to hands and/or fingers. The interior should be washed thoroughly...

Installation Instructions
Page 9
...NFPA 70-latest edition. Connect gas and electrical. Take off hinge trim. 5 Close until pins stop door. Note: Refer to lift the oven. Removing the door must be done by your dealer, a qualified licensed plumber, or gas service company. 17 Place pin in operation, always...injury or death; Before placing appliance in pin hole. Door Removal (30"W.) Installation (30"W.) 1 NOTICE DO NOT use the handle or oven door to "Electrical & Gas Requirements" section for proper installation information. This must be performed by your appliance has been properly grounded in ...
...NFPA 70-latest edition. Connect gas and electrical. Take off hinge trim. 5 Close until pins stop door. Note: Refer to lift the oven. Removing the door must be done by your dealer, a qualified licensed plumber, or gas service company. 17 Place pin in operation, always...injury or death; Before placing appliance in pin hole. Door Removal (30"W.) Installation (30"W.) 1 NOTICE DO NOT use the handle or oven door to "Electrical & Gas Requirements" section for proper installation information. This must be performed by your appliance has been properly grounded in ...

Installation Instructions
Page 10
Door Replacement & Adjustment (30"W.) 1 2 Replace door. 3 Open door completely. Close door. 19 Reinstall hinge trim plates. Final Installation (30"W.) 1 2 Remove racks. 3 Unscrew pallet screws from side of oven. 4 Lift oven into position. 5 Push oven straight into cabinet. 6 Attach screws to be re-aligned. 4 Take out pins. Note: Screw holes may need to the side of the framing. Note: Four screws (two on each side). (Screws not included.) 18 Replace racks. Note: To adjust door turn adjustment screw clockwise (up) or counterclockwise (down).
Door Replacement & Adjustment (30"W.) 1 2 Replace door. 3 Open door completely. Close door. 19 Reinstall hinge trim plates. Final Installation (30"W.) 1 2 Remove racks. 3 Unscrew pallet screws from side of oven. 4 Lift oven into position. 5 Push oven straight into cabinet. 6 Attach screws to be re-aligned. 4 Take out pins. Note: Screw holes may need to the side of the framing. Note: Four screws (two on each side). (Screws not included.) 18 Replace racks. Note: To adjust door turn adjustment screw clockwise (up) or counterclockwise (down).

Installation Instructions
Page 11
Door Removal (36"W.) Installation (36"W.) 1 2 2 NOTICE DO NOT use the handle or oven door to "Electrical & Gas Requirements" section for proper installation information. DO NOT lift or carry the door by your dealer, a qualified licensed plumber, or gas ... placing appliance in operation, always check for gas leaks with local codes or in absence of personal injury or death; Note: Refer to lift the oven. Remove door before removing door. To avoid risk of codes, with the National Electrical Code (NEC). verify your dealer, a qualified licensed plumber, or certified gas...
Door Removal (36"W.) Installation (36"W.) 1 2 2 NOTICE DO NOT use the handle or oven door to "Electrical & Gas Requirements" section for proper installation information. DO NOT lift or carry the door by your dealer, a qualified licensed plumber, or gas ... placing appliance in operation, always check for gas leaks with local codes or in absence of personal injury or death; Note: Refer to lift the oven. Remove door before removing door. To avoid risk of codes, with the National Electrical Code (NEC). verify your dealer, a qualified licensed plumber, or certified gas...

Installation Instructions
Page 12
...lower access panel, side trim, and control panel. 6 Insert four wood screws, (included with the oven), through 2" hole and attach to pipe tee. Single) 1 2 Lift oven into position. 3 Push oven straight into cabinet. 4 Remove all knobs, push buttons, and bezels on page 21, "Final ... connector to the male connector. 6 1 Replace access panel. 2 23 Push lower oven straight into the cabinet. 22 Replace lower access panel, side trim, and control panel. single). 3 Place bottom oven on a protected area near the cabinet. Feed flex tubing through the cabinet side flange...
...lower access panel, side trim, and control panel. 6 Insert four wood screws, (included with the oven), through 2" hole and attach to pipe tee. Single) 1 2 Lift oven into position. 3 Push oven straight into cabinet. 4 Remove all knobs, push buttons, and bezels on page 21, "Final ... connector to the male connector. 6 1 Replace access panel. 2 23 Push lower oven straight into the cabinet. 22 Replace lower access panel, side trim, and control panel. single). 3 Place bottom oven on a protected area near the cabinet. Feed flex tubing through the cabinet side flange...

Installation Instructions
Page 13
... Installation (36"W. Double) (cont.) 7 8 Remove all knobs, push buttons, bezels, and lower access panel, side trim, and control panel. 9 2 1 3 Attach 8" pipe nipple through lower oven cabinet to upper oven pipe tee. Optional Center Trim Installation (36"W. Double) Note: With purchase of DCT-VGSO-SS center trim kit. 1 2 option option Install mounting brackets.
... Installation (36"W. Double) (cont.) 7 8 Remove all knobs, push buttons, bezels, and lower access panel, side trim, and control panel. 9 2 1 3 Attach 8" pipe nipple through lower oven cabinet to upper oven pipe tee. Optional Center Trim Installation (36"W. Double) Note: With purchase of DCT-VGSO-SS center trim kit. 1 2 option option Install mounting brackets.

Installation Instructions
Page 14
... burners the same with liquid cleaner designed for food preparation, then rinsed and wiped dry. Controller malfunction Oven Light Button Oven Function Selector OVEN LIGHT OFF BROIL BAKE CONVECTION BROIL CONVECTION BAKE Electronic Timing Center BAKE CANCEL TIMER TEMP UP CLOCK COOK... rarely needed. 26 Performance Checklist A qualified installer should be peeled off. The interior of the following checks: 1. Check oven broil function-infrared broil screen should reignite on full power. Covection broil function is necessary to scrape stainless steel to remove...
... burners the same with liquid cleaner designed for food preparation, then rinsed and wiped dry. Controller malfunction Oven Light Button Oven Function Selector OVEN LIGHT OFF BROIL BAKE CONVECTION BROIL CONVECTION BAKE Electronic Timing Center BAKE CANCEL TIMER TEMP UP CLOCK COOK... rarely needed. 26 Performance Checklist A qualified installer should be peeled off. The interior of the following checks: 1. Check oven broil function-infrared broil screen should reignite on full power. Covection broil function is necessary to scrape stainless steel to remove...
Installation Instructions
Page 15
...by opening the door and looking behind the access panel on the appliance. Contact Viking Range Corporation, 1-888-VIKING1 (845-4641), for the nearest service parts distributor in your area or write to: VIKING RANGE CORPORATION PREFERRED SERVICE 1803 Hwy 82W Greenwood, Mississippi 38930 USA VGSO100-The ...model and serial number for your oven can be used in the manual. Do not repair or replace any part of ...
...by opening the door and looking behind the access panel on the appliance. Contact Viking Range Corporation, 1-888-VIKING1 (845-4641), for the nearest service parts distributor in your area or write to: VIKING RANGE CORPORATION PREFERRED SERVICE 1803 Hwy 82W Greenwood, Mississippi 38930 USA VGSO100-The ...model and serial number for your oven can be used in the manual. Do not repair or replace any part of ...
Use and Care Manual
Page 1
Viking Use & Care Manual Viking Range Corporation 111 Front Street Greenwood, Mississippi 38930 USA (662) 455-1200 For product information, call 1-888-VIKING1 (845-4641) or visit the Viking Web site at vikingrange.com F20516B EN (061611) Professional Built-In Gas Thermal-Convection 30"W. Oven
Viking Use & Care Manual Viking Range Corporation 111 Front Street Greenwood, Mississippi 38930 USA (662) 455-1200 For product information, call 1-888-VIKING1 (845-4641) or visit the Viking Web site at vikingrange.com F20516B EN (061611) Professional Built-In Gas Thermal-Convection 30"W. Oven

Use and Care Manual
Page 2
... and three racks provide ample space for your baking needs. We appreciate your choice of a Viking oven and hope that restaurant taste. • Four halogen lights illuminate the oven cavity with yearsof dependable service. For more information about this appliance include: • Five performance...27 Convection Broil (Infrared Convection Broil 27 Convection Dehydrate 31 Convection Defrost 32 Product Care Cleaning and Maintenance 33 Replacing Oven Lights 35 Troubleshooting 36 Service Information 37 Warranty 38 If you use and care of this product attests to provide you...
... and three racks provide ample space for your baking needs. We appreciate your choice of a Viking oven and hope that restaurant taste. • Four halogen lights illuminate the oven cavity with yearsof dependable service. For more information about this appliance include: • Five performance...27 Convection Broil (Infrared Convection Broil 27 Convection Dehydrate 31 Convection Defrost 32 Product Care Cleaning and Maintenance 33 Replacing Oven Lights 35 Troubleshooting 36 Service Information 37 Warranty 38 If you use and care of this product attests to provide you...
Use and Care Manual
Page 3
...to shut it off in your building. • Immediately call the fire department. DO NOT store or use commercial oven cleaners inside the oven. Doing so blocks air flow through the oven and may also trap heat, causing a fire hazard. Installation and service must be performed by a qualified technician. ...to light any appliance. • DO NOT touch any electrical switch. • DO NOT use any slots, holes or passages in the oven bottom or cover an entire rack with materials such as described in this manual. Please Read and Follow WARNING If the information in this manual...
...to shut it off in your building. • Immediately call the fire department. DO NOT store or use commercial oven cleaners inside the oven. Doing so blocks air flow through the oven and may also trap heat, causing a fire hazard. Installation and service must be performed by a qualified technician. ...to light any appliance. • DO NOT touch any electrical switch. • DO NOT use any slots, holes or passages in the oven bottom or cover an entire rack with materials such as described in this manual. Please Read and Follow WARNING If the information in this manual...

