Specs
Page 3
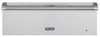
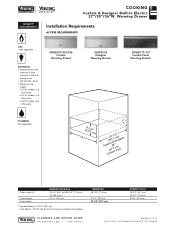
... ground circuit • 120 VAC/50 - 60 Hz • Maximum amp usage- Warming Drawer Installation Requirements ACCESS REQUIREMENTS GAS • Not applicable ELECTRICAL • Hardwire direct with separate 15-amp minimum 2-wire with product. UTILITY REQUIREMENTS COOKING Custom & Designer Built-In Electric 27"/30"/36"W. models-3.6 (425 watts) o 30"W. DEWD102 28...
... ground circuit • 120 VAC/50 - 60 Hz • Maximum amp usage- Warming Drawer Installation Requirements ACCESS REQUIREMENTS GAS • Not applicable ELECTRICAL • Hardwire direct with separate 15-amp minimum 2-wire with product. UTILITY REQUIREMENTS COOKING Custom & Designer Built-In Electric 27"/30"/36"W. models-3.6 (425 watts) o 30"W. DEWD102 28...
Installation Instructions
Page 4
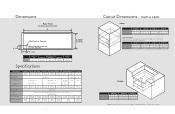
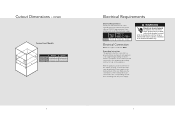
... depth 22-3/4" (27.8 cm) DFWD171 DFWD101 26" 29" (66.0 cm) (73.7 cm) 10-1/2" (26.7 cm) N/A N/A 17-1/4" 20-1/2" (43.8 cm) (52.1 cm) Electrical Requirements Hard wire direct with separate 15 amp minimum 2-wire with silicon caulk that is provided. 7 shipping wt. 80 lb. (36 kg) 90 lb. (40.5 kg) 110 lb. (49...
... depth 22-3/4" (27.8 cm) DFWD171 DFWD101 26" 29" (66.0 cm) (73.7 cm) 10-1/2" (26.7 cm) N/A N/A 17-1/4" 20-1/2" (43.8 cm) (52.1 cm) Electrical Requirements Hard wire direct with separate 15 amp minimum 2-wire with silicon caulk that is provided. 7 shipping wt. 80 lb. (36 kg) 90 lb. (40.5 kg) 110 lb. (49...
Installation Instructions
Page 5
... risk of the cabinet opening, connect wire leads extending from the power supply to the corresponding colored wires extending from the power supply. Hard wire direct with the circuit conductors and connected to operate, installation by an authorized installer only. 9 Maximum amp usage. Max. Cutout Dimensions - With the appliance positioned in...
... risk of the cabinet opening, connect wire leads extending from the power supply to the corresponding colored wires extending from the power supply. Hard wire direct with the circuit conductors and connected to operate, installation by an authorized installer only. 9 Maximum amp usage. Max. Cutout Dimensions - With the appliance positioned in...
Installation Instructions
Page 6
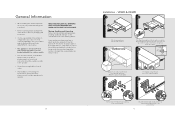
General Information • When installing this unit directly below other units, only install with Viking builtin products. • Remove warming drawer carefully from rear) 4 2" (5.1 cm) 2" (5.1 cm) Apply silicone caulk around the back of the installer to comply with local codes. ...
General Information • When installing this unit directly below other units, only install with Viking builtin products. • Remove warming drawer carefully from rear) 4 2" (5.1 cm) 2" (5.1 cm) Apply silicone caulk around the back of the installer to comply with local codes. ...
Use and Care Manual
Page 4
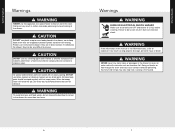
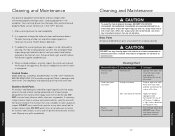
... brass parts. WARNING If the information in carbon monoxide poisoning and overheating of the drawer. CAUTION DO NOT use any slots, holes or passages in direct contact. DO NOT use brass cleaners or abrasive cleaners on stainless steel finish. Failure to keep foods warm that are coated with hot soapy water...
... brass parts. WARNING If the information in carbon monoxide poisoning and overheating of the drawer. CAUTION DO NOT use any slots, holes or passages in direct contact. DO NOT use brass cleaners or abrasive cleaners on stainless steel finish. Failure to keep foods warm that are coated with hot soapy water...
Use and Care Manual
Page 6
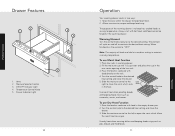
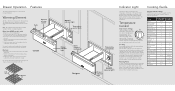
cold food cannot be heated in two ways: 1. The element will cycle on the rack. 4. Fill the moisture cup with food directly on and off to maintain a serving temperature. To use Moist Heat function 1. Product Controls Drawer Features 2 1 -MOISTURE + 3 4 5 1. ON/OFF Indicator Light 4. Drawer Indicator Light 10 ...
cold food cannot be heated in two ways: 1. The element will cycle on the rack. 4. Fill the moisture cup with food directly on and off to maintain a serving temperature. To use Moist Heat function 1. Product Controls Drawer Features 2 1 -MOISTURE + 3 4 5 1. ON/OFF Indicator Light 4. Drawer Indicator Light 10 ...
Use and Care Manual
Page 8
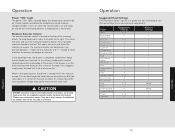
... Temperature Settings 2-3 2 1-2 2 2 2 2 1 2 2 3 2 2 2 2-3 2 2 2-3 2 3 2 2-3 2 Moisture Settings - + - + + + + + - This dry heat keeps the foods exterior dry and crisp. If melted onto the drawer, they are wrapped or placed in direct contact. Operation Power "ON" Light The power "ON" light is located at the top of the warming drawer. Moisture Selector Control The moisture selector control...
... Temperature Settings 2-3 2 1-2 2 2 2 2 1 2 2 3 2 2 2 2-3 2 2 2-3 2 3 2 2-3 2 Moisture Settings - + - + + + + + - This dry heat keeps the foods exterior dry and crisp. If melted onto the drawer, they are wrapped or placed in direct contact. Operation Power "ON" Light The power "ON" light is located at the top of the warming drawer. Moisture Selector Control The moisture selector control...
Use and Care Manual
Page 9
... is waterproof. Pull up any cleaning agent with hot towels to scrape stainless steel. Pull the knobs straight off knob. Wash in direction of rails). DO NOT use every day household cleaners that material when soapy water will permanently discolor stainless steel. Wipe up on all... finishes. Cleaning Chart Material/Problem Stainless steel/ Enamels Cleaning Products Mild cleaners Hard water spots and scales Vinegar and water Directions Sponge with cloth, then rinse with clear water and dry. Satisfactory for use on both right and left side rail until fully ...
... is waterproof. Pull up any cleaning agent with hot towels to scrape stainless steel. Pull the knobs straight off knob. Wash in direction of rails). DO NOT use every day household cleaners that material when soapy water will permanently discolor stainless steel. Wipe up on all... finishes. Cleaning Chart Material/Problem Stainless steel/ Enamels Cleaning Products Mild cleaners Hard water spots and scales Vinegar and water Directions Sponge with cloth, then rinse with clear water and dry. Satisfactory for use on both right and left side rail until fully ...
Quick Reference Guide
Page 1
... with 1/2 cup water and place the cup in the rear center opening in the rear center of the drawer and is touched gently with food directly on and off the bottom of the control panel. You may need to vary the heat settings to maintain the desired heat setting. However, your...
... with 1/2 cup water and place the cup in the rear center opening in the rear center of the drawer and is touched gently with food directly on and off the bottom of the control panel. You may need to vary the heat settings to maintain the desired heat setting. However, your...
Quick Reference Guide
Page 2
...are not meant to cover all instructions before cleaning. F20665A EN VIKING RANGE CORPORATION 111 Front Street • Greenwood, Mississippi 38930 USA • (662) 455-1200 (030911) Viking Quick Reference Guide Built-In Electric Warming Drawers (Indoor and ...Outdoor Models) Common sense, caution, and care must be exposed to a qualified servicer. Heating Elements • Use only dry potholders. It is specifically recommended in this guide are not followed. WARNING If the information in direct...
...are not meant to cover all instructions before cleaning. F20665A EN VIKING RANGE CORPORATION 111 Front Street • Greenwood, Mississippi 38930 USA • (662) 455-1200 (030911) Viking Quick Reference Guide Built-In Electric Warming Drawers (Indoor and ...Outdoor Models) Common sense, caution, and care must be exposed to a qualified servicer. Heating Elements • Use only dry potholders. It is specifically recommended in this guide are not followed. WARNING If the information in direct...