Use and Care Manual
Page 23
... upon request, and making the appliance reasonably accessible for products used in normal household use only authorized parts to insure protection under the limited warranty. Viking Range Corporation, warrantor, agrees to repair or replace, at 1-888-VIKING1 (845-4641), or write to obtain... slight color variation may vary from cosmetic defects in materials or workmanship (such as differences in all other than an authorized Viking Range Corporation service agency or representative. This warranty gives you specific legal rights, and you continue to jurisdiction. The serial...
... upon request, and making the appliance reasonably accessible for products used in normal household use only authorized parts to insure protection under the limited warranty. Viking Range Corporation, warrantor, agrees to repair or replace, at 1-888-VIKING1 (845-4641), or write to obtain... slight color variation may vary from cosmetic defects in materials or workmanship (such as differences in all other than an authorized Viking Range Corporation service agency or representative. This warranty gives you specific legal rights, and you continue to jurisdiction. The serial...

Side Panel Kit Instructions
Page 1
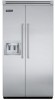
...side trim and that the rear flanges of the panel are making contact with Built-In Refrigerator/Freezers and Full Height Wine Cellars VIKING 111 Front Street Greenwood, Mississippi 38930 USA (662)455-1200 IMPORTANT - Attach the panel to cause injury during handling. Failure ... should leave instructions with a 9/64" (.36cm) diameter drill bit. (figure 2) 6. attached to maintain panel at the rear of the unit. Insure that the panel is to installation instructions included with the top of the unit using the five (5) black #8 sheet metal screws provided. 7. INSTALLATION ...
...side trim and that the rear flanges of the panel are making contact with Built-In Refrigerator/Freezers and Full Height Wine Cellars VIKING 111 Front Street Greenwood, Mississippi 38930 USA (662)455-1200 IMPORTANT - Attach the panel to cause injury during handling. Failure ... should leave instructions with a 9/64" (.36cm) diameter drill bit. (figure 2) 6. attached to maintain panel at the rear of the unit. Insure that the panel is to installation instructions included with the top of the unit using the five (5) black #8 sheet metal screws provided. 7. INSTALLATION ...