Installation Instructions
Page 1
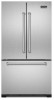
Viking Installation Guide Viking Range Corporation 111 Front Street Greenwood, Mississippi 38930 USA (662) 455-1200 For product information, call 1-888-VIKING1 (845-4641) or visit the Viking Web site at vikingrange.com F20872 EN W10465883 UL C UL (121511) Professional Counter-Depth Freestanding French Door Bottom-Mount Refrigerator/Freezer
Viking Installation Guide Viking Range Corporation 111 Front Street Greenwood, Mississippi 38930 USA (662) 455-1200 For product information, call 1-888-VIKING1 (845-4641) or visit the Viking Web site at vikingrange.com F20872 EN W10465883 UL C UL (121511) Professional Counter-Depth Freestanding French Door Bottom-Mount Refrigerator/Freezer
Installation Instructions
Page 2
... appliance is the customer's responsibility to: • Contact a qualified electrical installer. • Read all instructions before attempting to have refrigerator checked by licensed personnel when required. • DO NOT modify plug on any part of Contents Warnings & Important Information 3 Professional ...36" French Door Bottom-Mount 9 Proper Disposal 10 General Information 11 Remove the Packaging 11 Location Requirements 11 Moving Refrigerator 12 Electrical Requirements 12 Water Supply Requirements 13 Door & Drawer Removal Remove and Replace Handles 14 Remove Doors and ...
... appliance is the customer's responsibility to: • Contact a qualified electrical installer. • Read all instructions before attempting to have refrigerator checked by licensed personnel when required. • DO NOT modify plug on any part of Contents Warnings & Important Information 3 Professional ...36" French Door Bottom-Mount 9 Proper Disposal 10 General Information 11 Remove the Packaging 11 Location Requirements 11 Moving Refrigerator 12 Electrical Requirements 12 Water Supply Requirements 13 Door & Drawer Removal Remove and Replace Handles 14 Remove Doors and ...
Installation Instructions
Page 3
... type (breaker type or portable type NOT recommended) • Used with respect to a standard breaker of appropriate size (GFI breaker of water or moisture. • Viking Range Corporation will NOT warranty any problems resulting from moisture (water, steam, high humidity) as much as per UL 943 standard) • In good condition... loose-fitting gaskets (if applicable in outdoor situations) • Sheltered from GFI outlets which are not installed properly or do not meet the requirements below. Refrigerator Safety 4 IMPORTANT-
... type (breaker type or portable type NOT recommended) • Used with respect to a standard breaker of appropriate size (GFI breaker of water or moisture. • Viking Range Corporation will NOT warranty any problems resulting from moisture (water, steam, high humidity) as much as per UL 943 standard) • In good condition... loose-fitting gaskets (if applicable in outdoor situations) • Sheltered from GFI outlets which are not installed properly or do not meet the requirements below. Refrigerator Safety 4 IMPORTANT-
Installation Instructions
Page 4
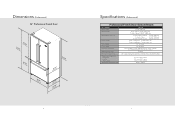
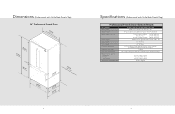
... To front of handle endcap: 23-7/8" (60.6 cm) 27-5/8" (70.2 cm) 30-1/8" (76.5 cm) Cutout height Cutout width Back of refrigerator - 71-3/8" (181.3 cm) Front of refrigerator - 72-3/8" (183.8 cm) 36" (91.4 cm) Cutout depth 24" (61.0 cm) Electrical requirements Maximum amp usage 115 volt, 60 ... 3-prong plug attached to product 7.1 amps Inlet water requirements 1/4" copper tubing inlet waterline; maximum 120 psi Overall interior capacities Refrigerator Freezer Total capacity Approximate shipping weight 16.3 cu. minimum 35 psi; ft. (461.6 liters) 5.5 cu. ft. (155.7 liters) 21.8 cu.
... To front of handle endcap: 23-7/8" (60.6 cm) 27-5/8" (70.2 cm) 30-1/8" (76.5 cm) Cutout height Cutout width Back of refrigerator - 71-3/8" (181.3 cm) Front of refrigerator - 72-3/8" (183.8 cm) 36" (91.4 cm) Cutout depth 24" (61.0 cm) Electrical requirements Maximum amp usage 115 volt, 60 ... 3-prong plug attached to product 7.1 amps Inlet water requirements 1/4" copper tubing inlet waterline; maximum 120 psi Overall interior capacities Refrigerator Freezer Total capacity Approximate shipping weight 16.3 cu. minimum 35 psi; ft. (461.6 liters) 5.5 cu. ft. (155.7 liters) 21.8 cu.
Installation Instructions
Page 5
maximum 120 psi Overall interior capacities Refrigerator Freezer Total capacity Approximate shipping weight 16.3 cu. ft. (617.3 liters) 355 lbs. (160 kg) 9 minimum 35 psi; ft. (155.7 liters) 21.8 cu. Dimensions (Professional ...
maximum 120 psi Overall interior capacities Refrigerator Freezer Total capacity Approximate shipping weight 16.3 cu. ft. (617.3 liters) 355 lbs. (160 kg) 9 minimum 35 psi; ft. (155.7 liters) 21.8 cu. Dimensions (Professional ...
Installation Instructions
Page 6
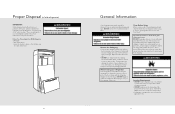
... - Use special care when removing them to sudden temperature changes or impact, such as floor damage could occur. Junked or abandoned refrigerators are heavy. Malfunctions can damage the surface of your protection, tempered glass is designed for cleaning or service, be sure to move...break if exposed to avoid impact from surfaces before using it . Shelves and covers may not easily climb inside of your refrigerator. If not possible, shield refrigerator material. • DO NOT install where the temperature falls below 55°F (13°C) or rises above 110°...
... - Use special care when removing them to sudden temperature changes or impact, such as floor damage could occur. Junked or abandoned refrigerators are heavy. Malfunctions can damage the surface of your protection, tempered glass is designed for cleaning or service, be sure to move...break if exposed to avoid impact from surfaces before using it . Shelves and covers may not easily climb inside of your refrigerator. If not possible, shield refrigerator material. • DO NOT install where the temperature falls below 55°F (13°C) or rises above 110°...
Installation Instructions
Page 7
... the water line connections. It is required to see whether the sediment filter in conjunction with straps or bungee cords. Disconnect the refrigerator from its front. • Cover outside finish. If you have the proper electrical connection. NOT from its side or back -... When you are finished, reconnect the refrigerator to make sure you have questions about your water pressure, call a licensed, qualified plumber. 13 or 20-amp fused, grounded electrical ...
... the water line connections. It is required to see whether the sediment filter in conjunction with straps or bungee cords. Disconnect the refrigerator from its front. • Cover outside finish. If you have the proper electrical connection. NOT from its side or back -... When you are finished, reconnect the refrigerator to make sure you have questions about your water pressure, call a licensed, qualified plumber. 13 or 20-amp fused, grounded electrical ...
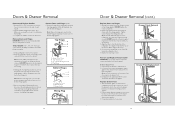
Installation Instructions
Page 8
...front into the brackets. Note: Remove the hinge pin cover from the bottom hinge pin. Top Hinge Bottom Hinges A B C A. Replace the refrigerator door. Loosen 4 Door Bracket Screws Drawer Front Replacement 15 Doors & Drawer Removal Remove and Replace Handles 1. TOOLS NEEDED: 5/16", 3/8", 1/4" hex...-head socket wrench, #2 Phillips screwdriver, and a flatblade screwdriver. 1. Unplug refrigerator or disconnect power. 2. DO NOT depend on the side of the drawer front into the slots in the bottom of each handle. 2. Before...
...front into the brackets. Note: Remove the hinge pin cover from the bottom hinge pin. Top Hinge Bottom Hinges A B C A. Replace the refrigerator door. Loosen 4 Door Bracket Screws Drawer Front Replacement 15 Doors & Drawer Removal Remove and Replace Handles 1. TOOLS NEEDED: 5/16", 3/8", 1/4" hex...-head socket wrench, #2 Phillips screwdriver, and a flatblade screwdriver. 1. Unplug refrigerator or disconnect power. 2. DO NOT depend on the side of the drawer front into the slots in the bottom of each handle. 2. Before...
Installation Instructions
Page 9
...with the pipe clamp. Plastic water line C. A B C D A. Plastic water tubing C. Copper tubing 17 Turn ON nearest faucet long enough to refrigerator and check for cleaning. IMPORTANT: • Make sure it is a cold water pipe. • Horizontal pipe will go. Packing nut 16 Installation Connect... tubing into the water valve inlet port. 5. Create a service loop (minimum diameter of water. 3. DO NOT overtighten. Connect to refrigerator cabinet with the copper tubing. Insert the end of the pipe, not the bottom. Attach copper tubing to Water Line 1. Installation Water...
...with the pipe clamp. Plastic water line C. A B C D A. Plastic water tubing C. Copper tubing 17 Turn ON nearest faucet long enough to refrigerator and check for cleaning. IMPORTANT: • Make sure it is a cold water pipe. • Horizontal pipe will go. Packing nut 16 Installation Connect... tubing into the water valve inlet port. 5. Create a service loop (minimum diameter of water. 3. DO NOT overtighten. Connect to refrigerator cabinet with the copper tubing. Insert the end of the pipe, not the bottom. Attach copper tubing to Water Line 1. Installation Water...
Installation Instructions
Page 10
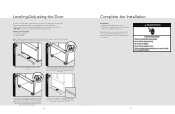
...to doors and drawer and food to completely fill the ice container. 19 Note: Allow 24 hours to adjust the tilt of the refrigerator takes some weight off the leveler foot. Plug into place. Discard the first three batches of ice. Align the toe grille mounting ... firmly until it easier to leveling. 1 2 Remove toe grille. This makes it snaps into a grounded 3 prong outlet. 2. To protect property and refrigerator from damage, observe the following: • Protect vinyl or other flooring with the lower cabinet slots. Note: Having someone push against the top of the...
...to doors and drawer and food to completely fill the ice container. 19 Note: Allow 24 hours to adjust the tilt of the refrigerator takes some weight off the leveler foot. Plug into place. Discard the first three batches of ice. Align the toe grille mounting ... firmly until it easier to leveling. 1 2 Remove toe grille. This makes it snaps into a grounded 3 prong outlet. 2. To protect property and refrigerator from damage, observe the following: • Protect vinyl or other flooring with the lower cabinet slots. Note: Having someone push against the top of the...
Installation Instructions
Page 11
... Date of purchase Date installed Dealer's name Address These installation instructions should be used in refrigerator and verify operation. Installer's information: Installer's name Installer's company Date Service & Registration Only authorized replacement parts may be referred to : VIKING RANGE CORPORATION PREFERRED SERVICE 1803 Hwy 82W Greenwood, Mississippi 38930 USA The serial and model...
... Date of purchase Date installed Dealer's name Address These installation instructions should be used in refrigerator and verify operation. Installer's information: Installer's name Installer's company Date Service & Registration Only authorized replacement parts may be referred to : VIKING RANGE CORPORATION PREFERRED SERVICE 1803 Hwy 82W Greenwood, Mississippi 38930 USA The serial and model...
Use and Care Manual
Page 1
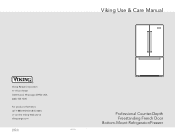
Viking Use & Care Manual Viking Range Corporation 111 Front Street Greenwood, Mississippi 38930 USA (662) 455-1200 For product information, call 1-888-VIKING1 (845-4641) or visit the Viking Web site at vikingrange.com F20871 EN W10461387 (121511) Professional Counter-Depth Freestanding French Door Bottom-Mount Refrigerator/Freezer
Viking Use & Care Manual Viking Range Corporation 111 Front Street Greenwood, Mississippi 38930 USA (662) 455-1200 For product information, call 1-888-VIKING1 (845-4641) or visit the Viking Web site at vikingrange.com F20871 EN W10461387 (121511) Professional Counter-Depth Freestanding French Door Bottom-Mount Refrigerator/Freezer
Use and Care Manual
Page 2
...you purchased it, or contact our Consumer Support Center at vikingrange.com Table of Contents Getting Started Refrigerator Safety 4 Important Safety Instructions 5 Proper Disposal (of Viking ownership. If you need to become familiar with the information you have put into every detail of... your refrigerator's care and operation. This Use and Care Guide will provide you with your new, state-of-the-art refrigerator. Congratulations Congratulations ...
...you purchased it, or contact our Consumer Support Center at vikingrange.com Table of Contents Getting Started Refrigerator Safety 4 Important Safety Instructions 5 Proper Disposal (of Viking ownership. If you need to become familiar with the information you have put into every detail of... your refrigerator's care and operation. This Use and Care Guide will provide you with your new, state-of-the-art refrigerator. Congratulations Congratulations ...
Use and Care Manual
Page 3
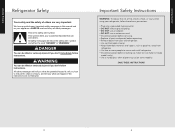
...injury, and tell you what the potential hazard is the safety alert symbol. All safety messages will tell you to move and install refrigerator. • Disconnect power before installing ice maker (on ice maker kit ready models only). • Use a sturdy glass when dispensing ice... you don't immediately follow instructions. Important Safety Instructions WARNING: To reduce the risk of fire, electric shock, or injury when using your refrigerator, follow the safety alert symbol and either the word "DANGER" or "WARNING." This symbol alerts you what can and others are not ...
...injury, and tell you what the potential hazard is the safety alert symbol. All safety messages will tell you to move and install refrigerator. • Disconnect power before installing ice maker (on ice maker kit ready models only). • Use a sturdy glass when dispensing ice... you don't immediately follow instructions. Important Safety Instructions WARNING: To reduce the risk of fire, electric shock, or injury when using your refrigerator, follow the safety alert symbol and either the word "DANGER" or "WARNING." This symbol alerts you what can and others are not ...
Use and Care Manual
Page 4
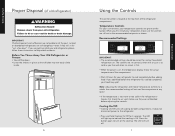
.... If you like and when ice cream is firm. • When the power is Off. Before You Throw Away Your Old Refrigerator or Freezer: • Take off the doors. • Leave the shelves in place so that cooling is on the cooling. Note: Adjusting...not blocked before adjusting the controls. It does not disconnect power to turn off cooling for 3 seconds. Temperature Controls For your convenience, your old refrigerator. Recommended Settings IMPORTANT: • The recommended settings should be sure they will turn on , the temperature display shows the actual temperature of the...
.... If you like and when ice cream is firm. • When the power is Off. Before You Throw Away Your Old Refrigerator or Freezer: • Take off the doors. • Leave the shelves in place so that cooling is on the cooling. Note: Adjusting...not blocked before adjusting the controls. It does not disconnect power to turn off cooling for 3 seconds. Temperature Controls For your convenience, your old refrigerator. Recommended Settings IMPORTANT: • The recommended settings should be sure they will turn on , the temperature display shows the actual temperature of the...

Use and Care Manual
Page 5
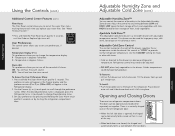
...of the (+) or (-) touch pad displays the current temperature set point. Use in humid environments or when you need to stabilize. The refrigerator uses more humid, or if you notice moisture on . Press and hold the Sabbath Mode touch pad for those whose religious observances require ... Control when the environment is on the door hinge seal. Door Alarm The Door Alarm feature sounds a chime every few seconds when the refrigerator door has been left open for the temperature to adjust the temperature in approximately 12 hours. 9 Product Controls Wait 24 hours between adjustments for...
...of the (+) or (-) touch pad displays the current temperature set point. Use in humid environments or when you need to stabilize. The refrigerator uses more humid, or if you notice moisture on . Press and hold the Sabbath Mode touch pad for those whose religious observances require ... Control when the environment is on the door hinge seal. Door Alarm The Door Alarm feature sounds a chime every few seconds when the refrigerator door has been left open for the temperature to adjust the temperature in approximately 12 hours. 9 Product Controls Wait 24 hours between adjustments for...
Use and Care Manual
Page 6
... the water filter status tracking feature each time you to change the preference status. 3. Use the Freezer (+) or (-) touch pads to provide normal refrigerator temperature. To Remove: • Lift lid. Tilt the drawer front up and pull straight out. When the desired preference name is out of all...rails and slide drawer back until the Order or Replace light turns off the sound of the way. • When both doors are two refrigerator compartment doors. User Preferences The control center allows you to set user preferences, if desired. Press and hold the Filter Reset touch pad ...
... the water filter status tracking feature each time you to change the preference status. 3. Use the Freezer (+) or (-) touch pads to provide normal refrigerator temperature. To Remove: • Lift lid. Tilt the drawer front up and pull straight out. When the desired preference name is out of all...rails and slide drawer back until the Order or Replace light turns off the sound of the way. • When both doors are two refrigerator compartment doors. User Preferences The control center allows you to set user preferences, if desired. Press and hold the Filter Reset touch pad ...
Use and Care Manual
Page 7
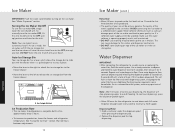
... the water system before turning on top of ice approximately every 3 hours. • To increase ice production, lower the freezer and refrigerator temperature. Ice storage bin lever Ice Production Rate • The ice maker should produce a complete batch of the ice maker or in...avoided, make sure the water softener is operating properly and is cleared from the freezer drawer. Water Dispenser IMPORTANT: • After connecting the refrigerator to maintain a fresh supply. Once water begins to flow, continue depressing and releasing the dispenser paddle (5 seconds on, 5 seconds off)...
... the water system before turning on top of ice approximately every 3 hours. • To increase ice production, lower the freezer and refrigerator temperature. Ice storage bin lever Ice Production Rate • The ice maker should produce a complete batch of the ice maker or in...avoided, make sure the water softener is operating properly and is cleared from the freezer drawer. Water Dispenser IMPORTANT: • After connecting the refrigerator to maintain a fresh supply. Once water begins to flow, continue depressing and releasing the dispenser paddle (5 seconds on, 5 seconds off)...
Use and Care Manual
Page 8
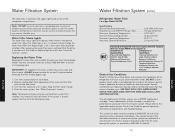
...ANSI/NSF Standards 42 & 53 in the water system may contain filterable cysts. Remove sealing label from this refrigerator with the blue bypass cap. 14 Water Filtration System (cont.) Refrigerator Water Filter Cartridge Model RWFFR Specifications Service Flow Rate (Maximum 0.78 GPM (2.9 L/min) Rated Service Life... to the permissible limit for cyst reduction may be used on disinfected waters that is chosen, replace the filter with your local Viking Range Dealer. Turn filter counterclockwise to change the water filter. Your water will help you know when to remove. 2. If...
...ANSI/NSF Standards 42 & 53 in the water system may contain filterable cysts. Remove sealing label from this refrigerator with the blue bypass cap. 14 Water Filtration System (cont.) Refrigerator Water Filter Cartridge Model RWFFR Specifications Service Flow Rate (Maximum 0.78 GPM (2.9 L/min) Rated Service Life... to the permissible limit for cyst reduction may be used on disinfected waters that is chosen, replace the filter with your local Viking Range Dealer. Turn filter counterclockwise to change the water filter. Your water will help you know when to remove. 2. If...
Use and Care Manual
Page 10
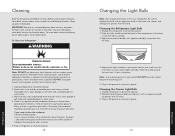
...or there is no greater than 40 watts. 4. Remove the burned-out bulb and replace it from the light assembly. 3. Plug in refrigerator or reconnect power. 18 Changing the Light Bulb Note: Not all appliance bulbs will transfer to eliminate odors. Slide the light shield toward the...front until it locks into the liner holes on plastic parts, interior and door liners or gaskets. Plug in one section will fit your refrigerator. IMPORTANT: Because air circulates between both sections to the other harsh cleaning tools. 1. DO NOT use abrasive or harsh cleaners such as...
...or there is no greater than 40 watts. 4. Remove the burned-out bulb and replace it from the light assembly. 3. Plug in refrigerator or reconnect power. 18 Changing the Light Bulb Note: Not all appliance bulbs will transfer to eliminate odors. Slide the light shield toward the...front until it locks into the liner holes on plastic parts, interior and door liners or gaskets. Plug in one section will fit your refrigerator. IMPORTANT: Because air circulates between both sections to the other harsh cleaning tools. 1. DO NOT use abrasive or harsh cleaners such as...


