Installation Instructions
Page 2
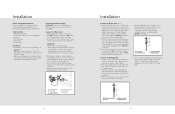
... separate 115 volt, 15 amp., 60 cycle line. • DO NOT tamper with refrigerator controls. • DO NOT service or replace any part of Contents Warnings & Important Information 3 Professional Dimensions (36" Bottom-Mount & French Door Bottom-Mount 6 Specifications (36" Bottom-Mount & French ...8226; ALWAYS disconnect refrigerator from power cord. • Refrigerator is required. Table of the refrigerator. • DO NOT clean refrigerator parts with flammable fluids. Please Read and Follow It is equipped with a power supply cord having a 3-prong grounding plug. All connections for...
... separate 115 volt, 15 amp., 60 cycle line. • DO NOT tamper with refrigerator controls. • DO NOT service or replace any part of Contents Warnings & Important Information 3 Professional Dimensions (36" Bottom-Mount & French Door Bottom-Mount 6 Specifications (36" Bottom-Mount & French ...8226; ALWAYS disconnect refrigerator from power cord. • Refrigerator is required. Table of the refrigerator. • DO NOT clean refrigerator parts with flammable fluids. Please Read and Follow It is equipped with a power supply cord having a 3-prong grounding plug. All connections for...
Installation Instructions
Page 7
... is connected to your water pressure, call a licensed, qualified plumber. Disconnect the refrigerator from its back. If you are finished, reconnect the refrigerator to internal parts. • Use an appliance dolly when moving refrigerator. If the water pressure to the reverse osmosis system is less than 40 to 60 psi (276...
... is connected to your water pressure, call a licensed, qualified plumber. Disconnect the refrigerator from its back. If you are finished, reconnect the refrigerator to internal parts. • Use an appliance dolly when moving refrigerator. If the water pressure to the reverse osmosis system is less than 40 to 60 psi (276...
Installation Instructions
Page 8
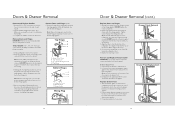
...bins from the bottom hinge pin. Lift the refrigerator door from doors. Before removing the left -hand side door from the door. Remove the parts for the bottom hinge as shown in place while you to four turns. Lift the left -hand side door, disconnect the wiring plug located.... 5. Doors & Drawer Removal Remove and Replace Handles 1. To replace the handles, reverse the directions. Tighten screws. See Wiring Plug graphic. Assemble the parts for later use . Pull the handle straight out from the bottom hinge pin. Starting with the top of the freezer compartment.
...bins from the bottom hinge pin. Lift the refrigerator door from doors. Before removing the left -hand side door from the door. Remove the parts for the bottom hinge as shown in place while you to four turns. Lift the left -hand side door, disconnect the wiring plug located.... 5. Doors & Drawer Removal Remove and Replace Handles 1. To replace the handles, reverse the directions. Tighten screws. See Wiring Plug graphic. Assemble the parts for later use . Pull the handle straight out from the bottom hinge pin. Starting with the top of the freezer compartment.
Installation Instructions
Page 9
... A B C D E F G E. Slip the compression sleeve and compression nut on the rear of the refrigerator to avoid kinks. 4. Installation Water Supply Requirements Gather the required tools and parts before the water line is connected, turn the ice maker OFF. Remove the plastic cap from moving. A B C D E A. Insert the end of the copper tubing into...
... A B C D E F G E. Slip the compression sleeve and compression nut on the rear of the refrigerator to avoid kinks. 4. Installation Water Supply Requirements Gather the required tools and parts before the water line is connected, turn the ice maker OFF. Remove the plastic cap from moving. A B C D E A. Insert the end of the copper tubing into...
Installation Instructions
Page 10
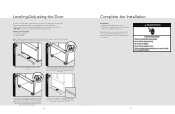
... foot screw clockwise. Leveling/Adjusting the Door To enhance the appearance and maintain performance, the refrigerator should be level. Plug into place. Return all removable parts to doors and drawer and food to produce the first batch of the refrigerator takes some weight off the leveler foot. Note: Allow 24 hours...
... foot screw clockwise. Leveling/Adjusting the Door To enhance the appearance and maintain performance, the refrigerator should be level. Plug into place. Return all removable parts to doors and drawer and food to produce the first batch of the refrigerator takes some weight off the leveler foot. Note: Allow 24 hours...

Installation Instructions
Page 11
Contact Viking Range Corporation, 1-888-VIKING1 (845-4641), for the nearest service parts distributor in your area or write to a qualified technician. Performance Checklist h Plug-in performing service on the appliance. You ... your refrigerator are located on water connection. Installer's information: Installer's name Installer's company Date Service & Registration Only authorized replacement parts may be referred to : VIKING RANGE CORPORATION PREFERRED SERVICE 1803 Hwy 82W Greenwood, Mississippi 38930 USA The serial and model numbers for future reference. 20 21
Contact Viking Range Corporation, 1-888-VIKING1 (845-4641), for the nearest service parts distributor in your area or write to a qualified technician. Performance Checklist h Plug-in performing service on the appliance. You ... your refrigerator are located on water connection. Installer's information: Installer's name Installer's company Date Service & Registration Only authorized replacement parts may be referred to : VIKING RANGE CORPORATION PREFERRED SERVICE 1803 Hwy 82W Greenwood, Mississippi 38930 USA The serial and model numbers for future reference. 20 21
Use and Care Manual
Page 3
... hazard is the safety alert symbol. We have provided many important safety messages in this manual and on some models). ALWAYS read and obey all parts and panels before operating. • Remove doors from your old refrigerator. • Use nonflammable cleaner. • Keep flammable materials and vapors, such as gasoline, away...
... hazard is the safety alert symbol. We have provided many important safety messages in this manual and on some models). ALWAYS read and obey all parts and panels before operating. • Remove doors from your old refrigerator. • Use nonflammable cleaner. • Keep flammable materials and vapors, such as gasoline, away...
Use and Care Manual
Page 7
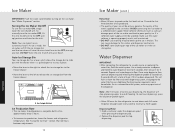
....) Remember • Allow 24 hours to the ice bin and dispenser mechanism. • DO NOT store anything sharp to the ice maker. This can damage parts of the ice maker and lead to the OFF (arm up the ice in place. • Move the lever to the right to attach the...
....) Remember • Allow 24 hours to the ice bin and dispenser mechanism. • DO NOT store anything sharp to the ice maker. This can damage parts of the ice maker and lead to the OFF (arm up the ice in place. • Move the lever to the right to attach the...
Use and Care Manual
Page 10
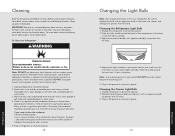
... NOT use paper towels, scouring pads, or other . Product Care Cleaning Both the refrigerator and freezer sections defrost automatically. Hand wash, rinse, and dry removable parts and interior surfaces thoroughly. If the environment is particularly greasy or dusty, or there is no need to clean the condenser: • Remove the base... and replace it from the light assembly. 3. Plug in warm water. 3. Wipe up spills immediately. Replace the light shield by inserting the tabs on plastic parts, interior and door liners or gaskets.
... NOT use paper towels, scouring pads, or other . Product Care Cleaning Both the refrigerator and freezer sections defrost automatically. Hand wash, rinse, and dry removable parts and interior surfaces thoroughly. If the environment is particularly greasy or dusty, or there is no need to clean the condenser: • Remove the base... and replace it from the light assembly. 3. Plug in warm water. 3. Wipe up spills immediately. Replace the light shield by inserting the tabs on plastic parts, interior and door liners or gaskets.
Use and Care Manual
Page 14
...90) days from the date of original retail purchase. SIX YEAR FULL WARRANTY ON SEALED REFRIGERATION PARTS AS LISTED Any sealed refrigeration system component, as detailed below , is longer. Viking Range Corporation, warrantor, agrees to repair or replace, at its option, any question of safety ... may be performed by anyone other costs, including labor. The name of the inherent differences in painted parts and porcelain parts as well as specified under the warranty. Viking Range Corporation, warrantor, agrees to the selling dealer within ninety (90) days from the dealer or ...
...90) days from the date of original retail purchase. SIX YEAR FULL WARRANTY ON SEALED REFRIGERATION PARTS AS LISTED Any sealed refrigeration system component, as detailed below , is longer. Viking Range Corporation, warrantor, agrees to repair or replace, at its option, any question of safety ... may be performed by anyone other costs, including labor. The name of the inherent differences in painted parts and porcelain parts as well as specified under the warranty. Viking Range Corporation, warrantor, agrees to the selling dealer within ninety (90) days from the dealer or ...

Energy Guide
Page 1
...least energy / Consomme le moins d'energie Similar Models compared Model number Type 5 20.5-22.4 volume in fl'/volume en pP VCFF236SS", RDDFF236SS 580 kWh Uses most energy / Consomme le plus d'energie Modeles similaires compares Numero du modele Removal of this label ... EnerGuide rating to determine how this is an offense (S.C. 1992, c. 36). Part No. Refrigerator-Freezer 'Automatic Defrost 'Bottom Mounted Freezer 'Without Through-the-Door-Ice Service Viking Range Corporation Model(s):VCFF236SS*, RDDFF236SS Capacity: 21.8 Cubic Feet Estimated Yearly Operating Cost $49 $61 Cost...
...least energy / Consomme le moins d'energie Similar Models compared Model number Type 5 20.5-22.4 volume in fl'/volume en pP VCFF236SS", RDDFF236SS 580 kWh Uses most energy / Consomme le plus d'energie Modeles similaires compares Numero du modele Removal of this label ... EnerGuide rating to determine how this is an offense (S.C. 1992, c. 36). Part No. Refrigerator-Freezer 'Automatic Defrost 'Bottom Mounted Freezer 'Without Through-the-Door-Ice Service Viking Range Corporation Model(s):VCFF236SS*, RDDFF236SS Capacity: 21.8 Cubic Feet Estimated Yearly Operating Cost $49 $61 Cost...


