

Countertop Rear Trim - Installation Instructions
Page 1
Viking Installation Guide Viking Range Corporation 111 Front Street Greenwood, Mississippi 38930 USA (662) 455-1200 For product information call 1-888-VIKING1 (845-4641) or visit the Viking Web site at vikingrange.com F1448K EN Range/Rangetop Rear Trim Accessories & Range Curb Base Fronts (020211)
Viking Installation Guide Viking Range Corporation 111 Front Street Greenwood, Mississippi 38930 USA (662) 455-1200 For product information call 1-888-VIKING1 (845-4641) or visit the Viking Web site at vikingrange.com F1448K EN Range/Rangetop Rear Trim Accessories & Range Curb Base Fronts (020211)
Countertop Rear Trim - Installation Instructions
Page 2
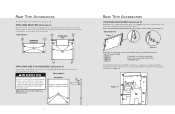
...Designer models. On VGSC530, VGSC536 and VGSC548 models there is Non-Combustible, these models, the spacers are needed to space the range off a combustible wall a prescribed safe distance. A 2 Rear Trim Accessories ATTACHING BACKGUARD (Illustration III) Backguards come equipped with... the supplied screws, before installing. ATTACHING REAR TRIM (Illustration I ) B RANGETOP REAR VIEW B RANGE REAR B VIEW B A A ATTACHING SHELF ON HIGH-SHELF (Illustration II) Place the top rolled edge (X) over the front lip of ...
...Designer models. On VGSC530, VGSC536 and VGSC548 models there is Non-Combustible, these models, the spacers are needed to space the range off a combustible wall a prescribed safe distance. A 2 Rear Trim Accessories ATTACHING BACKGUARD (Illustration III) Backguards come equipped with... the supplied screws, before installing. ATTACHING REAR TRIM (Illustration I ) B RANGETOP REAR VIEW B RANGE REAR B VIEW B A A ATTACHING SHELF ON HIGH-SHELF (Illustration II) Place the top rolled edge (X) over the front lip of ...
Countertop Rear Trim - Installation Instructions
Page 3
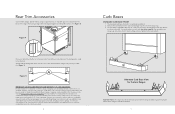
... unit. Normal installation for island trim on each side, but is also truly heat-resistant. 4 Curb Bases STANDARD CURB BASE FRONT 1. Only in the range installation guide for proper airflow when using the standard curb base. 5 remove, tighten bolts, and reattach. Remove the assembly from heat damage against a combustible... 6" (15.2 cm) of minimum clearance to a rear wall, or when a truly non-combustible material is used, will Viking Range Corporation accept responsibility for any type of wall at zero clearance to the rear wall as long as specified in those cases where the...
... unit. Normal installation for island trim on each side, but is also truly heat-resistant. 4 Curb Bases STANDARD CURB BASE FRONT 1. Only in the range installation guide for proper airflow when using the standard curb base. 5 remove, tighten bolts, and reattach. Remove the assembly from heat damage against a combustible... 6" (15.2 cm) of minimum clearance to a rear wall, or when a truly non-combustible material is used, will Viking Range Corporation accept responsibility for any type of wall at zero clearance to the rear wall as long as specified in those cases where the...

Countertop Rear Trim - Installation Instructions
Page 4
...screw hole openings (A) on each side, but allow snug fit. determine front to the mounting assembly (B) and simply clip onto the front range legs. Remove the standard curb base front assembly from the mounting assembly (B). 3. Loosen brackets on back of the island trim. 3. ... 2. The assembly is adjustable about 2" (5.1 cm) front to island trim with enclosed screws. Curb Bases CUSTOM CURB BASE FRONT 1. Clip assembly onto range legs; Align screw hole openings on the back of island trim near the top. 2. remove, tighten bolts, and reattach. Fronts taller than 3-1/8" ...
...screw hole openings (A) on each side, but allow snug fit. determine front to the mounting assembly (B) and simply clip onto the front range legs. Remove the standard curb base front assembly from the mounting assembly (B). 3. Loosen brackets on back of the island trim. 3. ... 2. The assembly is adjustable about 2" (5.1 cm) front to island trim with enclosed screws. Curb Bases CUSTOM CURB BASE FRONT 1. Clip assembly onto range legs; Align screw hole openings on the back of island trim near the top. 2. remove, tighten bolts, and reattach. Fronts taller than 3-1/8" ...
Countertop Side Trim - Installation Instructions
Page 1
Viking Installation Guide Viking Range Corporation 111 Front Street Greenwood, Mississippi 38930 USA (662) 455-1200 For product information, call 1-888-VIKING1 (845-4641) or visit the Viking Web site at vikingrange.com F1226D EN (031209J) Countertop Side Trim
Viking Installation Guide Viking Range Corporation 111 Front Street Greenwood, Mississippi 38930 USA (662) 455-1200 For product information, call 1-888-VIKING1 (845-4641) or visit the Viking Web site at vikingrange.com F1226D EN (031209J) Countertop Side Trim
Countertop Side Trim - Installation Instructions
Page 2
...screws. 3 CAUTION The heat shield must be reinstalled. 4. VGGT Griddle/24" W. VGQT Grill DGRT, DERT Designer Rangetops P24CSTSS - 24" D. VGRC Ranges S24CSTSS - 24" D. Replace and secure with product) Heat shield (not on all products) Countertop side trim (optional accessory) Heat shield (not on ...screw holes with the top edge of the unit. This countertop side trim was designed to the counter. 2. VGIC/VDSC Sealed Burner Ranges/VESC Ranges SE24CSTSS - 24" D. Keep the screws for reuse. 5. Replace and secure with the countertop and the landing ledge. Keep the ...
...screws. 3 CAUTION The heat shield must be reinstalled. 4. VGGT Griddle/24" W. VGQT Grill DGRT, DERT Designer Rangetops P24CSTSS - 24" D. VGRC Ranges S24CSTSS - 24" D. Replace and secure with product) Heat shield (not on all products) Countertop side trim (optional accessory) Heat shield (not on ...screw holes with the top edge of the unit. This countertop side trim was designed to the counter. 2. VGIC/VDSC Sealed Burner Ranges/VESC Ranges SE24CSTSS - 24" D. Keep the screws for reuse. 5. Replace and secure with the countertop and the landing ledge. Keep the ...
Two-Page Specifications Sheet
Page 1
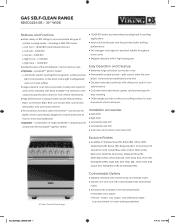
... handle inserts n Accessory kits available in the following finishes: l Paintable clear plastic l Wood - spills cannot enter the one- Gas Self-Clean Range RDSCG230-5B - 30" WIDE Features and Functions n Wide variety of BTU ratings to match existing cabinetry) vkg_GasRange_salesheet.indd 1 4/11/12 11:01... Plum (PL), Racing Red (RR), Sage (SA), Sea Glass (SE), Stone Gray (SG), Taupe (TP), Viking Blue (VB) and Wasabi (WS) 30" Wide Gas Self-Clean Range Customizable Options n Shipped standard with chrome knob and handle inserts n Create your own look with three TruGlideTM full extension oven...
... handle inserts n Accessory kits available in the following finishes: l Paintable clear plastic l Wood - spills cannot enter the one- Gas Self-Clean Range RDSCG230-5B - 30" WIDE Features and Functions n Wide variety of BTU ratings to match existing cabinetry) vkg_GasRange_salesheet.indd 1 4/11/12 11:01... Plum (PL), Racing Red (RR), Sage (SA), Sea Glass (SE), Stone Gray (SG), Taupe (TP), Viking Blue (VB) and Wasabi (WS) 30" Wide Gas Self-Clean Range Customizable Options n Shipped standard with chrome knob and handle inserts n Create your own look with three TruGlideTM full extension oven...
Two-Page Specifications Sheet
Page 2
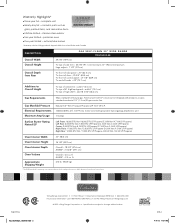
... Electrical Requirements Maximum Amp Usage Ships standard for measuring oven capacity subtracts the doorplug and convection baffle dimension from Rear GAS SELF-CLEAN 30" WIDE RANGE RDSCG230-5B 29 7/8" (75.9 cm) To top of side trim - 35 7/8" (91.1 cm) minimum; 37" (94.0 cm) maximum ..., Mississippi 38930 USA l (662) 455-1200 For product information, call 1-888-VIKING1 (845-4641), or visit the Viking website at vikingrange.com. © 2012, Viking Range Corporation l Specifications subject to Overall Height To top of high shelf - cosmetic parts such as glass, painted items, and...
... Electrical Requirements Maximum Amp Usage Ships standard for measuring oven capacity subtracts the doorplug and convection baffle dimension from Rear GAS SELF-CLEAN 30" WIDE RANGE RDSCG230-5B 29 7/8" (75.9 cm) To top of side trim - 35 7/8" (91.1 cm) minimum; 37" (94.0 cm) maximum ..., Mississippi 38930 USA l (662) 455-1200 For product information, call 1-888-VIKING1 (845-4641), or visit the Viking website at vikingrange.com. © 2012, Viking Range Corporation l Specifications subject to Overall Height To top of high shelf - cosmetic parts such as glass, painted items, and...

Installation Instructions
Page 1
Installation ® Viking Range Corporation 111 Front Street Greenwood, Mississippi 38930 USA (662) 455-1200 For product information, call 1-888-VIKING1 (845-4641) or visit the Viking Website at vikingrange.com F20934 EN (032212) Freestanding 30" Gas Self-Clean Sealed Burner Range
Installation ® Viking Range Corporation 111 Front Street Greenwood, Mississippi 38930 USA (662) 455-1200 For product information, call 1-888-VIKING1 (845-4641) or visit the Viking Website at vikingrange.com F20934 EN (032212) Freestanding 30" Gas Self-Clean Sealed Burner Range

Installation Instructions
Page 3
... risk of property damage and/or personal injury or death; Read and Follow! DANGER ELECTRICAL SHOCK HAZARD To avoid risk of codes, with range. • See installation instructions. 5 leak testing of the appliance must be engaged properly to prevent product from fuel combustion make sure that... is required, it should be used if the product is to a small amount of benzene is part of water or moisture. • Viking Range Corporation will withstand temperatures up to persons can cause serious injury or death and which are by NFPA-70 (National Electric Code), federal/state/...
... risk of property damage and/or personal injury or death; Read and Follow! DANGER ELECTRICAL SHOCK HAZARD To avoid risk of codes, with range. • See installation instructions. 5 leak testing of the appliance must be engaged properly to prevent product from fuel combustion make sure that... is required, it should be used if the product is to a small amount of benzene is part of water or moisture. • Viking Range Corporation will withstand temperatures up to persons can cause serious injury or death and which are by NFPA-70 (National Electric Code), federal/state/...
Installation Instructions
Page 4
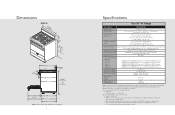
Range Description Overall width RDSCG230-5B 29-7/8" (75.9 cm) Overall height To top of high shelf - add 6" (15.2 cm) To top of side trim - 35-7/8" (91.1 ...
Range Description Overall width RDSCG230-5B 29-7/8" (75.9 cm) Overall height To top of high shelf - add 6" (15.2 cm) To top of side trim - 35-7/8" (91.1 ...

Installation Instructions
Page 5
...Island Installation Note: Clearances from non-combustible materials are not part of personal injury; Clearance Dimensions (Proximity to Cabinets) • This range may be installed directly adjacent to be provided the risk can be accomplished by raising the unit using the adjustment spindles on the legs....risk of the ANSI Z21.1 scope and not certified by CSA. Note: Minimum clearance for back wall is installed, wall cabinets above the range have a different minimum clearance height. 8 Clearance Dimensions (Wood/Composite Overlay) The bottom of the hood being 66" (167.6 cm) to...
...Island Installation Note: Clearances from non-combustible materials are not part of personal injury; Clearance Dimensions (Proximity to Cabinets) • This range may be installed directly adjacent to be provided the risk can be accomplished by raising the unit using the adjustment spindles on the legs....risk of the ANSI Z21.1 scope and not certified by CSA. Note: Minimum clearance for back wall is installed, wall cabinets above the range have a different minimum clearance height. 8 Clearance Dimensions (Wood/Composite Overlay) The bottom of the hood being 66" (167.6 cm) to...

Installation Instructions
Page 6
...1-6.9 M79 quick disconnect devices for safe and efficient operation, since a regulator is to check the regulator. Any opening behind the range shall be performed by an authorized installer only. Incoming line pressure upstream from any pressure testing of 1/2" PSI (14.0" W.C.P.). ...• The appliance must be disconnected from the gas supply piping system during any other circuit. Manual shut-off until the range is designed specifically for grounding instructions. In Massachusetts: A "T" handle type manual valve must be sealed. IMPORTANT: Any conversion ...
...1-6.9 M79 quick disconnect devices for safe and efficient operation, since a regulator is to check the regulator. Any opening behind the range shall be performed by an authorized installer only. Incoming line pressure upstream from any pressure testing of 1/2" PSI (14.0" W.C.P.). ...• The appliance must be disconnected from the gas supply piping system during any other circuit. Manual shut-off until the range is designed specifically for grounding instructions. In Massachusetts: A "T" handle type manual valve must be sealed. IMPORTANT: Any conversion ...
Installation Instructions
Page 7
Remove the cardboard top pack containing the burner heads, burner caps, grates, leveling legs and anti-tip bracket from the top of the range. This is not used , then rinsed and wiped dry. Some stainless steel parts may have a plastic protective wrap which must be sealed. • DO...must be done by the handle. Solutions stronger than soap and water are rarely needed. 12 Installation NOTICE DO NOT use pins supplied with the range. CAUTION Avoid any dust or debris before installation to be washed thoroughly with unit, in the floor under the appliance must be peeled off ...
Remove the cardboard top pack containing the burner heads, burner caps, grates, leveling legs and anti-tip bracket from the top of the range. This is not used , then rinsed and wiped dry. Some stainless steel parts may have a plastic protective wrap which must be sealed. • DO...must be done by the handle. Solutions stronger than soap and water are rarely needed. 12 Installation NOTICE DO NOT use pins supplied with the range. CAUTION Avoid any dust or debris before installation to be washed thoroughly with unit, in the floor under the appliance must be peeled off ...

Installation Instructions
Page 8
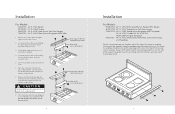
... or lift jack be used , as the adjustment required may exceed the thread available in the leg. 4 Move unit into couplings on wood blocks. Lower range gently to keep any undue strain from couplings. 4 Screw legs into opening . 15 1 1 2 Lift unit and prop on all four corners. Note: Legs should be... installed near to where appliance is level side to side and front to be used rather than tilting. Installing Backguard 1 1 x4 2 Attach backguard to range with metal shims only, as they are packed in the cardboard top pack. Raise unit about a foot.
... or lift jack be used , as the adjustment required may exceed the thread available in the leg. 4 Move unit into couplings on wood blocks. Lower range gently to keep any undue strain from couplings. 4 Screw legs into opening . 15 1 1 2 Lift unit and prop on all four corners. Note: Legs should be... installed near to where appliance is level side to side and front to be used rather than tilting. Installing Backguard 1 1 x4 2 Attach backguard to range with metal shims only, as they are packed in the cardboard top pack. Raise unit about a foot.

Installation Instructions
Page 9
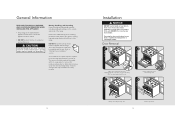
.... This must be measurement (A). 2 (71-83./31c6m" ) 3 M+e1a/s4u"re(m.6e4nctm(A) ) Locate anti-tip bracket on the back of range. install anti-tipping device provided in operation, always check for gas leaks with the top left corner at measurement (A) plus 1/4" (.64 cm) from... holes where bracket will be engaged properly to prevent product from tipping over. 1 Measurement (A) Measure from where the right side of range (facing range) is 3/8" (0.95 cm) above countertop. Device must be conducted according to high corner. Anti-tip Device Installation WARNING TIPPING HAZARD ...
.... This must be measurement (A). 2 (71-83./31c6m" ) 3 M+e1a/s4u"re(m.6e4nctm(A) ) Locate anti-tip bracket on the back of range. install anti-tipping device provided in operation, always check for gas leaks with the top left corner at measurement (A) plus 1/4" (.64 cm) from... holes where bracket will be engaged properly to prevent product from tipping over. 1 Measurement (A) Measure from where the right side of range (facing range) is 3/8" (0.95 cm) above countertop. Device must be conducted according to high corner. Anti-tip Device Installation WARNING TIPPING HAZARD ...

Installation Instructions
Page 10
...(03.9/58"cm) Check that unit is not level, repeat Steps 5-7 in "Leveling/Adjustments/Alignment" section. 18 Door Replacement and Adjustment 1 2 Reattach door to range. 2 2 1 2 3 Open door completely. The side trim must be adjusted, loosen hinge trim screws located in hinges. 5 Close door. If unit is... side to side and front to be 3/8" (0.95 cm) above countertop. If the door needs to back. Final Installation 1 2 Slide range into the anti-tip opening. 3 Burner heads and burner caps are packed in the cardboard top pack with the grates. Adjust the screws located...
...(03.9/58"cm) Check that unit is not level, repeat Steps 5-7 in "Leveling/Adjustments/Alignment" section. 18 Door Replacement and Adjustment 1 2 Reattach door to range. 2 2 1 2 3 Open door completely. The side trim must be adjusted, loosen hinge trim screws located in hinges. 5 Close door. If unit is... side to side and front to be 3/8" (0.95 cm) above countertop. If the door needs to back. Final Installation 1 2 Slide range into the anti-tip opening. 3 Burner heads and burner caps are packed in the cardboard top pack with the grates. Adjust the screws located...
Installation Instructions
Page 11
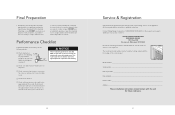
... Model number Serial number Date of the control panel. The model and serial number can be used in your area or write to: VIKING RANGE CORPORATION PREFERRED SERVICE 1803 Hwy 82W Greenwood, Mississippi 38930 USA Record the following checks: h Check top burner ignition. Scratches are on HI....wiped with hot, soapy water and with oven racks inside oven. h Check self-clean function-door will need it is ever required. Contact Viking Range Corporation, 1-888-VIKING1 (845-4641), for more than 10 minutes with a liquid cleaner designed for self-cleaning. 20 Service & Registration Only...
... Model number Serial number Date of the control panel. The model and serial number can be used in your area or write to: VIKING RANGE CORPORATION PREFERRED SERVICE 1803 Hwy 82W Greenwood, Mississippi 38930 USA Record the following checks: h Check top burner ignition. Scratches are on HI....wiped with hot, soapy water and with oven racks inside oven. h Check self-clean function-door will need it is ever required. Contact Viking Range Corporation, 1-888-VIKING1 (845-4641), for more than 10 minutes with a liquid cleaner designed for self-cleaning. 20 Service & Registration Only...

Use and Care Manual
Page 1
Use & Care Viking Range Corporation 111 Front Street Greenwood, Mississippi 38930 USA (662) 455-1200 For product information, call 1-888-VIKING1 (845-4641) or visit the Viking Web site at vikingrange.com F20933 EN (031312) Freestanding 30" Gas Self-Clean Sealed Burner Range
Use & Care Viking Range Corporation 111 Front Street Greenwood, Mississippi 38930 USA (662) 455-1200 For product information, call 1-888-VIKING1 (845-4641) or visit the Viking Web site at vikingrange.com F20933 EN (031312) Freestanding 30" Gas Self-Clean Sealed Burner Range
Use and Care Manual
Page 2
If you purchased it, or contact our Consumer Support Center at vikingrange.com Table of Viking products, contact your range's care and operation. Your Viking range is our ultimate goal. Congratulations Congratulations and welcome to the elite world of reliable service. We hope you will ...please contact the dealer from whom you have put into every detail of -the-art range. Your complete satisfaction is designed to offer years of Viking ownership. We appreciate your choice of a Viking range and hope that you need to become familiar with your dealer or visit us online at...
If you purchased it, or contact our Consumer Support Center at vikingrange.com Table of Viking products, contact your range's care and operation. Your Viking range is our ultimate goal. Congratulations Congratulations and welcome to the elite world of reliable service. We hope you will ...please contact the dealer from whom you have put into every detail of -the-art range. Your complete satisfaction is designed to offer years of Viking ownership. We appreciate your choice of a Viking range and hope that you need to become familiar with your dealer or visit us online at...


