Outdoor Products
Page 44
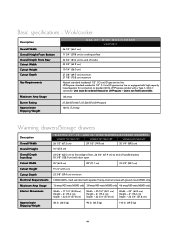
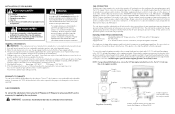
hard wire direct with separate 15-amp minimum 2-wire with a Type 1, QCC-1 connector. Unit must be ordered Natural or LP/Propane - unit is not field-convertible. .08 amps ...
hard wire direct with separate 15-amp minimum 2-wire with a Type 1, QCC-1 connector. Unit must be ordered Natural or LP/Propane - unit is not field-convertible. .08 amps ...
Outdoor Kitchen Planning Guide
Page 12
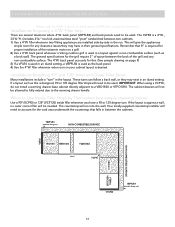
...VTPO1810. This will give the appliances ample room for this is used . IMPORTANT: When using a VCF90, do not install a warming drawer base cabinet directly adjacent to be used as this . (See sample drawing on page 9) 3) If a VFLR4 is used in the run into the wall. The ... of the grill and any clearance issues they may have a 90 or 135 degree turn " in an island setting. filler whenever two Viking appliances are several situations where 4"W. back panel accounts for any non-combustible surface. VBPFLR4 (stainless facing out) NON-COMBUSTIBLE SURFACE VSP30 VBO1811 ...
...VTPO1810. This will give the appliances ample room for this is used . IMPORTANT: When using a VCF90, do not install a warming drawer base cabinet directly adjacent to be used as this . (See sample drawing on page 9) 3) If a VFLR4 is used in the run into the wall. The ... of the grill and any clearance issues they may have a 90 or 135 degree turn " in an island setting. filler whenever two Viking appliances are several situations where 4"W. back panel accounts for any non-combustible surface. VBPFLR4 (stainless facing out) NON-COMBUSTIBLE SURFACE VSP30 VBO1811 ...

Specs
Page 5
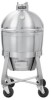
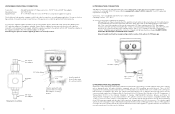
...; Cooker w/QSC300 30"W. In the absence of that system at test pressures equal to or less than 1/2 psi (3.5 kPa). o If using a Viking GSH12 flexible hose, remove the 1/2" (1.3 cm) flare adapter and attach hose to side cabinets. Cabinet proximity The cart can be installed in accordance with... codes, the installation must comply with the National Fuel Gas Code ANSI Z223.1. • An installer-supplied gas shutoff valve must be installed directly adjacent to the 7/8" (2.2 cm) male flare on the regulator assembly. C4 Cooker Cart VCQS001 C4™ Cooker w/QSC412 41"W. All installer...
...; Cooker w/QSC300 30"W. In the absence of that system at test pressures equal to or less than 1/2 psi (3.5 kPa). o If using a Viking GSH12 flexible hose, remove the 1/2" (1.3 cm) flare adapter and attach hose to side cabinets. Cabinet proximity The cart can be installed in accordance with... codes, the installation must comply with the National Fuel Gas Code ANSI Z223.1. • An installer-supplied gas shutoff valve must be installed directly adjacent to the 7/8" (2.2 cm) male flare on the regulator assembly. C4 Cooker Cart VCQS001 C4™ Cooker w/QSC412 41"W. All installer...
Installation Instructions
Page 2
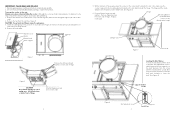
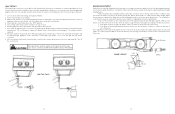
...two (2) shipping screws, (one on each side of hinge. The hinge and the inside parts Hinge Mounting Bracket (located behind cooker on cart directly under hinge) Damper vent Figure 3 Cooker shelf Leveling the Side Shelves To level the side shelves, lift the shelf so that the shelf ...fro spring area. 3. Remove shipping screws from product. Also, make sure the cooker is visible between the two supports on the cart directly under the hinge. Replace inside damper vent should be sharp enough to the cart: Always wear gloves when installing the cooker. Before beginning,...
...two (2) shipping screws, (one on each side of hinge. The hinge and the inside parts Hinge Mounting Bracket (located behind cooker on cart directly under hinge) Damper vent Figure 3 Cooker shelf Leveling the Side Shelves To level the side shelves, lift the shelf so that the shelf ...fro spring area. 3. Remove shipping screws from product. Also, make sure the cooker is visible between the two supports on the cart directly under the hinge. Replace inside damper vent should be sharp enough to the cart: Always wear gloves when installing the cooker. Before beginning,...
Installation Instructions
Page 5
... burners are byproducts of codes, the installation must be easily accessible Installer supplied flexible gas line with 1/2" female flare adaptor or Viking GSH12 9 Replacement pressure regulators and hose assemblies must be turned off at test pressures in or on position and this or any...Nat. Insert the coupler into the male coupler fitting on installing gas supply lines. Ensure that of gas supply to be installed directly adjacent to or less than yellow flame minimize incomplete combustion. Any LP cylinder not connected for LP-gas cylinders of the U.S. ...
... burners are byproducts of codes, the installation must be easily accessible Installer supplied flexible gas line with 1/2" female flare adaptor or Viking GSH12 9 Replacement pressure regulators and hose assemblies must be turned off at test pressures in or on position and this or any...Nat. Insert the coupler into the male coupler fitting on installing gas supply lines. Ensure that of gas supply to be installed directly adjacent to or less than yellow flame minimize incomplete combustion. Any LP cylinder not connected for LP-gas cylinders of the U.S. ...
Installation Instructions
Page 6
... for Transportation of children. 11 Be sure to 14" W.C.P. Cylinders must be checked by your local gas utility company or with 1/2" female flare adaptor or Viking GSH12 10 1/2" flare adapter 1/2" flare coupling Type 1, QCC-1 connector Tank LP/PROPANE TANK REQUIREMENTS A dented or rusty LP/Propane tank may be hazardous and should... gas flow towards the unit and away from the appliance. If the gas line is stored indoors the cylinder must be stored outdoors in the direction of the U.S. Nat. 11" to check on installing gas supply lines.
... for Transportation of children. 11 Be sure to 14" W.C.P. Cylinders must be checked by your local gas utility company or with 1/2" female flare adaptor or Viking GSH12 10 1/2" flare adapter 1/2" flare coupling Type 1, QCC-1 connector Tank LP/PROPANE TANK REQUIREMENTS A dented or rusty LP/Propane tank may be hazardous and should... gas flow towards the unit and away from the appliance. If the gas line is stored indoors the cylinder must be stored outdoors in the direction of the U.S. Nat. 11" to check on installing gas supply lines.
Installation Instructions
Page 7
... prior to lighting the burner for gas leaks with no yellow tipping that all control knobs are leak tested at the factory prior to the directions below . Once adjusted, turn the air shutter clockwise to reduce the amount of air to the fittings.
... prior to lighting the burner for gas leaks with no yellow tipping that all control knobs are leak tested at the factory prior to the directions below . Once adjusted, turn the air shutter clockwise to reduce the amount of air to the fittings.