Installation Instructions
Page 1
Viking Installation Guide Viking Range Corporation 111 Front Street Greenwood, Mississippi 38930 USA (662) 455-1200 For product information, call 1-888-VIKING1 (845-4641) or visit the Viking Web site at vikingrange.com F20626B EN W10345058 UL C UL (081110) Freestanding Bottom-Mount/ French Door Bottom-Mount Refrigerator/Freezer
Viking Installation Guide Viking Range Corporation 111 Front Street Greenwood, Mississippi 38930 USA (662) 455-1200 For product information, call 1-888-VIKING1 (845-4641) or visit the Viking Web site at vikingrange.com F20626B EN W10345058 UL C UL (081110) Freestanding Bottom-Mount/ French Door Bottom-Mount Refrigerator/Freezer
Installation Instructions
Page 2
... 3-prong receptacle. Disconnect the power cord by licensed personnel when required. • Do not modify plug on any part of refrigerator unless specifically recommended in refrigerator. • Never allow children to have it replaced with a power supply cord having a 3-prong grounding plug. If damage occurs...• Do not ground to a gas line or cold-water pipe. • Do not remove warning tag from electrical supply before using the refrigerator. • Observe all local codes and ordinances. (115 volt, 60-Hz, 15 amp, fused, electrical supply is the customer's responsibility to:...
... 3-prong receptacle. Disconnect the power cord by licensed personnel when required. • Do not modify plug on any part of refrigerator unless specifically recommended in refrigerator. • Never allow children to have it replaced with a power supply cord having a 3-prong grounding plug. If damage occurs...• Do not ground to a gas line or cold-water pipe. • Do not remove warning tag from electrical supply before using the refrigerator. • Observe all local codes and ordinances. (115 volt, 60-Hz, 15 amp, fused, electrical supply is the customer's responsibility to:...
Installation Instructions
Page 3
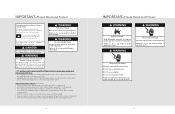
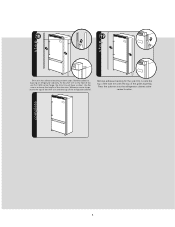
... This is normally related to reduce the chance of injury, and tell you how to the location of water or moisture. • Viking Range Corporation will be killed or seriously injured if you and others is required, it should be: • Of the receptacle type...All safety messages will NOT warranty any loose-fitting gaskets (if applicable in death, explosion, or fire. WARNING Suffocation Hazard Remove doors from refrigerator. WARNING Electrical Shock Hazard Disconnect power before removing doors. Electrical Shock Hazard Plug into a grounded 3 prong outlet. Do not use an adapter...
... This is normally related to reduce the chance of injury, and tell you how to the location of water or moisture. • Viking Range Corporation will be killed or seriously injured if you and others is required, it should be: • Of the receptacle type...All safety messages will NOT warranty any loose-fitting gaskets (if applicable in death, explosion, or fire. WARNING Suffocation Hazard Remove doors from refrigerator. WARNING Electrical Shock Hazard Disconnect power before removing doors. Electrical Shock Hazard Plug into a grounded 3 prong outlet. Do not use an adapter...
Installation Instructions
Page 4
...-.03/c4m") (3950-.55/c8m") (2539-.71/c2m") (2667-.93/c4m") ((11778812mm24--t..75ao65inx//.cc88. to 72-5/8" (184.5 cm) max. maximum 120 psi Overall interior capacities Refrigerator Freezer Total capacity Approximate shipping weight Bottom-Mount French Door Bottom-Mount 14.4 cu. ft. (399 liters) 5.5 cu. ft. (156 liters) 5.5 cu. ft. (555 liters...
...-.03/c4m") (3950-.55/c8m") (2539-.71/c2m") (2667-.93/c4m") ((11778812mm24--t..75ao65inx//.cc88. to 72-5/8" (184.5 cm) max. maximum 120 psi Overall interior capacities Refrigerator Freezer Total capacity Approximate shipping weight Bottom-Mount French Door Bottom-Mount 14.4 cu. ft. (399 liters) 5.5 cu. ft. (156 liters) 5.5 cu. ft. (555 liters...
Installation Instructions
Page 5
... Cutout width Addition of top grilles: 70-1/8" (178.1 cm) min. to 70-7/8" (180.0 cm) max. 71-7/8" (182.6 cm) min. maximum 120 psi Overall interior capacities Refrigerator Freezer Total capacity Approximate shipping weight French Door Bottom-Mount 14.1 cu. ft. (399 liters) 5.5 cu. mm"")) (14014-.15/c8m" ) (612.04"cm) (2783-.03...
... Cutout width Addition of top grilles: 70-1/8" (178.1 cm) min. to 70-7/8" (180.0 cm) max. 71-7/8" (182.6 cm) min. maximum 120 psi Overall interior capacities Refrigerator Freezer Total capacity Approximate shipping weight French Door Bottom-Mount 14.1 cu. ft. (399 liters) 5.5 cu. mm"")) (14014-.15/c8m" ) (612.04"cm) (2783-.03...
Installation Instructions
Page 6
...(61.0 cm) min. 10 Important Safety Instructions WARNING: To reduce the risk of fire, electric shock, or injury to persons when using the refrigerator, follow basic precautions, including the following: • Plug into a grounded 3 prong outlet. • Do not remove ground prong. • ...before operating. • Remove doors from your old refrigerator. • Use nonflammable cleaner. • Keep flammable materials and vapors, such as gasoline, away from refrigerator. • Use two or more people to move and install refrigerator. • Disconnect power before installing ice maker (...
...(61.0 cm) min. 10 Important Safety Instructions WARNING: To reduce the risk of fire, electric shock, or injury to persons when using the refrigerator, follow basic precautions, including the following: • Plug into a grounded 3 prong outlet. • Do not remove ground prong. • ...before operating. • Remove doors from your old refrigerator. • Use nonflammable cleaner. • Keep flammable materials and vapors, such as gasoline, away from refrigerator. • Use two or more people to move and install refrigerator. • Disconnect power before installing ice maker (...

Installation Instructions
Page 7
... side to allow for shipment. Explosion Hazard Keep flammable materials and vapors, such as floor damage could occur. Before You Throw Away Your Old Refrigerator or Freezer: • Take off the doors. • Leave the shelves in place so that children may not easily climb inside. 12 ... so can occur at top and 1/2" (1.3 cm) behind the machine compartment cover (located in death, explosion, or fire. • Do not install refrigerator near oven, radiator or other injury. Failure to swing open. When moving it , as gasoline, away from your opening smaller than anticipated. Do not ...
... side to allow for shipment. Explosion Hazard Keep flammable materials and vapors, such as floor damage could occur. Before You Throw Away Your Old Refrigerator or Freezer: • Take off the doors. • Leave the shelves in place so that children may not easily climb inside. 12 ... so can occur at top and 1/2" (1.3 cm) behind the machine compartment cover (located in death, explosion, or fire. • Do not install refrigerator near oven, radiator or other injury. Failure to swing open. When moving it , as gasoline, away from your opening smaller than anticipated. Do not ...
Installation Instructions
Page 8
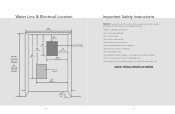
... required to the desired setting. 14 General Information Water Supply Requirements A cold water supply with straps or bungee cords. ALWAYS truck refrigerator from the electrical source. Do not use an extension cord. When you have questions about your water pressure, call a licensed, ...plumber. Recommended Grounding Method A 115 Volt, 60 Hz., AC only 15- Before you move your refrigerator to your refrigerator be a minimum of between the refrigerator and dolly. • Secure refrigerator to dolly firmly with water pressure of 40 to 60 psi (276 to make sure you are ...
... required to the desired setting. 14 General Information Water Supply Requirements A cold water supply with straps or bungee cords. ALWAYS truck refrigerator from the electrical source. Do not use an extension cord. When you have questions about your water pressure, call a licensed, ...plumber. Recommended Grounding Method A 115 Volt, 60 Hz., AC only 15- Before you move your refrigerator to your refrigerator be a minimum of between the refrigerator and dolly. • Secure refrigerator to dolly firmly with water pressure of 40 to 60 psi (276 to make sure you are ...
Installation Instructions
Page 9
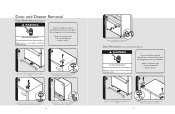
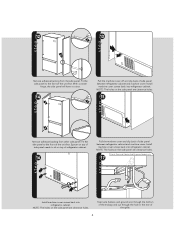
...death or electrical shock. Grasp firmly and pull outward to its final location. Some installations require door/drawer removal to transport the refrigerator to unclip. 3 Remove top hinge cover from center hinge pin. Remove top hinge covers from top hinge and remove hinge. ...Retain screw and cover for later use . 4 Unscrew 5/16" hex head screws from refrigerator doors. Retain screws for later use Door Removal (French Door Bottom-Mount) WARNING Electrical Shock Hazard Disconnect power before removing doors. Electrical ...
...death or electrical shock. Grasp firmly and pull outward to its final location. Some installations require door/drawer removal to transport the refrigerator to unclip. 3 Remove top hinge cover from center hinge pin. Remove top hinge covers from top hinge and remove hinge. ...Retain screw and cover for later use . 4 Unscrew 5/16" hex head screws from refrigerator doors. Retain screws for later use Door Removal (French Door Bottom-Mount) WARNING Electrical Shock Hazard Disconnect power before removing doors. Electrical ...

Installation Instructions
Page 10
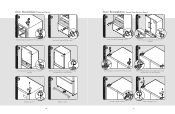
... and left hinges. Retain all screws for later use . 6 Disconnect wire harness on top of left side refrigerator door top hinge. Retain all screws for later use . 8 Lift left side refrigerator door, along with a flat blade screwdriver or fingernail. Retain all screws for later use . 18 Freezer Drawer...top hinge and remove hinge. 3 4 Unscrew 5/16" hex head screws from left top hinge. Retain for later use . 5 Lift right side refrigerator door from center hinge pin on both rails back in the drawer front. 4 Lift drawer front upward and off the screws. Remove door closure from...
... and left hinges. Retain all screws for later use . 6 Disconnect wire harness on top of left side refrigerator door top hinge. Retain all screws for later use . 8 Lift left side refrigerator door, along with a flat blade screwdriver or fingernail. Retain all screws for later use . 18 Freezer Drawer...top hinge and remove hinge. 3 4 Unscrew 5/16" hex head screws from left top hinge. Retain for later use . 5 Lift right side refrigerator door from center hinge pin on both rails back in the drawer front. 4 Lift drawer front upward and off the screws. Remove door closure from...
Installation Instructions
Page 11
... Bottom-Mount) 1 2 Install center hinges with Phillips screws. 3 Place hinge side of refrigerator door on center hinge pins. 4 Install top hinges loosely with 5/16" hex head screws. While holding refrigerator door upright, tighten down top hinges with 5/16" hex head driver. 5 6 Reconnect...top hinge loosely with 5/16" hex head screws. 3 Install center hinge with Phillips screws. 4 Place hinge side of refrigerator doors on center hinge pin. 5 While holding refrigerator doors upright, tighten down top hinge with 5/16" hex head drive. 6 Replace hinge cover. 20 Replace toe grille...
... Bottom-Mount) 1 2 Install center hinges with Phillips screws. 3 Place hinge side of refrigerator door on center hinge pins. 4 Install top hinges loosely with 5/16" hex head screws. While holding refrigerator door upright, tighten down top hinges with 5/16" hex head driver. 5 6 Reconnect...top hinge loosely with 5/16" hex head screws. 3 Install center hinge with Phillips screws. 4 Place hinge side of refrigerator doors on center hinge pin. 5 While holding refrigerator doors upright, tighten down top hinge with 5/16" hex head drive. 6 Replace hinge cover. 20 Replace toe grille...
Installation Instructions
Page 13
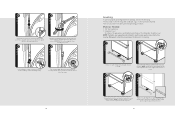
...Complete any required panel installation and/or water supply connection before leveling. Grasp firmly and pull outward to adjust the tilt of the refrigerator. Align the toe grille mounting clips with cardboard, rugs, or other protective material. • Do not use power tools when performing...turn the leveler foot screw clockwise. IMPORTANT: Do not overtighten. Check for 24 hours. Correct leaks if necessary. 24 Leveling To protect property and refrigerator from damage, observe the following: • Protect vinyl or other flooring with the lower cabinet slots. NOTE: It may occur. 8 1 ...
...Complete any required panel installation and/or water supply connection before leveling. Grasp firmly and pull outward to adjust the tilt of the refrigerator. Align the toe grille mounting clips with cardboard, rugs, or other protective material. • Do not use power tools when performing...turn the leveler foot screw clockwise. IMPORTANT: Do not overtighten. Check for 24 hours. Correct leaks if necessary. 24 Leveling To protect property and refrigerator from damage, observe the following: • Protect vinyl or other flooring with the lower cabinet slots. NOTE: It may occur. 8 1 ...

Installation Instructions
Page 14
... filter and water dispensing system. Close water filter door. Bottom-Mount NOTE: Allow 1-2 minute delay in death, fire, or electrical shock. 1. IMPORTANT: After connecting the refrigerator to unclip. 3 To raise left side door, turn leveler foot screw clockwise. 4 To raise left side door, turn leveler foot screw clockwise. Once water begins... flush air from the system, water may be required in the upper right corner of the dispenser. 27 Additional flushing may spurt out of the refrigerator. As air is located in some households.
... filter and water dispensing system. Close water filter door. Bottom-Mount NOTE: Allow 1-2 minute delay in death, fire, or electrical shock. 1. IMPORTANT: After connecting the refrigerator to unclip. 3 To raise left side door, turn leveler foot screw clockwise. 4 To raise left side door, turn leveler foot screw clockwise. Once water begins... flush air from the system, water may be required in the upper right corner of the dispenser. 27 Additional flushing may spurt out of the refrigerator. As air is located in some households.
Installation Instructions
Page 15
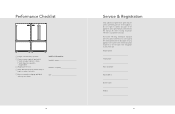
... and verify operation. The serial number and model number for your appliance are located on the identification plate mounted on the left wall of the refrigerator section of purchase Date installed Dealer's name Address 29 h Connect water supply (if applicable). • Verify icemaker bail arm is ever required. You will need...
... and verify operation. The serial number and model number for your appliance are located on the identification plate mounted on the left wall of the refrigerator section of purchase Date installed Dealer's name Address 29 h Connect water supply (if applicable). • Verify icemaker bail arm is ever required. You will need...
Additional Installation Instructions
Page 5
18 19 1 1 2 2 2 2 Shim trim has adhesive backing on refrigerator side only. Remove adhesive backing for the side trim. complete 5 Remove adhesive backing on both sides. With center hinge, the shim trim will have a cutout. ..., locate the top of the shim trim with the top of the unit first. Fit the shim trim to locate the height of the refrigerator cabinet. Press the side trim into the refrigerator cabinet at the center location. Locate the top of the side trim with the top of the shim trim.
18 19 1 1 2 2 2 2 Shim trim has adhesive backing on refrigerator side only. Remove adhesive backing for the side trim. complete 5 Remove adhesive backing on both sides. With center hinge, the shim trim will have a cutout. ..., locate the top of the shim trim with the top of the unit first. Fit the shim trim to locate the height of the refrigerator cabinet. Press the side trim into the refrigerator cabinet at the center location. Locate the top of the side trim with the top of the shim trim.
Side Panel Kit Instructions
Page 4
...the unit first. With a center hinge, the side panel will have a cutout. 14 2 1 Pull the machine cover off and slip back of side panel between refrigerator cabinet and machine cover. NOTE: The holes on top of side panel needs to the front of side panel between.... 16 Pull the machine cover and slip back of the unit first. Install machine cover screws back into refrigerator cabinet. Install machine cover screws back into refrigerator cabinet. 12 2 13 1 Remove adhesive backing from other side panel. Fit the side panel to sit on the side panel are clearance holes. 17 French...
...the unit first. With a center hinge, the side panel will have a cutout. 14 2 1 Pull the machine cover off and slip back of side panel between refrigerator cabinet and machine cover. NOTE: The holes on top of side panel needs to the front of side panel between.... 16 Pull the machine cover and slip back of the unit first. Install machine cover screws back into refrigerator cabinet. Install machine cover screws back into refrigerator cabinet. 12 2 13 1 Remove adhesive backing from other side panel. Fit the side panel to sit on the side panel are clearance holes. 17 French...
Specs
Page 1
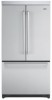
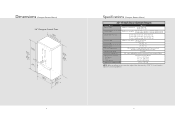
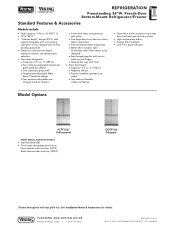
... cabinet sides and top. (DDFF) DDFF136 Designer *Shown throughout with digital readouts maintain the temperature selection • Frost-free refrigerator o Capacity-14.1 cu. side panels) integrates with surrounding cabinetry-fit for replacement of most existing appliances • Electronic controls... with top grille kits. French-Door Bottom-Mount Refrigerator/Freezer Standard Features & Accessories Models include • Total capacity-19.6 cu. ft. (399 lit.) o Four slide-out ...
... cabinet sides and top. (DDFF) DDFF136 Designer *Shown throughout with digital readouts maintain the temperature selection • Frost-free refrigerator o Capacity-14.1 cu. side panels) integrates with surrounding cabinetry-fit for replacement of most existing appliances • Electronic controls... with top grille kits. French-Door Bottom-Mount Refrigerator/Freezer Standard Features & Accessories Models include • Total capacity-19.6 cu. ft. (399 lit.) o Four slide-out ...
Specs
Page 2
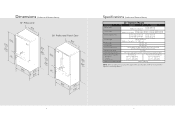
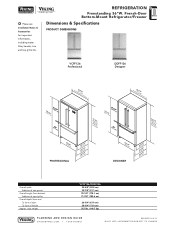
French-Door Bottom-Mount Refrigerator/Freezer Dimensions & Specifications PRODUCT DIMENSIONS VCFF136 Professional DDFF136 Designer (17708-.11/c8m") (14014-.15/c8m") (612.04"cm) w/side (3p95a1n-.17el/c8amc")cessory g(aw71cr81iictl2le-he7.s/...) 28-3/4" (73.0 cm) 327 lbs. (148.7 kg) PLANNING AND DESIGN GUIDE VIKINGRANGE.COM • 1-888-VIKING1 REVISED 5/2/11 ©2011 VRC-INFORMATION SUBJECT TO CHANGE REFRIGERATION Freestanding 36"W. % Please see Installation Notes & Accessories for important information, including water filter, handle, trim and top grille kits.
French-Door Bottom-Mount Refrigerator/Freezer Dimensions & Specifications PRODUCT DIMENSIONS VCFF136 Professional DDFF136 Designer (17708-.11/c8m") (14014-.15/c8m") (612.04"cm) w/side (3p95a1n-.17el/c8amc")cessory g(aw71cr81iictl2le-he7.s/...) 28-3/4" (73.0 cm) 327 lbs. (148.7 kg) PLANNING AND DESIGN GUIDE VIKINGRANGE.COM • 1-888-VIKING1 REVISED 5/2/11 ©2011 VRC-INFORMATION SUBJECT TO CHANGE REFRIGERATION Freestanding 36"W. % Please see Installation Notes & Accessories for important information, including water filter, handle, trim and top grille kits.
Specs
Page 4
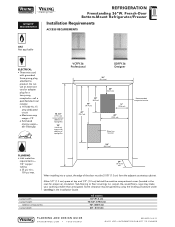
... grounded three-prong plug attached to product. carpet, tile, wood floors, rugs) may be 2-7/8" (7.3 cm) from the adjacent countertop cabinet. UTILITY REQUIREMENTS REFRIGERATION Freestanding 36"W. French-Door Bottom-Mount Refrigerator/Freezer Installation Requirements ACCESS REQUIREMENTS GAS Not applicable ELECTRICAL • Three-wire cord with addition of tops/grilles Cutout depth All models...
... grounded three-prong plug attached to product. carpet, tile, wood floors, rugs) may be 2-7/8" (7.3 cm) from the adjacent countertop cabinet. UTILITY REQUIREMENTS REFRIGERATION Freestanding 36"W. French-Door Bottom-Mount Refrigerator/Freezer Installation Requirements ACCESS REQUIREMENTS GAS Not applicable ELECTRICAL • Three-wire cord with addition of tops/grilles Cutout depth All models...
Specs
Page 5
...wrapped" look when used with top grille and top kits • Side panel kits include panels for both sides Approx. Warranty valid on Viking products shipped within the United States and Canada. ship wt. PLANNING AND DESIGN GUIDE VIKINGRANGE.COM • 1-888-VIKING1 REVISED 5/2/11 &#...169;2011 VRC-INFORMATION SUBJECT TO CHANGE ship wt. ship wt. French-Door Bottom-Mount Refrigerator/Freezer % Installation Notes & Accessories Side Trim Kit • Stainless Steel finish • Provides "built-in " look when used with a top...
...wrapped" look when used with top grille and top kits • Side panel kits include panels for both sides Approx. Warranty valid on Viking products shipped within the United States and Canada. ship wt. PLANNING AND DESIGN GUIDE VIKINGRANGE.COM • 1-888-VIKING1 REVISED 5/2/11 &#...169;2011 VRC-INFORMATION SUBJECT TO CHANGE ship wt. ship wt. French-Door Bottom-Mount Refrigerator/Freezer % Installation Notes & Accessories Side Trim Kit • Stainless Steel finish • Provides "built-in " look when used with a top...


