Installation Instructions
Page 6
... from refrigerator. • Use two or more people to move and install refrigerator. • Disconnect power before installing ice maker (on ice maker kit ready models only). SAVE THESE INSTRUCTIONS 11
... from refrigerator. • Use two or more people to move and install refrigerator. • Disconnect power before installing ice maker (on ice maker kit ready models only). SAVE THESE INSTRUCTIONS 11

Installation Instructions
Page 7
... refrigerator. Explosion Hazard Keep flammable materials and vapors, such as floor damage could occur. If not possible, shield refrigerator material. 13 Do not remove the model/serial number label. Some clearance may be sure to allow for "just a few days." Measuring the Opening When installing your opening smaller than anticipated. Proper...
... refrigerator. Explosion Hazard Keep flammable materials and vapors, such as floor damage could occur. If not possible, shield refrigerator material. 13 Do not remove the model/serial number label. Some clearance may be sure to allow for "just a few days." Measuring the Opening When installing your opening smaller than anticipated. Proper...
Installation Instructions
Page 15
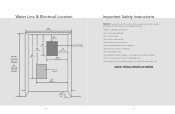
... and no leaks on the left wall of the refrigerator section of the unit. You will need it if service is down . Model number Serial number Date of the appliance unless specifically recommended in performing service on the appliance. Installer's information: Installer's name Installer's ...unit down . • Verify dispenser operation (if applicable). All other servicing should be used in the manual. The serial number and model number for your appliance are located on the identification plate mounted on water connection. h Align/square door(s). Do not repair or replace ...
... and no leaks on the left wall of the refrigerator section of the unit. You will need it if service is down . Model number Serial number Date of the appliance unless specifically recommended in performing service on the appliance. Installer's information: Installer's name Installer's ...unit down . • Verify dispenser operation (if applicable). All other servicing should be used in the manual. The serial number and model number for your appliance are located on the identification plate mounted on water connection. h Align/square door(s). Do not repair or replace ...

Additional Installation Instructions
Page 2
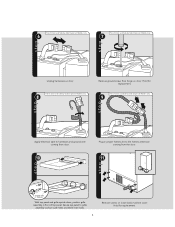
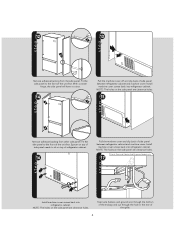
Installation Right Panel Right Trim Front Grille Adhesive 1 Tape Screws A B C Left Panel Left Trim Spacer Set Screws L Bracket Required Components Bottom Mount Model Only 2 Remove and discard screw and hinge cover. Bottom Mount Model Only 4 Remove three screws from mullion area opposite the center hinge. 5 Install set screws from bag into holes from hole on non-hinge side. Remove screw on hinge plate. (Repeat if two hinges are used.) Bottom Mount Model Only 3 Remove and discard plug button from previous step. 2 Remove edge of corner cover.
Installation Right Panel Right Trim Front Grille Adhesive 1 Tape Screws A B C Left Panel Left Trim Spacer Set Screws L Bracket Required Components Bottom Mount Model Only 2 Remove and discard screw and hinge cover. Bottom Mount Model Only 4 Remove three screws from mullion area opposite the center hinge. 5 Install set screws from bag into holes from hole on non-hinge side. Remove screw on hinge plate. (Repeat if two hinges are used.) Bottom Mount Model Only 3 Remove and discard plug button from previous step. 2 Remove edge of corner cover.

Additional Installation Instructions
Page 3
...B A Apply adhesive tape to grille assembly. French Door and Side-by-Side Dispenser Models only 6 French Door and Side-by-Side Dispenser Models only 7 Unplug harnesses on door. French Door and Side-by -Side Dispenser Models only Plug in the kit to harnesses and ground wire coming from hinge on door.... Attach brackets included in proper harness kit to the harness coming from door. 10 French Door and Side-by -Side Dispenser Models only 9 Apply electrical tape to...
...B A Apply adhesive tape to grille assembly. French Door and Side-by-Side Dispenser Models only 6 French Door and Side-by-Side Dispenser Models only 7 Unplug harnesses on door. French Door and Side-by -Side Dispenser Models only Plug in the kit to harnesses and ground wire coming from hinge on door.... Attach brackets included in proper harness kit to the harness coming from door. 10 French Door and Side-by -Side Dispenser Models only 9 Apply electrical tape to...

Additional Installation Instructions
Page 4
...through the bottom of the endcap and out through the hole in the rear of the grille. 15 French Door and Side-by -Side Dispenser Models only Position spacers included in the kit on top of unit. 17 72" Secure the grille brackets to the holes in cabinet. Secure wire harness... to the top of tape. 16 C Remove adhesive backing. 12 Bottom Mount Model only 13 French Door and Side-by -Side Dispenser Models only 2 1 Connect wire harness to the cabinet. Firmly press the grille assembly down so the adhesive adheres to wire harness...
...through the bottom of the endcap and out through the hole in the rear of the grille. 15 French Door and Side-by -Side Dispenser Models only Position spacers included in the kit on top of unit. 17 72" Secure the grille brackets to the holes in cabinet. Secure wire harness... to the top of tape. 16 C Remove adhesive backing. 12 Bottom Mount Model only 13 French Door and Side-by -Side Dispenser Models only 2 1 Connect wire harness to the cabinet. Firmly press the grille assembly down so the adhesive adheres to wire harness...

Side Panel Kit Instructions
Page 2
Bottom Mount Model Only 4 Remove three screws from mullion area opposite the center hinge. 5 Install set screws from bag into holes from hole on non-hinge side. Installation Top Panel Front Grille Screws Caps A B Left Panel Right Panel Set Screws Required Components Bottom Mount Model Only 2 1 Remove and discard screw and hinge cover. (Repeat if two hinges are used.) Bottom Mount Model Only 3 Remove and discard plug button from previous step. 2 Remove edge of corner cover.
Bottom Mount Model Only 4 Remove three screws from mullion area opposite the center hinge. 5 Install set screws from bag into holes from hole on non-hinge side. Installation Top Panel Front Grille Screws Caps A B Left Panel Right Panel Set Screws Required Components Bottom Mount Model Only 2 1 Remove and discard screw and hinge cover. (Repeat if two hinges are used.) Bottom Mount Model Only 3 Remove and discard plug button from previous step. 2 Remove edge of corner cover.
Side Panel Kit Instructions
Page 3
...Hold for replacement. Secure top panel to the harness extension coming from hinge on door. French Door and Side-by-Side Dispenser Models only 9 Apply electrical tape to harnesses and ground wire coming from the door. 11 A A - French Door and Side-by-Side Dispenser... Models only 6 French Door and Side-by-Side Dispenser Models only 7 Unplug harnesses on lower back machine cover. Designer Series B - Pro Series With top panel and grille upside down, position...
...Hold for replacement. Secure top panel to the harness extension coming from hinge on door. French Door and Side-by-Side Dispenser Models only 9 Apply electrical tape to harnesses and ground wire coming from the door. 11 A A - French Door and Side-by-Side Dispenser... Models only 6 French Door and Side-by-Side Dispenser Models only 7 Unplug harnesses on lower back machine cover. Designer Series B - Pro Series With top panel and grille upside down, position...
Side Panel Kit Instructions
Page 4
NOTE: The holes on the side panel are clearance holes. 17 French Door and Side-by-Side Dispenser Models only Install machine cover screws back into refrigerator cabinet. Install machine cover screws back into refrigerator cabinet. 12 2 13 1 Remove adhesive backing from other side ...
NOTE: The holes on the side panel are clearance holes. 17 French Door and Side-by-Side Dispenser Models only Install machine cover screws back into refrigerator cabinet. Install machine cover screws back into refrigerator cabinet. 12 2 13 1 Remove adhesive backing from other side ...

Side Panel Kit Instructions
Page 5
18 French Door and Side-by-Side Dispenser Models only 19 Connect wire harness to front door and position top panel and grille on top of unit. 21 Insert screws through holes of tape. 20 A Align top panel and grille assembly to wire harness extension in cabinet. Connect ground screw. complete 5 Insert cap covers into side panel. Secure wire harness to top of the cabinet with a piece of top panel into holes.
18 French Door and Side-by-Side Dispenser Models only 19 Connect wire harness to front door and position top panel and grille on top of unit. 21 Insert screws through holes of tape. 20 A Align top panel and grille assembly to wire harness extension in cabinet. Connect ground screw. complete 5 Insert cap covers into side panel. Secure wire harness to top of the cabinet with a piece of top panel into holes.
Specs
Page 1
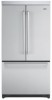
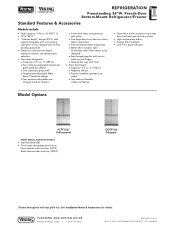
...tray with surrounding cabinetry-fit for five minutes • High temperature alarm • Energy Star Qualified • CEE Tier I Super Efficient Model Options VCFF136* Professional FINISH DETAILS FOR BOTH MODELS • Stainless Steel (SS) • Finish code designates door fronts. See Installation Notes & Accessories for details. REFRIGERATION Freestanding 36"W....• 1-888-VIKING1 REVISED 5/2/11 ©2011 VRC-INFORMATION SUBJECT TO CHANGE French-Door Bottom-Mount Refrigerator/Freezer Standard Features & Accessories Models include • Total capacity-19.6 cu.
...tray with surrounding cabinetry-fit for five minutes • High temperature alarm • Energy Star Qualified • CEE Tier I Super Efficient Model Options VCFF136* Professional FINISH DETAILS FOR BOTH MODELS • Stainless Steel (SS) • Finish code designates door fronts. See Installation Notes & Accessories for details. REFRIGERATION Freestanding 36"W....• 1-888-VIKING1 REVISED 5/2/11 ©2011 VRC-INFORMATION SUBJECT TO CHANGE French-Door Bottom-Mount Refrigerator/Freezer Standard Features & Accessories Models include • Total capacity-19.6 cu.
Specs
Page 4
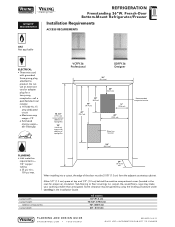
.../grilles 72" (182.9 cm) cutout with grounded three-prong plug attached to product. When installing into a cutout, the edge of tops/grilles Cutout depth All models 36" (91.4 cm) 70-1/2" (179.0 cm) 72" (182.9 cm) 24" (61.0 cm) PLANNING AND DESIGN GUIDE VIKINGRANGE.COM • 1-888-VIKING1 REVISED 5/2/11 ©2011...
.../grilles 72" (182.9 cm) cutout with grounded three-prong plug attached to product. When installing into a cutout, the edge of tops/grilles Cutout depth All models 36" (91.4 cm) 70-1/2" (179.0 cm) 72" (182.9 cm) 24" (61.0 cm) PLANNING AND DESIGN GUIDE VIKINGRANGE.COM • 1-888-VIKING1 REVISED 5/2/11 ©2011...
Specs
Page 5
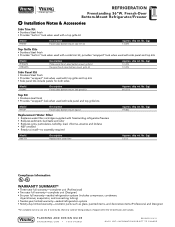
...8226; Stainless steel finish • Provides "wrapped" look when used with a top grille kit Model FRSTKF Description French door bottom-mount side trim kit Approx. Warranty valid on Viking products shipped within the United States and Canada. REFRIGERATION Freestanding 36"W. lbs. (kg) 13 (5.9)... chlorine, atrazine and lindane • NSF certified • Ready to install-no assembly required Approx. lbs. (kg) 60 (27.0) Model FRTOP Description French door bottom-mount top kit Replacement Water Filter • Replaces water filter cartridges supplied with top grille and top kits &#...
...8226; Stainless steel finish • Provides "wrapped" look when used with a top grille kit Model FRSTKF Description French door bottom-mount side trim kit Approx. Warranty valid on Viking products shipped within the United States and Canada. REFRIGERATION Freestanding 36"W. lbs. (kg) 13 (5.9)... chlorine, atrazine and lindane • NSF certified • Ready to install-no assembly required Approx. lbs. (kg) 60 (27.0) Model FRTOP Description French door bottom-mount top kit Replacement Water Filter • Replaces water filter cartridges supplied with top grille and top kits &#...
Use and Care Manual
Page 2
.... All safety messages will again select our products for your appliance. Disconnect power before installing ice maker (on some models). maker kit ready models only). Use a sturdy glass when dispensing ice (on ice Replace all safety messages. SAVE THESE INSTRUCTIONS 3 Always ... materials and vapors, such as outlined in this manual and on your other major appliance needs. We appreciate your choosing a Viking Range Corporation product, and hope that can happen if the instructions are not followed. 2 Important Safety Instructions IMPORTANT SAFETY INSTRUCTIONS ...
.... All safety messages will again select our products for your appliance. Disconnect power before installing ice maker (on some models). maker kit ready models only). Use a sturdy glass when dispensing ice (on ice Replace all safety messages. SAVE THESE INSTRUCTIONS 3 Always ... materials and vapors, such as outlined in this manual and on your other major appliance needs. We appreciate your choosing a Viking Range Corporation product, and hope that can happen if the instructions are not followed. 2 Important Safety Instructions IMPORTANT SAFETY INSTRUCTIONS ...
Use and Care Manual
Page 5
... seconds. Sabbath Mode (SAB) When the Sabbath Mode is turned on the control. Vacation Mode (some models) The moisture control feature turns on the door hinge seal. To turn off . Moisture Control (on some models) The Vacation Mode feature causes the freezer to help reduce moisture on the cabinet. The refrigerator uses...
... seconds. Sabbath Mode (SAB) When the Sabbath Mode is turned on the control. Vacation Mode (some models) The moisture control feature turns on the door hinge seal. To turn off . Moisture Control (on some models) The Vacation Mode feature causes the freezer to help reduce moisture on the cabinet. The refrigerator uses...

Use and Care Manual
Page 9
... The dispenser feature may be used determines life span of water filter cartridge. System Specification and Performance Data Sheet Refrigerator Water Filter Cartridge Model RWFFR Specifications Service Flow Rate (Maximum 0.78 GPM 2.9 L/min) Rated Service Life RWFFR (750 gal. Snap filter cover closed.... and continue with blue bypass cap. Additional flushing may be required in some households. Replacement water filters are available through your local Viking Range Dealer. Use a sturdy container to flow. This will flush air from the filter and water dispensing system. If you choose...
... The dispenser feature may be used determines life span of water filter cartridge. System Specification and Performance Data Sheet Refrigerator Water Filter Cartridge Model RWFFR Specifications Service Flow Rate (Maximum 0.78 GPM 2.9 L/min) Rated Service Life RWFFR (750 gal. Snap filter cover closed.... and continue with blue bypass cap. Additional flushing may be required in some households. Replacement water filters are available through your local Viking Range Dealer. Use a sturdy container to flow. This will flush air from the filter and water dispensing system. If you choose...

Use and Care Manual
Page 10
... Filter State of California Department of Health Services Water Treatment Device Certificate Number 06 - 1790 Date Issued: June 1, 2006 Trademark /Model Designation RWFFR-750 Replacement Elements RWFFR Manufacturer: CUNO, Incorporated, a 3M Company The water treatment device(s) listed on disinfected water that may... be used on this filtration system. Water Filter Tested and certified by NSF International against ANSI/NSF Standards 42 & 53 in models RWFFR for the reduction of: Standard No. 42 Standard No. 53 Aesthetic Effects: Health Effects: Taste and Odor Reduction Chemical...
... Filter State of California Department of Health Services Water Treatment Device Certificate Number 06 - 1790 Date Issued: June 1, 2006 Trademark /Model Designation RWFFR-750 Replacement Elements RWFFR Manufacturer: CUNO, Incorporated, a 3M Company The water treatment device(s) listed on disinfected water that may... be used on this filtration system. Water Filter Tested and certified by NSF International against ANSI/NSF Standards 42 & 53 in models RWFFR for the reduction of: Standard No. 42 Standard No. 53 Aesthetic Effects: Health Effects: Taste and Odor Reduction Chemical...

Use and Care Manual
Page 15
... operation while running. • Refrigerator is quieter overall. Many of the normal sounds that may be detected that is in an older model. SOUND Clicking POSSIBLE CAUSE • Freezer control clicks when starting or stopping compressor. See page 15. After a Long Vacation or Absence... operational. 29 Initially you may be noticed in an upright position during moving the refrigerator. The following are normal. For dispenser models, run water through the dispenser for at least the first three harvests). Always truck the refrigerator from its side or back,...
... operation while running. • Refrigerator is quieter overall. Many of the normal sounds that may be detected that is in an older model. SOUND Clicking POSSIBLE CAUSE • Freezer control clicks when starting or stopping compressor. See page 15. After a Long Vacation or Absence... operational. 29 Initially you may be noticed in an upright position during moving the refrigerator. The following are normal. For dispenser models, run water through the dispenser for at least the first three harvests). Always truck the refrigerator from its side or back,...
Use and Care Manual
Page 18
...service is not a condition of dealer from jurisdiction to jurisdiction. Model No. Keep this warranty. Viking Range Corporation, warrantor, agrees to repair or replace, at 1-888-VIKING1 (845-4641), or write to: VIKING RANGE CORPORATION PREFERRED SERVICE 1803 Hwy 82W Greenwood, Mississippi 38930 USA... date of a component part includes its component part or parts. Service Information If service is required, call Viking Range Corporation. The serial number and model number for new construction, whichever period is ninety (90) days. The return of safety arise which could ...
...service is not a condition of dealer from jurisdiction to jurisdiction. Model No. Keep this warranty. Viking Range Corporation, warrantor, agrees to repair or replace, at 1-888-VIKING1 (845-4641), or write to: VIKING RANGE CORPORATION PREFERRED SERVICE 1803 Hwy 82W Greenwood, Mississippi 38930 USA... date of a component part includes its component part or parts. Service Information If service is required, call Viking Range Corporation. The serial number and model number for new construction, whichever period is ninety (90) days. The return of safety arise which could ...

Energy Guide
Page 1
...183;Automatic Defrost ·Bottom Mounted Freezer ·Without Through-the-Door-Ice Service Viking Corporation Model(s):DDFF136SS* Capacity: 19.6 Cubic Feet Estimated Yearly Operating Cost $48 $47 $61 Cost Range of Similar Models 451kWh Estimated Yearly Electricity Use Your cost will depend on your utility rates and use....tique 451 kWh per year / par année This model / Ce modèle 435 kWh Uses least energy / Consomme le moins d'énergie Similar Models compared Model number Type 5 18.5-20.4 volume in ft3/volume en pi3 DDFF136SS* 569 kWh Uses most energy / Consomme le plus ...
...183;Automatic Defrost ·Bottom Mounted Freezer ·Without Through-the-Door-Ice Service Viking Corporation Model(s):DDFF136SS* Capacity: 19.6 Cubic Feet Estimated Yearly Operating Cost $48 $47 $61 Cost Range of Similar Models 451kWh Estimated Yearly Electricity Use Your cost will depend on your utility rates and use....tique 451 kWh per year / par année This model / Ce modèle 435 kWh Uses least energy / Consomme le moins d'énergie Similar Models compared Model number Type 5 18.5-20.4 volume in ft3/volume en pi3 DDFF136SS* 569 kWh Uses most energy / Consomme le plus ...

