
User Guide
Page 3
NexStar FX NAS GUI 06 5. SAMBA Server (SMB) 12 6. Printer Server 22 9. Media Server Connection-Xbox / PS3 19 8. NexStar FX NAS Manager 04 4. FTP Server 16 7. Mapping Network Drives 31 11. Product Introduction / Features 02 2. Q&A 32 12. Contact 34 1 Warranty 34 13. Mac Installation (Mac 10.5.4 or above) 26 10. Parts Layout 03 3. Table of Contents 1.
NexStar FX NAS GUI 06 5. SAMBA Server (SMB) 12 6. Printer Server 22 9. Media Server Connection-Xbox / PS3 19 8. NexStar FX NAS Manager 04 4. FTP Server 16 7. Mapping Network Drives 31 11. Product Introduction / Features 02 2. Q&A 32 12. Contact 34 1 Warranty 34 13. Mac Installation (Mac 10.5.4 or above) 26 10. Parts Layout 03 3. Table of Contents 1.
User Guide
Page 4
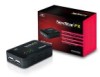
... need to first configure the IP for purchasing NexStar FX Gigabit NAS Adapter. For configuration details, please refer to configure ...NexStar FX Gigabit NAS Adapter is a flexible, economical and powerful unit for installation. 3. Add Storage To Any Network - Now you can easily install the NexStar FX Gigabit NAS Adapter into your operating environment does not support DHCP server, NexStar FX Gigabit NAS Adapter will obtain an IP address from the DHCP Server automatically. 2. 1. Setup NexStar FX Gigabit NAS Adapter as DHCP server and assign an IP for your NexStar FX Gigabit NAS Adapter...
... need to first configure the IP for purchasing NexStar FX Gigabit NAS Adapter. For configuration details, please refer to configure ...NexStar FX Gigabit NAS Adapter is a flexible, economical and powerful unit for installation. 3. Add Storage To Any Network - Now you can easily install the NexStar FX Gigabit NAS Adapter into your operating environment does not support DHCP server, NexStar FX Gigabit NAS Adapter will obtain an IP address from the DHCP Server automatically. 2. 1. Setup NexStar FX Gigabit NAS Adapter as DHCP server and assign an IP for your NexStar FX Gigabit NAS Adapter...

User Guide
Page 6
NexStar FX NAS Manager 3.1 Search NexStar FX Gigabit NAS Adapter by SearchDisk 1. Select "Search Next" and when the NexStar FX is "admin" for both user name and password, click "OK" to the "Search Utility" folder. Run "SDisk.jar". 2. The default login is found, click "Connect". 3. Run the Utility CD enclosed in package and navigate to enter configurations. 4 3.
NexStar FX NAS Manager 3.1 Search NexStar FX Gigabit NAS Adapter by SearchDisk 1. Select "Search Next" and when the NexStar FX is "admin" for both user name and password, click "OK" to the "Search Utility" folder. Run "SDisk.jar". 2. The default login is found, click "Connect". 3. Run the Utility CD enclosed in package and navigate to enter configurations. 4 3.

User Guide
Page 7
3.2 Search NexStar FX Gigabit NAS Adapter by using Windows Internet Explorer. 1. Open IE browser and type in the default host name "NST-600NU" in the search bar. 2. The default login is "admin" for both user name and password, click "OK" to enter configurations. 5
3.2 Search NexStar FX Gigabit NAS Adapter by using Windows Internet Explorer. 1. Open IE browser and type in the default host name "NST-600NU" in the search bar. 2. The default login is "admin" for both user name and password, click "OK" to enter configurations. 5

User Guide
Page 8
4. This procedure can be deleted from the format. 6 Note: All existing data will be done by clicking on the respective flags to select your language. 4.1 Hard Disk format For first time installation, you need to format the hard disk into FAT32 file system. NexStar FX NAS GUI NexStar FX NAS supports multi-language user interface. Please click on the format button.
4. This procedure can be deleted from the format. 6 Note: All existing data will be done by clicking on the respective flags to select your language. 4.1 Hard Disk format For first time installation, you need to format the hard disk into FAT32 file system. NexStar FX NAS GUI NexStar FX NAS supports multi-language user interface. Please click on the format button.
User Guide
Page 9
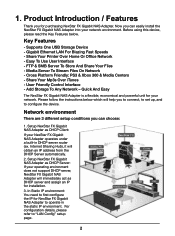
... on "My Computer", choose "Properties", and go to the computer name tab to save the settings. - 4.2 Status This tab provides the basic information for the NexStar FX Gigabit NAS Adapter. If you prefer a different name, type in the correct group name to access this page. But if your workstation belongs to a different workgroup, type in...
... on "My Computer", choose "Properties", and go to the computer name tab to save the settings. - 4.2 Status This tab provides the basic information for the NexStar FX Gigabit NAS Adapter. If you prefer a different name, type in the correct group name to access this page. But if your workstation belongs to a different workgroup, type in...
User Guide
Page 10
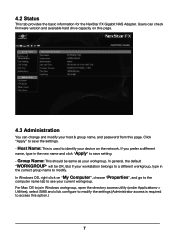
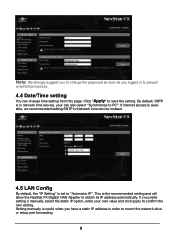
... available, we recommended setting SNTP to Network time service instead. 4.5 LAN Config By default, the "IP Setting" is the recommended setting and will allow the NexStar FX Gigabit NAS Adapter to save the setting.
... available, we recommended setting SNTP to Network time service instead. 4.5 LAN Config By default, the "IP Setting" is the recommended setting and will allow the NexStar FX Gigabit NAS Adapter to save the setting.

User Guide
Page 13
... to your computer and decompress it if necessary. System reboot: This can be restored to reboot the NAS system. - Click "Reset" under the factory defaults and it will revert back to restart the network...remove the device during the firmware update. 4.7 Maintenance This page allows you to update the NexStar FX NAS firmware, to go to the status page to confirm that the update is complete, it will...factory default. - Wait for the NexStar FX NAS. SAMBA/FTP account setting will still remain in the NexStar FX NAS, other settings will be used to the default password setting.
... to your computer and decompress it if necessary. System reboot: This can be restored to reboot the NAS system. - Click "Reset" under the factory defaults and it will revert back to restart the network...remove the device during the firmware update. 4.7 Maintenance This page allows you to update the NexStar FX NAS firmware, to go to the status page to confirm that the update is complete, it will...factory default. - Wait for the NexStar FX NAS. SAMBA/FTP account setting will still remain in the NexStar FX NAS, other settings will be used to the default password setting.

User Guide
Page 14
A default "guest" folder is created and shared to create User account. Click on the "Add" button. Note: Use only "English alphabet" for folder names and no special characters when creating new folders. 5.1 How to all users from under the same network as the NexStar FX NAS. SAMBA Server (SMB) SMB server allows you to share data or files through LAN environment. Type new account name, password and click "OK". 12 5.
A default "guest" folder is created and shared to create User account. Click on the "Add" button. Note: Use only "English alphabet" for folder names and no special characters when creating new folders. 5.1 How to all users from under the same network as the NexStar FX NAS. SAMBA Server (SMB) SMB server allows you to share data or files through LAN environment. Type new account name, password and click "OK". 12 5.

User Guide
Page 15
Here, we name the account "User1" to demonstrate, enter password and click "Next" to continue. You can "Run" from Windows start button, type "\\" and follow by the NexStar FX's IP address (eg:\\192.168.1.10), and click "OK" to enter share management. Type "User1" and password to login. 13
Here, we name the account "User1" to demonstrate, enter password and click "Next" to continue. You can "Run" from Windows start button, type "\\" and follow by the NexStar FX's IP address (eg:\\192.168.1.10), and click "OK" to enter share management. Type "User1" and password to login. 13

User Guide
Page 16
This folder can be accessed from other computers on your local network. 14 Now you have successfully set up the folder that you wish to share on your NexStar FX NAS.
This folder can be accessed from other computers on your local network. 14 Now you have successfully set up the folder that you wish to share on your NexStar FX NAS.
User Guide
Page 18
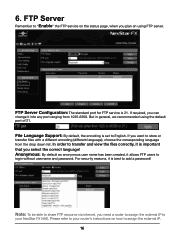
... server. Please refer to store or transfer files with a different encoding (different language), choose the corresponding language from 1025-6550. If you want to your NexStar FX NAS. Anonymous: By default an anonymous user name has been created, it is set to English. 6. FTP Server Configuration: The standard port for FTP service is...
... server. Please refer to store or transfer files with a different encoding (different language), choose the corresponding language from 1025-6550. If you want to your NexStar FX NAS. Anonymous: By default an anonymous user name has been created, it is set to English. 6. FTP Server Configuration: The standard port for FTP service is...
User Guide
Page 24
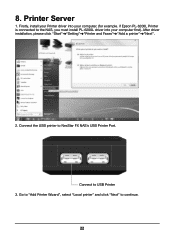
Firstly, install your Printer driver into your computer, (for example. Connect to NexStar FX NAS's USB Printer Port. After driver installation, please click "Start" "Setting" "Printer and Faxes" "Add a printer" "Next". 2. 8. Connect the USB printer to USB Printer 3. Go to "Add Printer Wizard", select "Local printer" and click "Next" to the NAS, you must install PL-6200L driver into your computer first). Printer Server 1. if Epson PL-6200L Printer is connected to continue. 22
Firstly, install your Printer driver into your computer, (for example. Connect to NexStar FX NAS's USB Printer Port. After driver installation, please click "Start" "Setting" "Printer and Faxes" "Add a printer" "Next". 2. 8. Connect the USB printer to USB Printer 3. Go to "Add Printer Wizard", select "Local printer" and click "Next" to the NAS, you must install PL-6200L driver into your computer first). Printer Server 1. if Epson PL-6200L Printer is connected to continue. 22

User Guide
Page 26
5. Select "Custom" and go to continue. 6. Enter the NexStar FX NAS IP address (Eg. 192.168.15.100), then click "Next" to "Setting". 24
5. Select "Custom" and go to continue. 6. Enter the NexStar FX NAS IP address (Eg. 192.168.15.100), then click "Next" to "Setting". 24

User Guide
Page 27
7. If status shows "OK", the printer is setting up successfully. Function Printers (MFP); Please contact the printer manufacture for detailed specifications. 25 scanning functions may not work. Notes: NexStar FX Printer server does not support GDI/Host-based printers. LRxxx; For some Multi- Select "LPR" in protocol, and give a queue name E.g. select LPR byte enable and click "OK" to complete TCP/IP printer setup. 9. Click "Finish" to finish the port setting. 8. Go to "Printer server page and check printer server status.
7. If status shows "OK", the printer is setting up successfully. Function Printers (MFP); Please contact the printer manufacture for detailed specifications. 25 scanning functions may not work. Notes: NexStar FX Printer server does not support GDI/Host-based printers. LRxxx; For some Multi- Select "LPR" in protocol, and give a queue name E.g. select LPR byte enable and click "OK" to complete TCP/IP printer setup. 9. Click "Finish" to finish the port setting. 8. Go to "Printer server page and check printer server status.
User Guide
Page 28
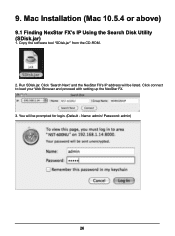
Mac Installation (Mac 10.5.4 or above) 9.1 Finding NexStar FX's IP Using the Search Disk Utility (SDisk.jar) 1. Copy the software tool "SDisk.jar" from the CD-ROM. 2. Name: admin/ Password: admin) 26 9. Run SDisk.jar. Click 'Search Next' and the NexStar FX's IP address will be listed. Click connect to load your Web Browser and proceed with setting up the NexStar FX. 3. You will be prompted for login. (Default -
Mac Installation (Mac 10.5.4 or above) 9.1 Finding NexStar FX's IP Using the Search Disk Utility (SDisk.jar) 1. Copy the software tool "SDisk.jar" from the CD-ROM. 2. Name: admin/ Password: admin) 26 9. Run SDisk.jar. Click 'Search Next' and the NexStar FX's IP address will be listed. Click connect to load your Web Browser and proceed with setting up the NexStar FX. 3. You will be prompted for login. (Default -

User Guide
Page 29
If the Workgroup is in the same Workgroup it will appear below " ". 27 and look for log in , it will be prompted for the NexStar FX. 3. You can choose the existing folders and access its contents. 4. 9.2 How to 'Computer' or use "Guest" or other identities you have created. 5. If the NexStar FX is different, please click "All..." You will appear under Shared Devices( ). Once you have properly logged in . After you enter into the NexStar FX you can use Shift-Command-C. 2. Click 'Go' and navigate to Access Files Using SMB(Samba) 1.
If the Workgroup is in the same Workgroup it will appear below " ". 27 and look for log in , it will be prompted for the NexStar FX. 3. You can choose the existing folders and access its contents. 4. 9.2 How to 'Computer' or use "Guest" or other identities you have created. 5. If the NexStar FX is different, please click "All..." You will appear under Shared Devices( ). Once you have properly logged in . After you enter into the NexStar FX you can use Shift-Command-C. 2. Click 'Go' and navigate to Access Files Using SMB(Samba) 1.

User Guide
Page 30
Once you have properly logged in, it will be prompted for log in. 3. You will appear below " ". 28 You can choose the existing folders and access its contents. 4. After you enter into the NexStar FX you can use "Guest" or other identities you have created. 5.
Once you have properly logged in, it will be prompted for log in. 3. You will appear below " ". 28 You can choose the existing folders and access its contents. 4. After you enter into the NexStar FX you can use "Guest" or other identities you have created. 5.

User Guide
Page 31
or use "Guest" or other identities you have created. 29 You must log in the following: 'smb://192.168.1.112/' (Eg. 9.3 How to Access the NexStar FX Using 'Connect to Server...' Type in . If the NexStar Fx's IP is 192.168.1.112) 3. You can use Command-K. 2. Click 'Go' and navigate to 'Connect to Server' 1.
or use "Guest" or other identities you have created. 29 You must log in the following: 'smb://192.168.1.112/' (Eg. 9.3 How to Access the NexStar FX Using 'Connect to Server...' Type in . If the NexStar Fx's IP is 192.168.1.112) 3. You can use Command-K. 2. Click 'Go' and navigate to 'Connect to Server' 1.

User Guide
Page 32
4. Once the authentication has gone through, the NexStar FX folder will be listed under " " 30
4. Once the authentication has gone through, the NexStar FX folder will be listed under " " 30