Owners Manual
Page 1
Get answers 24/7 at our website: www.uniden.com. OWNER'S MANUAL Need Help? Never use damaged products! UDSC15 ACCESSORY CAMERA Compatible with UDS655 Wireless Video Surveillance System If any items are missing or damaged, contact our Customer Care Line immediately.
Get answers 24/7 at our website: www.uniden.com. OWNER'S MANUAL Need Help? Never use damaged products! UDSC15 ACCESSORY CAMERA Compatible with UDS655 Wireless Video Surveillance System If any items are missing or damaged, contact our Customer Care Line immediately.
Owners Manual
Page 3
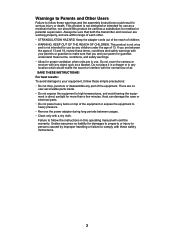
... use by improper handling or failure to comply with your parents or guardian to heavy pressure. xx Allow for more than a few minutes. Uniden assumes no user-serviceable parts inside. xx STRANGULATION HAZARD. For best results: To avoid damage to high temperatures, and avoid leaving the equipment ...in any object such as a medical monitor, nor should this operating manual will void the warranty. Do not cover the camera or receiver with any location which would muffle the sound or interfere with a dry cloth. xx Clean only with the normal flow of 13...
... use by improper handling or failure to comply with your parents or guardian to heavy pressure. xx Allow for more than a few minutes. Uniden assumes no user-serviceable parts inside. xx STRANGULATION HAZARD. For best results: To avoid damage to high temperatures, and avoid leaving the equipment ...in any object such as a medical monitor, nor should this operating manual will void the warranty. Do not cover the camera or receiver with any location which would muffle the sound or interfere with a dry cloth. xx Clean only with the normal flow of 13...
Owners Manual
Page 4
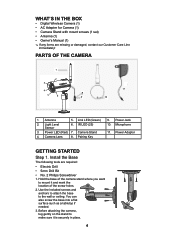
... Power Adaptor Getting Started Step 1. Install the Base The following tools are missing or damaged, contact our Customer Care Line immediately! Before attaching the camera, tug gently on the stand to the wall or ceiling. Link LED (Green) 2. Power LED (Red) 7. Pairing Key 9. Microphone 11. ... Level Sensor 6. IR LED (25) 3. You can also screw the base into a flat surface such as a tabletop if needed. 3. Camera Lens 8. Hold the base of the camera stand where you want to mount it is securely in place. 4 Antenna 5. Power Jack 10. Parts of the screw holes...
... Power Adaptor Getting Started Step 1. Install the Base The following tools are missing or damaged, contact our Customer Care Line immediately! Before attaching the camera, tug gently on the stand to the wall or ceiling. Link LED (Green) 2. Power LED (Red) 7. Pairing Key 9. Microphone 11. ... Level Sensor 6. IR LED (25) 3. You can also screw the base into a flat surface such as a tabletop if needed. 3. Camera Lens 8. Hold the base of the camera stand where you want to mount it is securely in place. 4 Antenna 5. Power Jack 10. Parts of the screw holes...
Owners Manual
Page 5
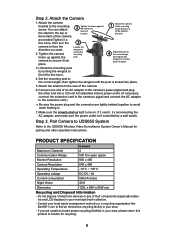
...to locate proper recycling facilities in your area, please return this product to Uniden for pairing and other end into a 120 volt AC (standard indoor) power outlet. (If necessary, connect the extension cord to the camera's pigtail and connect the AC adapter to the extension cord.) ##Be ...the wingnut until the post is locked into place. 3. Connect one end of their components (especially batteries and LCD displays) in . 7. Attach the Camera 1. Unlock the mounting post by a wall switch. Step 3. Step 2. Make sure the Power status light turns on. You can attach the stand to...
...to locate proper recycling facilities in your area, please return this product to Uniden for pairing and other end into a 120 volt AC (standard indoor) power outlet. (If necessary, connect the extension cord to the camera's pigtail and connect the AC adapter to the extension cord.) ##Be ...the wingnut until the post is locked into place. 3. Connect one end of their components (especially batteries and LCD displays) in . 7. Attach the Camera 1. Unlock the mounting post by a wall switch. Step 3. Step 2. Make sure the Power status light turns on. You can attach the stand to...


