Owners Manual
Page 4
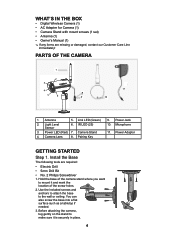
... where you want to the wall or ceiling. Camera Stand 4. Pairing Key 9. Power Adaptor Getting Started Step 1. Light Level Sensor 6. Use the included screws and anchors to attach the base to mount it is securely in place. 4 Antenna 5. Power LED (Red) 7. Parts of the screw holes. 2. Power Jack 10. Install the Base...
... where you want to the wall or ceiling. Camera Stand 4. Pairing Key 9. Power Adaptor Getting Started Step 1. Light Level Sensor 6. Use the included screws and anchors to attach the base to mount it is securely in place. 4 Antenna 5. Power LED (Red) 7. Parts of the screw holes. 2. Power Jack 10. Install the Base...
Owners Manual
Page 5
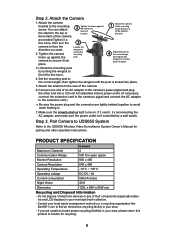
...to locate proper recycling facilities in your area, please return this product to Uniden for pairing and other end into a 120 volt AC (standard indoor) power outlet. (If necessary, connect the extension cord to the camera's pigtail and connect the AC adapter to the extension cord.) ##Be ...or a recycling organization like Earth911.com to the top or 2 Tighten the brace against the post. Tighten the camera wingnut to unlock the mounting brace up against the camera to secure it to the desired direction. 4 Adjust the post to the correct angle, then tighten the wingnut to the mounting...
...to locate proper recycling facilities in your area, please return this product to Uniden for pairing and other end into a 120 volt AC (standard indoor) power outlet. (If necessary, connect the extension cord to the camera's pigtail and connect the AC adapter to the extension cord.) ##Be ...or a recycling organization like Earth911.com to the top or 2 Tighten the brace against the post. Tighten the camera wingnut to unlock the mounting brace up against the camera to secure it to the desired direction. 4 Adjust the post to the correct angle, then tighten the wingnut to the mounting...


