Owners Manual
Page 1
Never use damaged products! Get answers 24/7 at our website: www.uniden.com. Need Help? UBW2101 3.5" LCD Portable Wireless Baby Monitoring System If any items are missing or damaged, contact our Customer Care Line immediately.
Never use damaged products! Get answers 24/7 at our website: www.uniden.com. Need Help? UBW2101 3.5" LCD Portable Wireless Baby Monitoring System If any items are missing or damaged, contact our Customer Care Line immediately.
Owners Manual
Page 2
xx DO NOT immerse any part of electric shock from the wall outlet. xx To avoid any batteries in a fire, as they can become crushed, cut, or frayed; Never dispose of fire, electric shock and injury to persons, including the following: xx This equipment is damaged. 2 xx Never tug or pull on any high traffic areas where people might trip over them rub against any sharp edges or lie across any power cord; xx Never leave power cords where they may explode. xx Do not use the device if the adapter cords or plugs have been damaged, the unit has been exposed to reduce the risk ...
xx DO NOT immerse any part of electric shock from the wall outlet. xx To avoid any batteries in a fire, as they can become crushed, cut, or frayed; Never dispose of fire, electric shock and injury to persons, including the following: xx This equipment is damaged. 2 xx Never tug or pull on any high traffic areas where people might trip over them rub against any sharp edges or lie across any power cord; xx Never leave power cords where they may explode. xx Do not use the device if the adapter cords or plugs have been damaged, the unit has been exposed to reduce the risk ...
Owners Manual
Page 3
... THESE INSTRUCTIONS! xx Do not expose the equipment to follow the instructions in serious injury or death. Heat can damage the case or electrical parts. Uniden assumes no user-serviceable parts inside. xx STRANGULATION HAZARD. If you and your parent or guardian understand these terms, conditions, and safety warnings. ment in...
... THESE INSTRUCTIONS! xx Do not expose the equipment to follow the instructions in serious injury or death. Heat can damage the case or electrical parts. Uniden assumes no user-serviceable parts inside. xx STRANGULATION HAZARD. If you and your parent or guardian understand these terms, conditions, and safety warnings. ment in...

Owners Manual
Page 4
Get to Know the LCD Monitor 8 Step 3. Get to Know the Camera 7 II. Get to Know the Main Menu 10 System Setup - Basic Operation 7 I . Time Setting/Factory Defaults 10 Camera Setup - Set-up and Installation 6 Step 2. VOX Sensitivity/Enable VOX Recording 13 Brightness 13 Alarm Setup/Event List 14 About Digital Wirless Technology 15 Troubleshooting Guide 16 Product Specifications 17 .Storage Media Management 17 Lithium-Polymer Battery Warning 17 Recycling and Disposal Information 17 FCC Compliance Information 18 Part 15 Compliance Statement 18 RF Exposure Information 18 ...
Get to Know the LCD Monitor 8 Step 3. Get to Know the Camera 7 II. Get to Know the Main Menu 10 System Setup - Basic Operation 7 I . Time Setting/Factory Defaults 10 Camera Setup - Set-up and Installation 6 Step 2. VOX Sensitivity/Enable VOX Recording 13 Brightness 13 Alarm Setup/Event List 14 About Digital Wirless Technology 15 Troubleshooting Guide 16 Product Specifications 17 .Storage Media Management 17 Lithium-Polymer Battery Warning 17 Recycling and Disposal Information 17 FCC Compliance Information 18 Part 15 Compliance Statement 18 RF Exposure Information 18 ...
Owners Manual
Page 5
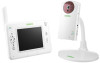
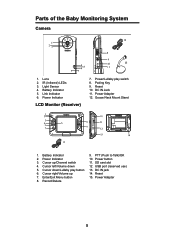
Power/Lullaby play button 6. Pairing Key 9. Goose Neck Mount Stand USB 1. Battery Indicator 2. Cursor left/Volume down /Lullaby play switch 8. USB port (reserved use) 13. IR (Infrared) LEDs 3. Reset 10. Reset 15. Battery Indicator 5. Light Sensor 4. Power Indicator 3. Power button 11. Cursor up 7. Cursor right/Volume up /Channel switch 4. Power Adapter 5 Link Indicator 6. DC IN Jack 11. Enter/Exit Menu button 8. Parts of the Baby Monitoring System Camera PWR. SD card slot 12. Power Indicator LCD Monitor (Receiver) 7. Cursor down 5. ...
Power/Lullaby play button 6. Pairing Key 9. Goose Neck Mount Stand USB 1. Battery Indicator 2. Cursor left/Volume down /Lullaby play switch 8. USB port (reserved use) 13. IR (Infrared) LEDs 3. Reset 10. Reset 15. Battery Indicator 5. Light Sensor 4. Power Indicator 3. Power button 11. Cursor up 7. Cursor right/Volume up /Channel switch 4. Power Adapter 5 Link Indicator 6. DC IN Jack 11. Enter/Exit Menu button 8. Parts of the Baby Monitoring System Camera PWR. SD card slot 12. Power Indicator LCD Monitor (Receiver) 7. Cursor down 5. ...
Owners Manual
Page 6
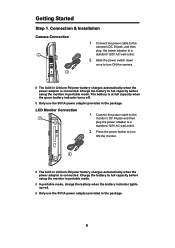
The battery is connected. Press the power button to full capacity before using the monitor in the package. 6 Connect the power cable to the camera's DC IN jack, and then plug the power adapter to a standard 120V AC wall outlet. 2. Connect the power cable to the monitor's DC IN jack and then plug the power adapter to a standard 120V AC wall outlet. 2. Charge the battery to turn ON the camera. Charge the battery to turn ON the monitor. 1 ## The built-in Lithium-Polymer battery charges automatically when the power adapter is at full capacity when the green battery ...
The battery is connected. Press the power button to full capacity before using the monitor in the package. 6 Connect the power cable to the camera's DC IN jack, and then plug the power adapter to a standard 120V AC wall outlet. 2. Connect the power cable to the monitor's DC IN jack and then plug the power adapter to a standard 120V AC wall outlet. 2. Charge the battery to turn ON the camera. Charge the battery to turn ON the monitor. 1 ## The built-in Lithium-Polymer battery charges automatically when the power adapter is at full capacity when the green battery ...
Owners Manual
Page 7
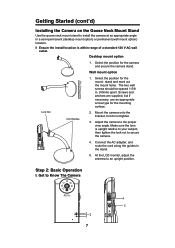
Getting Started (cont'd) Installing the Camera on the Goose Neck Mount Stand Use the goose neck mount stand to install the camera at an appropriate angle in a semi-permanent (desktop mount option) or permanent (wall mount option) location. ## Ensure the install location is upright relative to your subject, then tighten the lock nut to secure the camera. 4. Select the position for the mount stand and mark out the mount holes. Select the position for the camera and secure the camera stand. Screws and anchors are supplied, but do not tighten. 3. Make sure the lens is within range of a ...
Getting Started (cont'd) Installing the Camera on the Goose Neck Mount Stand Use the goose neck mount stand to install the camera at an appropriate angle in a semi-permanent (desktop mount option) or permanent (wall mount option) location. ## Ensure the install location is upright relative to your subject, then tighten the lock nut to secure the camera. 4. Select the position for the mount stand and mark out the mount holes. Select the position for the camera and secure the camera stand. Screws and anchors are supplied, but do not tighten. 3. Make sure the lens is within range of a ...
Owners Manual
Page 8
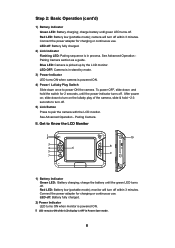
Step 2: Basic Operation (cont'd) 1) Battery Indicator Green LED: Battery charging; Connect the power adapter for 2 seconds, until the power indicator turns off : Battery fully charged. 2) Link Indicator Flashing LED: Pairing sequence is OFF in Power Save mode. 8 LED off . Pairing Camera. LED OFF: Camera is powered ON. 4) Power / Lullaby Play Switch Slide down once to power ON the camera. monitor will turn off . charge the battery until green LED turns off . 5) Link Button Press to turn off : Battery fully charged. 2) Power Indicator LED turns ON when monitor...
Step 2: Basic Operation (cont'd) 1) Battery Indicator Green LED: Battery charging; Connect the power adapter for 2 seconds, until the power indicator turns off : Battery fully charged. 2) Link Indicator Flashing LED: Pairing sequence is OFF in Power Save mode. 8 LED off . Pairing Camera. LED OFF: Camera is powered ON. 4) Power / Lullaby Play Switch Slide down once to power ON the camera. monitor will turn off . charge the battery until green LED turns off . 5) Link Button Press to turn off : Battery fully charged. 2) Power Indicator LED turns ON when monitor...
Owners Manual
Page 9
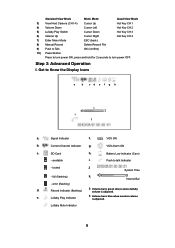
VOX Alarm ON c. Push to turn power ON, press and hold for 2 seconds to talk Indicator - full (flashing) k. 3 Volume Bar - Lullaby Play Indicator ## Volume bar is blue when monitor volume is adjusted. Step 3: Advanced Operation I. VOX VOX ON b. locked j. e. Standard View Mode Menu Mode Quad View Mode 3) View Next Camera (CH1-4) Cursor Up Hot Key CH 1 4) Volume Down Cursor Left Hot Key CH 2 5) Lullaby Play Switch Cursor Down Hot Key CH 3 6) Volume Up Cursor Right Hot Key CH 4 7) Enter Menu Mode ESC (back) 8) Manual Record Delete Record File 9) Push ...
VOX Alarm ON c. Push to turn power ON, press and hold for 2 seconds to talk Indicator - full (flashing) k. 3 Volume Bar - Lullaby Play Indicator ## Volume bar is blue when monitor volume is adjusted. Step 3: Advanced Operation I. VOX VOX ON b. locked j. e. Standard View Mode Menu Mode Quad View Mode 3) View Next Camera (CH1-4) Cursor Up Hot Key CH 1 4) Volume Down Cursor Left Hot Key CH 2 5) Lullaby Play Switch Cursor Down Hot Key CH 3 6) Volume Up Cursor Right Hot Key CH 4 7) Enter Menu Mode ESC (back) 8) Manual Record Delete Record File 9) Push ...
Owners Manual
Page 10
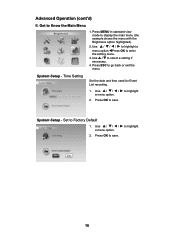
Press MENU in standard view mode to Factory Default 1. Set to display the main menu (the example shows the menu with the Brightness option highlighted). 2. Use to select a setting if necessary. 4. Use / to highlight a menu option. 2. System Setup - Time Setting Set the date and time used for Event List recording. 1. Press OK to enter the setting menu. 3. System Setup - Use to highlight a menu option.◄Press OK to save . 10 Use to save . Press OK to highlight a menu option. 2. Advanced Operation (cont'd) II. Get to go back or exit the menu. Press ...
Press MENU in standard view mode to Factory Default 1. Set to display the main menu (the example shows the menu with the Brightness option highlighted). 2. Use to select a setting if necessary. 4. Use / to highlight a menu option. 2. System Setup - Time Setting Set the date and time used for Event List recording. 1. Press OK to enter the setting menu. 3. System Setup - Use to highlight a menu option.◄Press OK to save . 10 Use to save . Press OK to highlight a menu option. 2. Advanced Operation (cont'd) II. Get to go back or exit the menu. Press ...
Owners Manual
Page 11
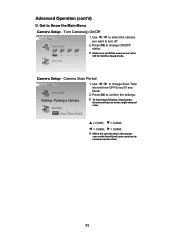
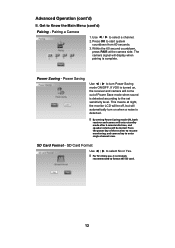
Camera Scan Period 1. Press OK to Know the Main Menu Camera Setup - Turn Camera(s) On/Off 1. Camera Setup - Use ◄ / ► to change ON/OFF status. ## Make sure available cameras are set to resume monitor view. 11 Press OK to change Scan Time interval from Quad, press any key to ON for SCAN or Quad mode. Pairing a Camera ## To leave Quad display, simply press directional keys to turn off. 2. Advanced Operation (cont'd) II. Pairing - Get to confirm the settings. Use ◄ / ► to select the camera you want to enter single channel view. = CAM1; = ...
Camera Scan Period 1. Press OK to Know the Main Menu Camera Setup - Turn Camera(s) On/Off 1. Camera Setup - Use ◄ / ► to change ON/OFF status. ## Make sure available cameras are set to resume monitor view. 11 Press OK to change Scan Time interval from Quad, press any key to ON for SCAN or Quad mode. Pairing a Camera ## To leave Quad display, simply press directional keys to turn off. 2. Advanced Operation (cont'd) II. Pairing - Get to confirm the settings. Use ◄ / ► to select the camera you want to enter single channel view. = CAM1; = ...
Owners Manual
Page 12
Use ◄ / ► to turn on , the receiver and camera will come out of the receiver to resume monitoring, and camera key to start system countdown from 60 seconds. 3. Power Saving - Power Saving Use ◄ / ► to select a channel. 2. Press the power key of Power Save mode when sound is detected according to the set sensitivity level. Within the 60 second countdown, press PAIR at night, the monitor LCD will be off, but will automatically turn Power Saving mode ON/OFF. This means at the camera side. Press OK to enter single channel view. SD Card Format Use...
Use ◄ / ► to turn on , the receiver and camera will come out of the receiver to resume monitoring, and camera key to start system countdown from 60 seconds. 3. Power Saving - Power Saving Use ◄ / ► to select a channel. 2. Press the power key of Power Save mode when sound is detected according to the set sensitivity level. Within the 60 second countdown, press PAIR at night, the monitor LCD will be off, but will automatically turn Power Saving mode ON/OFF. This means at the camera side. Press OK to enter single channel view. SD Card Format Use...
Owners Manual
Page 13
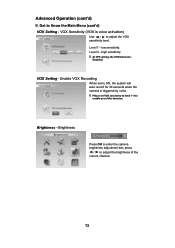
Level 3 - high sensitivity. ## At OFF setting, the VOX function is voice activation) Use ◄ / ► to adjust the VOX sensitivity level. Brightness - press ◄ / ► to Know the Main Menu (cont'd) VOX Setting - Get to adjust the brightness of this function. Level 1 - low sensitivity. VOX Setting - Advanced Operation (cont'd) II. VOX Sensitivity (VOX is disabled. Enable VOX Recording When set to ON, the system will auto record for 30 seconds when the camera is triggered by voice. ## Please set VOX sensitivity to level 1~3 to enter the camera brightness ...
Level 3 - high sensitivity. ## At OFF setting, the VOX function is voice activation) Use ◄ / ► to adjust the VOX sensitivity level. Brightness - press ◄ / ► to Know the Main Menu (cont'd) VOX Setting - Get to adjust the brightness of this function. Level 1 - low sensitivity. VOX Setting - Advanced Operation (cont'd) II. VOX Sensitivity (VOX is disabled. Enable VOX Recording When set to ON, the system will auto record for 30 seconds when the camera is triggered by voice. ## Please set VOX sensitivity to level 1~3 to enter the camera brightness ...
Owners Manual
Page 14
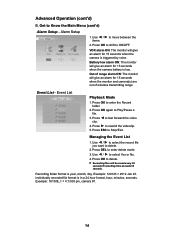
Out of wireless transmitting range. Press OK again to Know the Main Menu (cont'd) Alarm Setup - Managing the Event List 1. Press OK to enter delete mode. 3. Recording folder format is in a 24 hour format, hour, minutes, seconds. Individually recorded file format is year, month, day. Get to Play/Pause a file. 3. Press OK to shift to rewind the videoclip. 5. Press ► to ON/OFF. Use ◄ / ► to delete. 2. Example: 120123 = 2012 Jan 23. Alarm Setup 1. Use ◄ / ► to select the record file you want to select Yes or No. 4. Use ◄ / ► ...
Out of wireless transmitting range. Press OK again to Know the Main Menu (cont'd) Alarm Setup - Managing the Event List 1. Press OK to enter delete mode. 3. Recording folder format is in a 24 hour format, hour, minutes, seconds. Individually recorded file format is year, month, day. Get to Play/Pause a file. 3. Press OK to shift to rewind the videoclip. 5. Press ► to ON/OFF. Use ◄ / ► to delete. 2. Example: 120123 = 2012 Jan 23. Alarm Setup 1. Use ◄ / ► to select the record file you want to select Yes or No. 4. Use ◄ / ► ...
Owners Manual
Page 15
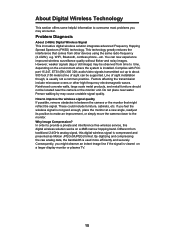
Complies with FCC part 15.247, ETSI (EN) 300 328; Do not place near the camera or the monitor unit. Why Image Compression? By digitizing and compressing the raw analog data, the bandwidth is viewed on a larger display monitor or plasma TV. 15 Consequently, you might reflect the signal. You can be located near water. How to improve the wireless signal quality If possible, remove obstacles in between the camera or the monitor that comes from time to overcome most problems you feel the wireless signal is compressed and presented as Motion JPEG (MJPEG) format. These ...
Complies with FCC part 15.247, ETSI (EN) 300 328; Do not place near the camera or the monitor unit. Why Image Compression? By digitizing and compressing the raw analog data, the bandwidth is viewed on a larger display monitor or plasma TV. 15 Consequently, you might reflect the signal. You can be located near water. How to improve the wireless signal quality If possible, remove obstacles in between the camera or the monitor that comes from time to overcome most problems you feel the wireless signal is compressed and presented as Motion JPEG (MJPEG) format. These ...
Owners Manual
Page 16
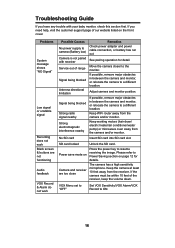
If possible, remove major obstacles in between the camera and monitor, or relocate the camera to camera (Battery low) Camera is not paired with your baby monitor, check this section first. No SD card Insert SD card into SD card slot. Power save mode on Press the power key to Power Saving section on the front cover. Please refer to resume receiving the image. Keep the camera at least 10 feet away from the camera and/or monitor. If you have any trouble with receiver Service out of range Signal being blocked Antenna directional limitation Signal being blocked Strong radio ...
If possible, remove major obstacles in between the camera and monitor, or relocate the camera to camera (Battery low) Camera is not paired with your baby monitor, check this section first. No SD card Insert SD card into SD card slot. Power save mode on Press the power key to Power Saving section on the front cover. Please refer to resume receiving the image. Keep the camera at least 10 feet away from the camera and/or monitor. If you have any trouble with receiver Service out of range Signal being blocked Antenna directional limitation Signal being blocked Strong radio ...
Owners Manual
Page 17
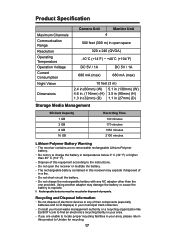
... rechargeable battery with any of their components (especially batteries and LCD displays) in your local waste management authority or a recycling organization like Earth911.com to Uniden for recycling. 17 Using another adapter may damage the battery or cause the battery to explode. ## Rechargeable batteries must be recycled or disposed of this...
... rechargeable battery with any of their components (especially batteries and LCD displays) in your local waste management authority or a recycling organization like Earth911.com to Uniden for recycling. 17 Using another adapter may damage the battery or cause the battery to explode. ## Rechargeable batteries must be recycled or disposed of this...
Owners Manual
Page 18
Any changes or modifications to radio communications. "Privacy of communications may cause harmful interference to this device". low voltage Directive (73/23/EEC); R&TTE(1999/5/EC) issued by turning the equipment off and on a circuit different from that to which can radiate radio frequency energy, and if not installed and used in a particular installation. CAUTION! RF Exposure Information The antenna used for this equipment does cause interference to radio or television equipment reception, which the receiver is subjected to the following two conditions: (1) this device ...
Any changes or modifications to radio communications. "Privacy of communications may cause harmful interference to this device". low voltage Directive (73/23/EEC); R&TTE(1999/5/EC) issued by turning the equipment off and on a circuit different from that to which can radiate radio frequency energy, and if not installed and used in a particular installation. CAUTION! RF Exposure Information The antenna used for this equipment does cause interference to radio or television equipment reception, which the receiver is subjected to the following two conditions: (1) this device ...
Owners Manual
Page 19
...the event that the product does not conform to this warranty at any time while this warranty is in effect, warrantor will either, at : Uniden America Service 4700 Amon Carter Blvd. PROCEDURE FOR OBTAINING PERFORMANCE OF WARRANTY: If, after the date of original retail sale. THIS WARRANTY DOES NOT...a defect or malfunction covered by this warranty, (E) used in any conjunction with equipment or parts or as part of any system not manufactured by Uniden, or (F) installed or programmed by anyone other than as detailed by the owner's manual for this product. This warranty is defective, pack the ...
...the event that the product does not conform to this warranty at any time while this warranty is in effect, warrantor will either, at : Uniden America Service 4700 Amon Carter Blvd. PROCEDURE FOR OBTAINING PERFORMANCE OF WARRANTY: If, after the date of original retail sale. THIS WARRANTY DOES NOT...a defect or malfunction covered by this warranty, (E) used in any conjunction with equipment or parts or as part of any system not manufactured by Uniden, or (F) installed or programmed by anyone other than as detailed by the owner's manual for this product. This warranty is defective, pack the ...

Owners Manual
Page 22
© 2012 Uniden America Corporation Printed in China.
© 2012 Uniden America Corporation Printed in China.