
English Owners Manual
Page 1
...; Input Method Select 6 • Adjusting the Display Contrast 6 • Opening Programs 7 • Exiting Programs 7 • Minimizing Programs 7 • Calibrate "Hot" Key 7 • Help 7 The Stylus 8 Powering up 9 The Setup Wizard 9 • Calibrating Your Display 10 • World Clock -
...; Input Method Select 6 • Adjusting the Display Contrast 6 • Opening Programs 7 • Exiting Programs 7 • Minimizing Programs 7 • Calibrate "Hot" Key 7 • Help 7 The Stylus 8 Powering up 9 The Setup Wizard 9 • Calibrating Your Display 10 • World Clock -

English Owners Manual
Page 2
This product is a proprietary trademark of mobile devices powered by the Microsoft® Windows® CE operating system. The information contained on your new PC100. FEATURES • Jot Character Recognition • ActiveSync™ Docking &#..., long life, and outstanding performance. Use this Startup Guide to familiarize yourself with your purchase of the ™ PC100, a member of the expanding family of Uniden America Corporation 2 WELCOME Congratulations on the following pages will get you up and running as quickly as possible.
This product is a proprietary trademark of mobile devices powered by the Microsoft® Windows® CE operating system. The information contained on your new PC100. FEATURES • Jot Character Recognition • ActiveSync™ Docking &#..., long life, and outstanding performance. Use this Startup Guide to familiarize yourself with your purchase of the ™ PC100, a member of the expanding family of Uniden America Corporation 2 WELCOME Congratulations on the following pages will get you up and running as quickly as possible.
English Owners Manual
Page 4
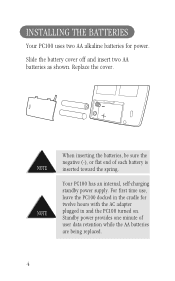
For first time use, leave the PC100 docked in the cradle for power. Your PC100 has an internal, self-charging standby power supply. Slide the battery cover off and insert two AA batteries as shown. Replace the cover. + When inserting the batteries, be sure the ...negative (-), or flat end of user data retention while the AA batteries are being replaced. 4 Standby power provides one minute of each battery is NOTE inserted toward the spring. INSTALLING THE BATTERIES Your PC100 uses two AA alkaline batteries for twelve hours...
For first time use, leave the PC100 docked in the cradle for power. Your PC100 has an internal, self-charging standby power supply. Slide the battery cover off and insert two AA batteries as shown. Replace the cover. + When inserting the batteries, be sure the ...negative (-), or flat end of user data retention while the AA batteries are being replaced. 4 Standby power provides one minute of each battery is NOTE inserted toward the spring. INSTALLING THE BATTERIES Your PC100 uses two AA alkaline batteries for twelve hours...
English Owners Manual
Page 9
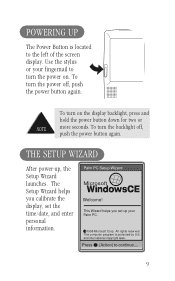
To turn the backlight off , push the power button again. To turn the power on the display backlight, press and hold the power button down for two or NOTE more seconds. To turn the power off , push the power button again. Use the stylus or your Palm PC. 1998 Microsoft Corp. ...reserved This computer program is located to the left of the screen display. Press (Action) to turn on . THE SETUP WIZARD After power-up your fingernail to continue.... 9 The Setup Wizard helps you set the time/date, and enter personal information. and international copyright laws...
To turn the backlight off , push the power button again. To turn the power on the display backlight, press and hold the power button down for two or NOTE more seconds. To turn the power off , push the power button again. Use the stylus or your Palm PC. 1998 Microsoft Corp. ...reserved This computer program is located to the left of the screen display. Press (Action) to turn on . THE SETUP WIZARD After power-up your fingernail to continue.... 9 The Setup Wizard helps you set the time/date, and enter personal information. and international copyright laws...

English Owners Manual
Page 21
"Auto Insert" in your PC100. 21 o Hardware Setup 1. Tighten the finger screws on back of your computer. Place the docking cradle upright on -screen instructions to install your computer. Plug the AC adapter into the serial port of the plug. 3. Plug the docking cradle's serial cable into the wall. ! Make sure there is an adequate AC power source nearby. 2. Use only the Uniden AC Adapter supplied with your Computer's system settings must be enabled before NOTE Windows™ CE will AutoPlay. 2. Follow the on the desktop near your Windows™ CE software.
"Auto Insert" in your PC100. 21 o Hardware Setup 1. Tighten the finger screws on back of your computer. Place the docking cradle upright on -screen instructions to install your computer. Plug the AC adapter into the serial port of the plug. 3. Plug the docking cradle's serial cable into the wall. ! Make sure there is an adequate AC power source nearby. 2. Use only the Uniden AC Adapter supplied with your Computer's system settings must be enabled before NOTE Windows™ CE will AutoPlay. 2. Follow the on the desktop near your Windows™ CE software.