
User Guide
Page 3
...Taking Care of these products to be in compliance with all local, state and federal law. Uniden expects consumer's use of Your Hardware 45 Receiver 45 Cameras 45 Additional Information 48 Product Specifications 48 Lithium-Polymer Battery Warning 49 Recycling and Disposal Information 49...System 15 Recording Live Video 15 Playing Back Recorded Video 15 Adding New Cameras 16 Uniden Guardian Screen Descriptions 18 Overview...18 Uniden Guardian Settings Screen 18 Camera Setup Screen 20 Pairing...20 Camera On 21 Recorder Setup Screen 22 Network Setup Screen 24 Alarm Setup Screen ...
...Taking Care of these products to be in compliance with all local, state and federal law. Uniden expects consumer's use of Your Hardware 45 Receiver 45 Cameras 45 Additional Information 48 Product Specifications 48 Lithium-Polymer Battery Warning 49 Recycling and Disposal Information 49...System 15 Recording Live Video 15 Playing Back Recorded Video 15 Adding New Cameras 16 Uniden Guardian Screen Descriptions 18 Overview...18 Uniden Guardian Settings Screen 18 Camera Setup Screen 20 Pairing...20 Camera On 21 Recorder Setup Screen 22 Network Setup Screen 24 Alarm Setup Screen ...
User Guide
Page 5
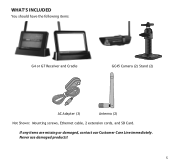
What's Included You should have the following items: G4 or G7 Receiver and Cradle GC45 Camera (2) Stand (2) AC Adapter (3) Antenna (2) Not Shown: Mounting screws, Ethernet cable, 2 extension cords, and SD Card. Never use damaged products! 5 If any items are missing or damaged, contact our Customer Care Line immediately.
What's Included You should have the following items: G4 or G7 Receiver and Cradle GC45 Camera (2) Stand (2) AC Adapter (3) Antenna (2) Not Shown: Mounting screws, Ethernet cable, 2 extension cords, and SD Card. Never use damaged products! 5 If any items are missing or damaged, contact our Customer Care Line immediately.
User Guide
Page 6
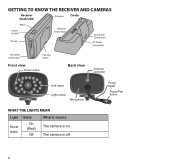
The camera is on. Getting to Know the Receiver and Cameras Receiver (back/side) Antenna Cradle Reset Power On/O SD slot Receiver Power Dock Data Cable Connection AC Power Connection AC Power Connection Pull-Out Stand Front view Power status Back view Antenna connector Link status Light sensor Microphone Power pigtail Power/Pair button What the lights mean Light Power status State On (Red) Off What it means The camera is off. 6
The camera is on. Getting to Know the Receiver and Cameras Receiver (back/side) Antenna Cradle Reset Power On/O SD slot Receiver Power Dock Data Cable Connection AC Power Connection AC Power Connection Pull-Out Stand Front view Power status Back view Antenna connector Link status Light sensor Microphone Power pigtail Power/Pair button What the lights mean Light Power status State On (Red) Off What it means The camera is off. 6
User Guide
Page 7
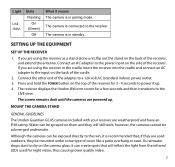
... 1. Connect an AC adapter to a 120 volt AC (standard indoor) power outlet. 3. The receiver displays the Uniden Welcome screen for night vision, thus causing lower quality video. 7 Mount the Camera Stand General Guidelines The Uniden Guardian GC45 cameras included with your receiver are using the receiver in the cradle, insert the receiver into the...
... 1. Connect an AC adapter to a 120 volt AC (standard indoor) power outlet. 3. The receiver displays the Uniden Welcome screen for night vision, thus causing lower quality video. 7 Mount the Camera Stand General Guidelines The Uniden Guardian GC45 cameras included with your receiver are using the receiver in the cradle, insert the receiver into the...
User Guide
Page 8
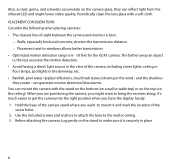
... the driveway, etc. •• Rainfall, pool water ripples/reflections, tree/shrub leaves blowing in the wind - Placement next to get the camera into the right position when you might lower video quality. The farther away an object is, the less accurate the motion detection. ••... 's much easier to windows allows better transmission. •• Optimized motion detection range is securely in the view of -sight between the camera and monitor is best. -- can generate motion detection false alarms. You can reflect light from the infrared LED and might want to the...
... the driveway, etc. •• Rainfall, pool water ripples/reflections, tree/shrub leaves blowing in the wind - Placement next to get the camera into the right position when you might lower video quality. The farther away an object is, the less accurate the motion detection. ••... 's much easier to windows allows better transmission. •• Optimized motion detection range is securely in the view of -sight between the camera and monitor is best. -- can generate motion detection false alarms. You can reflect light from the infrared LED and might want to the...
User Guide
Page 9
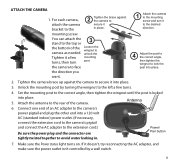
... the wingnut until the post is locked into a 120 volt AC (standard indoor) power outlet. (If necessary, connect the extension cord to the camera's pigtail and connect the AC adapter to the extension cord.) Be sure the power plug and the connector are tightly twisted together to the mounting... try reconnecting the AC adapter, and make sure the power outlet isn't controlled by a wall switch. 9 For each camera, attach the camera bracket to the 2 Tighten the brace against the camera to secure it to the desired direction. 4 Adjust the post to the correct angle, then tighten the wingnut to the...
... the wingnut until the post is locked into a 120 volt AC (standard indoor) power outlet. (If necessary, connect the extension cord to the camera's pigtail and connect the AC adapter to the extension cord.) Be sure the power plug and the connector are tightly twisted together to the mounting... try reconnecting the AC adapter, and make sure the power outlet isn't controlled by a wall switch. 9 For each camera, attach the camera bracket to the 2 Tighten the brace against the camera to secure it to the desired direction. 4 Adjust the post to the correct angle, then tighten the wingnut to the...
User Guide
Page 10
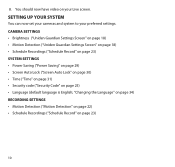
... page 22) •• Schedule Recordings ("Schedule Record" on page 25) •• Language (default language is English; Camera Settings •• Brightness ("Uniden Guardian Settings Screen" on page 18) •• Motion Detection ("Uniden Guardian Settings Screen" on page 18) •• Schedule Recordings ("Schedule Record" on page 23) System Settings •...;• Time ("Time" on page 31) •• Security code ("Security Code" on page 23) 10 Setting Up Your System You can now set your cameras and system to your Live screen.
... page 22) •• Schedule Recordings ("Schedule Record" on page 25) •• Language (default language is English; Camera Settings •• Brightness ("Uniden Guardian Settings Screen" on page 18) •• Motion Detection ("Uniden Guardian Settings Screen" on page 18) •• Schedule Recordings ("Schedule Record" on page 23) System Settings •...;• Time ("Time" on page 31) •• Security code ("Security Code" on page 23) 10 Setting Up Your System You can now set your cameras and system to your Live screen.
User Guide
Page 11
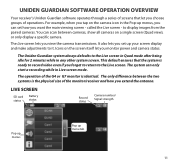
...two systems is identical. The Uniden Guardian system always defaults to the Live screen. Icons on the camera icon in the Pop-up menus, you can set up menu tab 11 This default ensures that let you monitor power and camera status. Live Screen SD ... you set how you view the camera transmissions. The only difference between cameras, show all cameras on a single screen (Quad view), or only display a specific camera. to it. It also lets you extend the antenna. Uniden Guardian Software Operation Overview Your receiver's Uniden Guardian software operates through a series ...
...two systems is identical. The Uniden Guardian system always defaults to the Live screen. Icons on the camera icon in the Pop-up menus, you can set up menu tab 11 This default ensures that let you monitor power and camera status. Live Screen SD ... you set how you view the camera transmissions. The only difference between cameras, show all cameras on a single screen (Quad view), or only display a specific camera. to it. It also lets you extend the antenna. Uniden Guardian Software Operation Overview Your receiver's Uniden Guardian software operates through a series ...

User Guide
Page 12
... Capacity Indicates memory capacity remaining. Recording 12 Not recording • Flashing - Tap to display camera input: • Scan between cameras (5 seconds) • Quad view (all paired cameras display) • Full view (1 camera displays on - Uniden Guardian System Settings Access the Uniden Guardian Software Operation screens or view recorded events. Battery Capacity Displays battery capacity. This graphic...
... Capacity Indicates memory capacity remaining. Recording 12 Not recording • Flashing - Tap to display camera input: • Scan between cameras (5 seconds) • Quad view (all paired cameras display) • Full view (1 camera displays on - Uniden Guardian System Settings Access the Uniden Guardian Software Operation screens or view recorded events. Battery Capacity Displays battery capacity. This graphic...

User Guide
Page 13
... CARD INDICATOR Displays red when the SD card is not present or is damaged. Quad View divides the screen's image area into 4 quadrants and displays camera video in 2 views - Changing How the Live Screen Displays The Live screen displays in each quadrant. Pop up Menu Tab Opens and closes the pop... does Connects your system to the Internet. Scheduled System indicates scheduled recording in progress. Motion System indicates motion detection recording in progress. If less than 4 cameras are on, only those cameras' video will display on the Live screen. 13
... CARD INDICATOR Displays red when the SD card is not present or is damaged. Quad View divides the screen's image area into 4 quadrants and displays camera video in 2 views - Changing How the Live Screen Displays The Live screen displays in each quadrant. Pop up Menu Tab Opens and closes the pop... does Connects your system to the Internet. Scheduled System indicates scheduled recording in progress. Motion System indicates motion detection recording in progress. If less than 4 cameras are on, only those cameras' video will display on the Live screen. 13
User Guide
Page 14
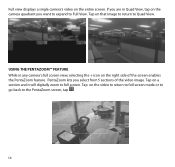
Using the PentaZoom™ Feature While in Quad View, tap on the right side of the video image. Full view displays a single camera's video on a section and it will digitally zoom to full screen. PentaZoom lets you want to expand to Full View. If you are in any camera's full screen view, selecting the + icon on the camera quadrant you select from 5 sections of the screen enables the PentaZoom feature. Tap on the entire screen. Tap on the video to return to full screen mode or to go back to Quad View. Tap on that image to return to the PentaZoom screen, tap . 14
Using the PentaZoom™ Feature While in Quad View, tap on the right side of the video image. Full view displays a single camera's video on a section and it will digitally zoom to full screen. PentaZoom lets you want to expand to Full View. If you are in any camera's full screen view, selecting the + icon on the camera quadrant you select from 5 sections of the screen enables the PentaZoom feature. Tap on the entire screen. Tap on the video to return to full screen mode or to go back to Quad View. Tap on that image to return to the PentaZoom screen, tap . 14
User Guide
Page 15
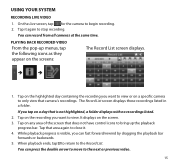
... the screens: The Record List screen displays. 1. You can fast forward/rewind by dragging the playback bar forwards or backwards. 5. Tap on a specific camera to only view that area again to close it again to the Record List. You can press the double arrow to move to begin recording.... 2. On the Live screen, tap for the camera to the next or previous video. 15 Tap it . 4. Tap on the highlighted day containing the recording you can record from all...
... the screens: The Record List screen displays. 1. You can fast forward/rewind by dragging the playback bar forwards or backwards. 5. Tap on a specific camera to only view that area again to close it again to the Record List. You can press the double arrow to move to begin recording.... 2. On the Live screen, tap for the camera to the next or previous video. 15 Tap it . 4. Tap on the highlighted day containing the recording you can record from all...
User Guide
Page 16
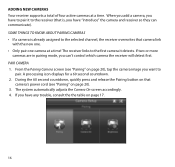
...assigned to know about pairing cameras •• If a camera is , you have "introduce" the camera and receiver so they can 't control which camera the receiver will detect first. From the Pairing Camera screen (see "Pairing" on page 20). 3. If two or more cameras are in pairing mode, ...you have to pair. A processing icon displays for a 60 second countdown. 2. Adding New Cameras Your receiver supports a total of four active cameras at a time! Pair Camera 1. During the 60 second countdown, quickly press and release the Pairing button on page 17. 16 Some things...
...assigned to know about pairing cameras •• If a camera is , you have "introduce" the camera and receiver so they can 't control which camera the receiver will detect first. From the Pairing Camera screen (see "Pairing" on page 20). 3. If two or more cameras are in pairing mode, ...you have to pair. A processing icon displays for a 60 second countdown. 2. Adding New Cameras Your receiver supports a total of four active cameras at a time! Pair Camera 1. During the 60 second countdown, quickly press and release the Pairing button on page 17. 16 Some things...
User Guide
Page 17
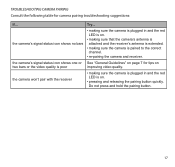
...shows one or See "General Guidelines" on page 7 for camera pairing troubleshooting suggestions: If... the camera's signal status icon shows no bars • making sure the camera is plugged in and the red LED is on. • making sure that the camera's antenna is attached and the receiver's antenna is extended.... • making sure the camera is plugged in and the red LED is on. • pressing and releasing the pairing button quickly. Do not press...
...shows one or See "General Guidelines" on page 7 for camera pairing troubleshooting suggestions: If... the camera's signal status icon shows no bars • making sure the camera is plugged in and the red LED is on. • making sure that the camera's antenna is attached and the receiver's antenna is extended.... • making sure the camera is plugged in and the red LED is on. • pressing and releasing the pairing button quickly. Do not press...
User Guide
Page 18
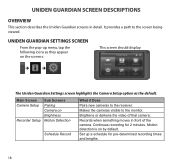
... The Uniden Guardian Settings screen highlights the Camera Setup option as the default. Records when something moves in detail. It provides a path to the receiver. Main Screen Camera Setup Recorder Setup Sub Screens Pairing Camera on Brightness Motion Detection Schedule...they appear on by default. Makes the cameras visible to the monitor. Uniden Guardian Screen Descriptions Overview This section describes the Uniden Guardian screens in front of that camera. Brightens or darkens the video of the camera. Continues recording for pre-determined recording times...
... The Uniden Guardian Settings screen highlights the Camera Setup option as the default. Records when something moves in detail. It provides a path to the receiver. Main Screen Camera Setup Recorder Setup Sub Screens Pairing Camera on Brightness Motion Detection Schedule...they appear on by default. Makes the cameras visible to the monitor. Uniden Guardian Screen Descriptions Overview This section describes the Uniden Guardian screens in front of that camera. Brightens or darkens the video of the camera. Continues recording for pre-determined recording times...
User Guide
Page 20
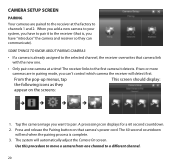
... will end when the pairing process is already assigned to know about pairing cameras: •• If a camera is complete. 3. If two or more cameras are paired to the receiver at a time! Tap the camera image you can communicate). From the pop-up menus, tap This screen should... for a 60 second countdown. 2. Use this procedure to move a camera from one camera at the factory to the first camera it to a different channel. 20 When you add a new camera to your system, you have "introduce" the camera and receiver so they appear on that is, you have to pair ...
... will end when the pairing process is already assigned to know about pairing cameras: •• If a camera is complete. 3. If two or more cameras are paired to the receiver at a time! Tap the camera image you can communicate). From the pop-up menus, tap This screen should... for a 60 second countdown. 2. Use this procedure to move a camera from one camera at the factory to the first camera it to a different channel. 20 When you add a new camera to your system, you have "introduce" the camera and receiver so they appear on that is, you have to pair ...
User Guide
Page 21
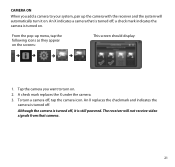
An X replaces the checkmark and indicates the camera is turned off , it on. Although the camera is turned off . Tap the camera you add a camera to turn it is still powered. An X indicates a camera that camera. 21 From the pop-up the camera with the receiver and the system will not receive video signals from that is turned...
An X replaces the checkmark and indicates the camera is turned off , it on. Although the camera is turned off . Tap the camera you add a camera to turn it is still powered. An X indicates a camera that camera. 21 From the pop-up the camera with the receiver and the system will not receive video signals from that is turned...
User Guide
Page 22
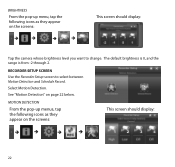
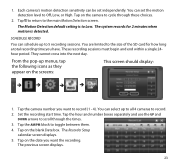
...; 22 Motion Detection From the pop-up menu, tap the following icons as they appear on the screens: This screen should display: Tap the camera whose brightness level you want to select between Motion Detection and Schedule Record. Recorder Setup Screen Use the Recorder Setup screen to change.
...; 22 Motion Detection From the pop-up menu, tap the following icons as they appear on the screens: This screen should display: Tap the camera whose brightness level you want to select between Motion Detection and Schedule Record. Recorder Setup Screen Use the Recorder Setup screen to change.
User Guide
Page 23
...blank Date box. Tap to return to toggle between them. 4. Schedule Record You can select up to Off, Low, or High. Tap the camera number you want to cycle through the times. 3. Tap the hour and number boxes separately and use the UP and DOWN arrows to Low. Tap... 1. From the pop-up menus, tap the following icons as they appear on the camera to record (1 - 4). Set the recording start time. 1. You can schedule up to all 4 cameras to the size of the SD card for 2 minutes when motion is to scroll through these choices. 2. The Motion...
...blank Date box. Tap to return to toggle between them. 4. Schedule Record You can select up to Off, Low, or High. Tap the camera number you want to cycle through the times. 3. Tap the hour and number boxes separately and use the UP and DOWN arrows to Low. Tap... 1. From the pop-up menus, tap the following icons as they appear on the camera to record (1 - 4). Set the recording start time. 1. You can schedule up to all 4 cameras to the size of the SD card for 2 minutes when motion is to scroll through these choices. 2. The Motion...
User Guide
Page 27
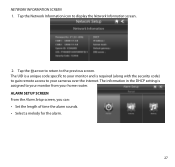
The UID is a unique code specific to your monitor and is assigned to display the Network Information screen. 2. Tap the arrow to return to your home router. Tap the Network Information icon to your monitor from your cameras over the internet. Alarm Setup Screen From the Alarm Setup screen, you can: •• Set the length of time the alarm sounds. •• Select a melody for the alarm. 27 The information in the DHCP setting is required (along with the security code) to gain remote access to the previous screen. Network Information Screen 1.
The UID is a unique code specific to your monitor and is assigned to display the Network Information screen. 2. Tap the arrow to return to your home router. Tap the Network Information icon to your monitor from your cameras over the internet. Alarm Setup Screen From the Alarm Setup screen, you can: •• Set the length of time the alarm sounds. •• Select a melody for the alarm. 27 The information in the DHCP setting is required (along with the security code) to gain remote access to the previous screen. Network Information Screen 1.


