Owners Manual
Page 6
... Search 100 SEARCHING 100 Storing a Displayed Frequency (while searching)......101 CLOSE CALL MENU 102 Volume Offset 65 Copy/Paste Channel 65 USING THE BCD325P2 WITH A GPS 65 LOCATION-BASED SCANNING 65 NON RADIO LOCATION-BASED GPS FEATURES.........66 CONNECTING YOUR SCANNER 66 Edit Name 68 Set Type 68...Set Alert Volume (Dangerous Road/Xing only 69 Set Alert Light (Dangerous Road/Xing only 69 GPS DISPLAY MODE (POI ONLY 72 GPS REVIEW LOCATION MODE 74 PRIORITY/PRIORITY ID/PRIORITY PLUS SCAN 76 USING STARTUP KEYS 77 SCANNING SYSTEMS 78 USING NUMBER TAGS 82 P25 ADJUSTMENT MODE ...
... Search 100 SEARCHING 100 Storing a Displayed Frequency (while searching)......101 CLOSE CALL MENU 102 Volume Offset 65 Copy/Paste Channel 65 USING THE BCD325P2 WITH A GPS 65 LOCATION-BASED SCANNING 65 NON RADIO LOCATION-BASED GPS FEATURES.........66 CONNECTING YOUR SCANNER 66 Edit Name 68 Set Type 68...Set Alert Volume (Dangerous Road/Xing only 69 Set Alert Light (Dangerous Road/Xing only 69 GPS DISPLAY MODE (POI ONLY 72 GPS REVIEW LOCATION MODE 74 PRIORITY/PRIORITY ID/PRIORITY PLUS SCAN 76 USING STARTUP KEYS 77 SCANNING SYSTEMS 78 USING NUMBER TAGS 82 P25 ADJUSTMENT MODE ...
Owners Manual
Page 22
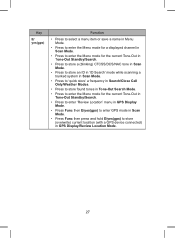
...Menu Mode. • Turn to select POIs in GPS Display Mode. • Turn to select locations GPS Review Location Mode. • Turn to temporary lock out an alert in GPS Display Mode. • Turn to ...; Press Func then Volto skip to the location that starts with the next letter of the alphabet in GPS Review Location Mode. • Press to enter Menu Mode. • Press to return to previous menu. •...to a channel and/or a system number tag after entering. • Press to return to GPS Mode in Review Location Mode. • Press Func then Menu to go to the 'Edit' menu for the current system ...
...Menu Mode. • Turn to select POIs in GPS Display Mode. • Turn to select locations GPS Review Location Mode. • Turn to temporary lock out an alert in GPS Display Mode. • Turn to ...; Press Func then Volto skip to the location that starts with the next letter of the alphabet in GPS Review Location Mode. • Press to enter Menu Mode. • Press to return to previous menu. •...to a channel and/or a system number tag after entering. • Press to return to GPS Mode in Review Location Mode. • Press Func then Menu to go to the 'Edit' menu for the current system ...
Owners Manual
Page 24
... Scan Mode. • Press to toggle the lockout status of a frequency in Search Mode. • Press to toggle the lockout status of a location in GPS Review Location Mode. • Press and hold to unlock (and enable) all groups and channels in a system in Scan Hold Mode. • Press and hold to... ranges/Close Call in Search Hold Mode. • Press and hold to unlock all locations of the current type (POI, DRD, or DXG) in GPS Review Location Mode. • Press Func then L/O to toggle the lockout status of a conventional system/site/search in Scan Hold Mode. • Press Func then L/O to...
... Scan Mode. • Press to toggle the lockout status of a frequency in Search Mode. • Press to toggle the lockout status of a location in GPS Review Location Mode. • Press and hold to unlock (and enable) all groups and channels in a system in Scan Hold Mode. • Press and hold to... ranges/Close Call in Search Hold Mode. • Press and hold to unlock all locations of the current type (POI, DRD, or DXG) in GPS Review Location Mode. • Press Func then L/O to toggle the lockout status of a conventional system/site/search in Scan Hold Mode. • Press Func then L/O to...

Owners Manual
Page 26
... ID while programming. • Press to enter an 'i' when entering an 'I-Call' ID while programming. • Press to return to GPS Display Mode in GPS Review Location Mode. • Press Func then .no(pri) to toggle Priority On, Priority Plus, Priority Off in Scan Hold Mode. 26
... ID while programming. • Press to enter an 'i' when entering an 'I-Call' ID while programming. • Press to return to GPS Display Mode in GPS Review Location Mode. • Press Func then .no(pri) to toggle Priority On, Priority Plus, Priority Off in Scan Hold Mode. 26
Owners Manual
Page 27
... Tone-Out Search Mode. • Press to enter the Menu mode for the current Tone-Out in Tone-Out Standby/Search. • Press to enter 'Review Location' menu in GPS Display Mode. • Press Func then E/yes(gps) to enter GPS mode in Scan Mode. • Press Func then press and...
... Tone-Out Search Mode. • Press to enter the Menu mode for the current Tone-Out in Tone-Out Standby/Search. • Press to enter 'Review Location' menu in GPS Display Mode. • Press Func then E/yes(gps) to enter GPS mode in Scan Mode. • Press Func then press and...
Owners Manual
Page 46
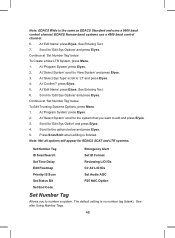
... for EDACS SCAT and LTR systems. Set Number Tag ID Scan/Search Set Time Delay Edit Fleetmap Priority IS Scan Emergency Alert Set ID Format Reviewing L/O IDs Clr All L/O IDs Set Audio AGC Set Status Bit Set End Code P25 NAC Option Set Number Tag Allows you want to number a system...
... for EDACS SCAT and LTR systems. Set Number Tag ID Scan/Search Set Time Delay Edit Fleetmap Priority IS Scan Emergency Alert Set ID Format Reviewing L/O IDs Clr All L/O IDs Set Audio AGC Set Status Bit Set End Code P25 NAC Option Set Number Tag Allows you want to number a system...
Owners Manual
Page 49
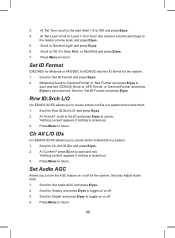
... Format (DEC/HEX for Motorola or AFS/DEC for EDACS) sets the ID format for the system. scroll to the ID and press E/yes to review locked out IDs in a system. 1. Clr All L/O IDs (no EDACS SCAT) allows you to toggle on or off . 3. Scroll to 'Set Audio AGC' and press...
... Format (DEC/HEX for Motorola or AFS/DEC for EDACS) sets the ID format for the system. scroll to the ID and press E/yes to review locked out IDs in a system. 1. Clr All L/O IDs (no EDACS SCAT) allows you to toggle on or off . 3. Scroll to 'Set Audio AGC' and press...
Owners Manual
Page 66
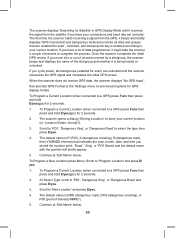
Once the scanner completes the initial GPS review, if you move into or out of an area covered by a site/group, the scanner beeps and displays the name of the site/group and ... displays "No GPS Input". See also Set GPS Format in GPS Display Mode until the scanner reacquires the GPS signal and completes the initial GPS review. To Program a New Location press Menu. Scroll to store your current location (or 'Location Exists', Accept?). 3. The default name is DRD (dangerous road), DXG (dangerous...
Once the scanner completes the initial GPS review, if you move into or out of an area covered by a site/group, the scanner beeps and displays the name of the site/group and ... displays "No GPS Input". See also Set GPS Format in GPS Display Mode until the scanner reacquires the GPS signal and completes the initial GPS review. To Program a New Location press Menu. Scroll to store your current location (or 'Location Exists', Accept?). 3. The default name is DRD (dangerous road), DXG (dangerous...
Owners Manual
Page 67
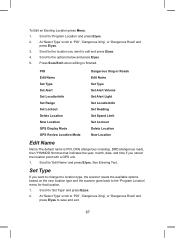
... Type Dangerous Xing or Roads Edit Name Set Type Set Alert Set LocationInfo Set Range Set Lockout Delete Location New Location GPS Display Mode GPS Review Location Mode Set Alert Volume Set Alert Light Set LocationInfo Set Heading Set Speed Limit Set Lockout Delete Location New Location Edit Name Name The...
... Type Dangerous Xing or Roads Edit Name Set Type Set Alert Set LocationInfo Set Range Set Lockout Delete Location New Location GPS Display Mode GPS Review Location Mode Set Alert Volume Set Alert Light Set LocationInfo Set Heading Set Speed Limit Set Lockout Delete Location New Location Edit Name Name The...

Owners Manual
Page 71
2. To make the alert speed-dependent, enter the speed limit for this in 'Review Location Mode' by pressing L/O. The default setting is 'Unlocked'. 1. Scroll to save and exit. Set Lockout the default setting is 'All Range'. 1. Note: you can ...
2. To make the alert speed-dependent, enter the speed limit for this in 'Review Location Mode' by pressing L/O. The default setting is 'Unlocked'. 1. Scroll to save and exit. Set Lockout the default setting is 'All Range'. 1. Note: you can ...
Owners Manual
Page 74
... of your current location will see 'Searching for Satellite' until the GPS unit reacquires a signal. If you lose the satellite signal, you can review the type, range setting, and location information for each location. The most recently stored location is turned on a background Scan/Srch press Hold. ... did not temporary lock out. To restore all systems at one time. If a GPS is detected as soon as the scanner is displayed. GPS REVIEW LOCATION MODE If you have programmed data for a Point of Interest, Dangerous Crossing, and a Dangerous Road, you will be temporarily locked out. Note...
... of your current location will see 'Searching for Satellite' until the GPS unit reacquires a signal. If you lose the satellite signal, you can review the type, range setting, and location information for each location. The most recently stored location is turned on a background Scan/Srch press Hold. ... did not temporary lock out. To restore all systems at one time. If a GPS is detected as soon as the scanner is displayed. GPS REVIEW LOCATION MODE If you have programmed data for a Point of Interest, Dangerous Crossing, and a Dangerous Road, you will be temporarily locked out. Note...

Owners Manual
Page 75
Head - In Review Location Mode: 1. To Select a Location turn the scroll control. 2. To Unlock all Locations of the Current type (POI, DXG, or DRD) press and hold L/O. 7. Indicates a ...
Head - In Review Location Mode: 1. To Select a Location turn the scroll control. 2. To Unlock all Locations of the Current type (POI, DXG, or DRD) press and hold L/O. 7. Indicates a ...
Owners Manual
Page 81
... On) press any channel. Press Func then press and hold Hold/ . Press Scan/Srch to exit. Press Scan/Srch to exit. To unlock and/or review locked out IDs see Reviewing Locked out IDs. To start Tone-Out Standby/Search assign it 's gone).
... On) press any channel. Press Func then press and hold Hold/ . Press Scan/Srch to exit. Press Scan/Srch to exit. To unlock and/or review locked out IDs see Reviewing Locked out IDs. To start Tone-Out Standby/Search assign it 's gone).
Owners Manual
Page 86
... there. Press Func and quickly (within 3 seconds) scroll to the system that has the channel you want to 'Clr All L/O IDs' and press E/yes. To Review and/or Unlock Locked out IDs in a System Scroll to unlock and press L/O until 'All Unlocked' appears. 3. scroll to the ID and press E/yes to...
... there. Press Func and quickly (within 3 seconds) scroll to the system that has the channel you want to 'Clr All L/O IDs' and press E/yes. To Review and/or Unlock Locked out IDs in a System Scroll to unlock and press L/O until 'All Unlocked' appears. 3. scroll to the ID and press E/yes to...
Owners Manual
Page 90
... all frequencies for Searching and Close Call search. Scroll to return. At 'Unlock All' press E/yes. 3. Press Menu to the options below and press E/yes. 3. Reviewing Locked Out Frequencies: A 'T' appears to scanning when done with editing. SEARCH/CLOSE CALL OPTIONS MENU These are the settings you should look at before you...
... all frequencies for Searching and Close Call search. Scroll to return. At 'Unlock All' press E/yes. 3. Press Menu to the options below and press E/yes. 3. Reviewing Locked Out Frequencies: A 'T' appears to scanning when done with editing. SEARCH/CLOSE CALL OPTIONS MENU These are the settings you should look at before you...
Owners Manual
Page 93
... the settings for Quick Search, Close Call, and Band Scope operations. See also Adjust Audio AGC. 1. During this delay. Please review those first. Press MENU to 1000 ms and press E/yes. P25 Waiting Time basically gives the scanner time to determine if frequencies ...and press E/yes. 2. Edit Service Service Search Edit Custom Custom Search Set Search Key Search and Store Quick Search Searching Storing a Displayed Frequency Reviewing Locked out Frequencies EDITING A SERVICE SEARCH To Edit a Service Search 1. MENU Important! Scroll to toggle on or off. 3. Scroll to the...
... the settings for Quick Search, Close Call, and Band Scope operations. See also Adjust Audio AGC. 1. During this delay. Please review those first. Press MENU to 1000 ms and press E/yes. P25 Waiting Time basically gives the scanner time to determine if frequencies ...and press E/yes. 2. Edit Service Service Search Edit Custom Custom Search Set Search Key Search and Store Quick Search Searching Storing a Displayed Frequency Reviewing Locked out Frequencies EDITING A SERVICE SEARCH To Edit a Service Search 1. MENU Important! Scroll to toggle on or off. 3. Scroll to the...
Owners Manual
Page 101
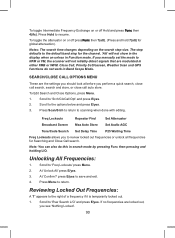
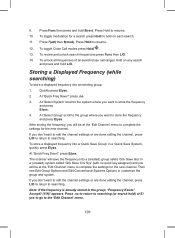
... Frequency (while searching) To store a displayed frequency into a (created) group called 'Qck Save Grp' in a (created) system called 'Qck Save Cnv Sys' (with no . 3. To review and unlock search frequencies press Func then L/O. 14. At 'Select Group' scroll to hold on any search and press and hold L/O. Press Func then press...
... Frequency (while searching) To store a displayed frequency into a (created) group called 'Qck Save Grp' in a (created) system called 'Qck Save Cnv Sys' (with no . 3. To review and unlock search frequencies press Func then L/O. 14. At 'Select Group' scroll to hold on any search and press and hold L/O. Press Func then press...
Owners Manual
Page 102
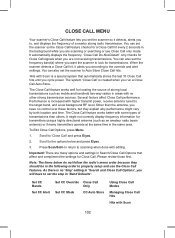
... to the options below do not follow the radio's menu order because they explain why performance might not correctly display frequency information for transmissions. Please review those first. Set CC Bands Set CC Alert Set CC Override Close Call Only Set CC Mode CC Auto Store Using Close Call Modes Managing...
... to the options below do not follow the radio's menu order because they explain why performance might not correctly display frequency information for transmissions. Please review those first. Set CC Bands Set CC Alert Set CC Override Close Call Only Set CC Mode CC Auto Store Using Close Call Modes Managing...
