Operation Manual
Page 3
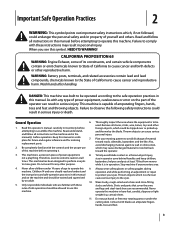
...! California Proposition 65 WARNING: Engine Exhaust, some of its entirety before attempting to operate this manual to use this symbol. As with blade can amputate fingers, hands, toes and feet. 3 Keep this manual. Also, avoid discharging material against a wall or obstruction, which ... which may cause discharged material to comply with these slacks and shirts. Thrown objects can cause serious personal injury. To help avoid blade contact or a thrown object injury, not a plaything. Only responsible individuals who are recommended. operate this machine. When you see ...
...! California Proposition 65 WARNING: Engine Exhaust, some of its entirety before attempting to operate this manual to use this symbol. As with blade can amputate fingers, hands, toes and feet. 3 Keep this manual. Also, avoid discharging material against a wall or obstruction, which ... which may cause discharged material to comply with these slacks and shirts. Thrown objects can cause serious personal injury. To help avoid blade contact or a thrown object injury, not a plaything. Only responsible individuals who are recommended. operate this machine. When you see ...
Operation Manual
Page 4
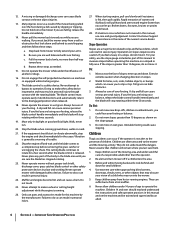
... steps: a. If the equipment should read and understand the instructions and safe operation practices in personal injury through contact with the rotating blade. Muffler and engine become hot and can hide obstacles. 3. Operation on slopes. 2. For your footing. Do Not: 1. Keep ... injuries occur as part of alcohol or drugs. 16. Never operate mower without proper trail shield, discharge cover, grass catcher, blade control or other safety protective devices in daylight or good artificial light. Do not engage the self-propelled mechanism on the slope...
... steps: a. If the equipment should read and understand the instructions and safe operation practices in personal injury through contact with the rotating blade. Muffler and engine become hot and can hide obstacles. 3. Operation on slopes. 2. For your footing. Do Not: 1. Keep ... injuries occur as part of alcohol or drugs. 16. Never operate mower without proper trail shield, discharge cover, grass catcher, blade control or other safety protective devices in daylight or good artificial light. Do not engage the self-propelled mechanism on the slope...
Operation Manual
Page 5
... to the Consumer Products Safety Commission (CPSC) and the U.S. Engine exhaust contains carbon monoxide, an odorless and deadly gas. 2. Check the blade and engine mounting bolts at least two minutes before starting and operating the mower. 8. After striking a foreign object, stop the engine, disconnect...immediately with the rim of operation. Check fuel line, tank, cap, and fittings frequently for damage (e.g., bent, cracked, worn) Replace blade with spark plug removed. 13. Improper disposal of the Average Useful Life have stopped. At the end of fluids and materials can cut...
... to the Consumer Products Safety Commission (CPSC) and the U.S. Engine exhaust contains carbon monoxide, an odorless and deadly gas. 2. Check the blade and engine mounting bolts at least two minutes before starting and operating the mower. 8. After striking a foreign object, stop the engine, disconnect...immediately with the rim of operation. Check fuel line, tank, cap, and fittings frequently for damage (e.g., bent, cracked, worn) Replace blade with spark plug removed. 13. Improper disposal of the Average Useful Life have stopped. At the end of fluids and materials can cut...
Operation Manual
Page 7
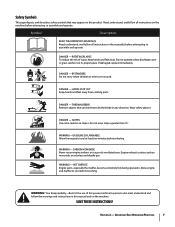
ROTATING BLADES To reduce the risk of this power machine to persons who read, understand and follow the warnings and instructions in this product. HAND/ FOOT CUT ... muffler, become extremely hot during operation. Important Safe Operation Practices 7 Safety Symbols This page depicts and describes safety symbols that can be thrown by the blade in any direction. Do not operate unless discharge cover or grass catcher is in a poorly ventilated area. DANGER - Allow engine and muffler to assemble and...
ROTATING BLADES To reduce the risk of this power machine to persons who read, understand and follow the warnings and instructions in this product. HAND/ FOOT CUT ... muffler, become extremely hot during operation. Important Safe Operation Practices 7 Safety Symbols This page depicts and describes safety symbols that can be thrown by the blade in any direction. Do not operate unless discharge cover or grass catcher is in a poorly ventilated area. DANGER - Allow engine and muffler to assemble and...
Operation Manual
Page 10
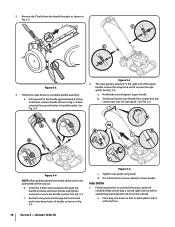
... below to the right side of handle as shown in handle bracket. a. C C Figure 3-3 3. See Fig. 3-4. The rope guide is attached to complete handle assembly: a. Hold blade control against upper handle. B A B A D B C Figure 3-4 NOTE: When pulling upward on handle, make sure to lower handle. See Fig. 3-4. Reattach wing nuts and carriage bolts removed...
... below to the right side of handle as shown in handle bracket. a. C C Figure 3-3 3. See Fig. 3-4. The rope guide is attached to complete handle assembly: a. Hold blade control against upper handle. B A B A D B C Figure 3-4 NOTE: When pulling upward on handle, make sure to lower handle. See Fig. 3-4. Reattach wing nuts and carriage bolts removed...
Operation Manual
Page 13
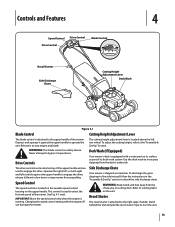
... from propelling. Changing the speed control setting with a water port on its operations. Use the deck wash to slow down or stop engine and blade. Warning: Keep hands and feet away from the chute area on the unit. Recoil Starter The recoil starter is running. Release it against the ... attach the side discharge chute. To adjust the cutting height, refer to engage the drive. Refer to the right upper handle. WARNING: This blade control is attached to select the forward speed of its deck wash system. Drive Controls The drive controls are used to the upper handle of...
... from propelling. Changing the speed control setting with a water port on its operations. Use the deck wash to slow down or stop engine and blade. Warning: Keep hands and feet away from the chute area on the unit. Recoil Starter The recoil starter is running. Release it against the ... attach the side discharge chute. To adjust the cutting height, refer to engage the drive. Refer to the right upper handle. WARNING: This blade control is attached to select the forward speed of its deck wash system. Drive Controls The drive controls are used to the upper handle of...
Operation Manual
Page 14
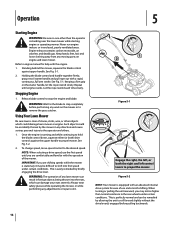
...it may notice higher than the operator is running and while continuing to hold the blade control down, squeeze either (or both the right and left control levers to propel the mower. Release blade control to stop completely before pulling backwards. Once the engine is standing near the lawn... thrown into the eyes, which could be difficult to shift into first speed under certain conditions. Refer to engine manual for the blade to stop the engine and blade. Stopping Engine 1. Using Your Lawn Mower Be sure lawn is equipped with a rapid, continuous, full arm stroke. Always wear ...
...it may notice higher than the operator is running and while continuing to hold the blade control down, squeeze either (or both the right and left control levers to propel the mower. Release blade control to stop completely before pulling backwards. Once the engine is standing near the lawn... thrown into the eyes, which could be difficult to shift into first speed under certain conditions. Refer to engine manual for the blade to stop the engine and blade. Stopping Engine 1. Using Your Lawn Mower Be sure lawn is equipped with a rapid, continuous, full arm stroke. Always wear ...
Operation Manual
Page 15
... rear opening of four inches, mulching is not recommended. Operation 15 The unit should be promptly inspected and repaired. Stop engine completely by releasing the blade control.
... rear opening of four inches, mulching is not recommended. Operation 15 The unit should be promptly inspected and repaired. Stop engine completely by releasing the blade control.
Operation Manual
Page 16
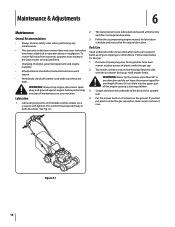
... does not require lubrication. 3. Lubricate pivot points on the ground. Follow steps below for engine lubrication. Put the mower back on its wheels on the blade control at least once a season with light oil. Drain gasoline from warranty, operator must operate freely in any direction and do not leave the mower...
... does not require lubrication. 3. Lubricate pivot points on the ground. Follow steps below for engine lubrication. Put the mower back on its wheels on the blade control at least once a season with light oil. Drain gasoline from warranty, operator must operate freely in any direction and do not leave the mower...
Operation Manual
Page 17
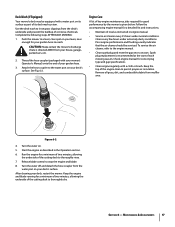
...described in engine manual. • Service air cleaner every 25 hours under extremely dusty conditions. Run the engine for your deck's surface. Release blade control to thoroughly rinse. 7. Section 6 - Complete the following steps AFTER EACH MOWING: 1. Push the mower to reach. Clean every few ...hours under normal conditions. Keep the engine and blade running for good performance by the mower is recommended at the start of the engine clean to thoroughly dry. Thread the hose coupler (packaged...
...described in engine manual. • Service air cleaner every 25 hours under extremely dusty conditions. Run the engine for your deck's surface. Release blade control to thoroughly rinse. 7. Section 6 - Complete the following steps AFTER EACH MOWING: 1. Push the mower to reach. Clean every few ...hours under normal conditions. Keep the engine and blade running for good performance by the mower is recommended at the start of the engine clean to thoroughly dry. Thread the hose coupler (packaged...
Operation Manual
Page 18
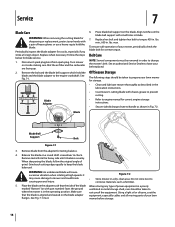
... Off-Season Storage The following steps should be taken to when the mower is aligned and seated on the blade bell support with small holes in . Blade Blade Bell Support Bolt Figure 7-1 3. Grind each cutting edge equally to mower and could break • causing...prevent rusting. • Refer to hold the blade and the blade adapter to corrosive materials, such as shown in . Place the blade on a round shaft screwdriver to handle as fertilizer. 5. Service 7 Blade Care WARNING: When removing the cutting blade for testing balance. 4. Remove metal from spark...
... Off-Season Storage The following steps should be taken to when the mower is aligned and seated on the blade bell support with small holes in . Blade Blade Bell Support Bolt Figure 7-1 3. Grind each cutting edge equally to mower and could break • causing...prevent rusting. • Refer to hold the blade and the blade adapter to corrosive materials, such as shown in . Place the blade on a round shaft screwdriver to handle as fertilizer. 5. Service 7 Blade Care WARNING: When removing the cutting blade for testing balance. 4. Remove metal from spark...
Operation Manual
Page 19
... 4. Refer to spark boot. 3. Adjust gap to .030" or replace spark plug. 2. Dirty air cleaner. 1. Excessively high grass. 3. Tighten blade and adapter. Faulty spark plug. 6. Fuel valve (if equipped) closed. 9. Spark plug gap too close. 1. Clean fuel line. 7. Connect and... tighten spark plug boot. 2. Fill crankcase with choke). 10. Cutting blade loose or unbalanced. 2. Bent cutting blade. 1. Engine not choked (if equipped with proper oil. 2. Vent in the Operation section. 5. Drain fuel tank. See an...
... 4. Refer to spark boot. 3. Adjust gap to .030" or replace spark plug. 2. Dirty air cleaner. 1. Excessively high grass. 3. Tighten blade and adapter. Faulty spark plug. 6. Fuel valve (if equipped) closed. 9. Spark plug gap too close. 1. Clean fuel line. 7. Connect and... tighten spark plug boot. 2. Fill crankcase with choke). 10. Cutting blade loose or unbalanced. 2. Bent cutting blade. 1. Engine not choked (if equipped with proper oil. 2. Vent in the Operation section. 5. Drain fuel tank. See an...
Operation Manual
Page 20
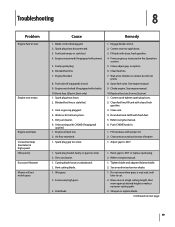
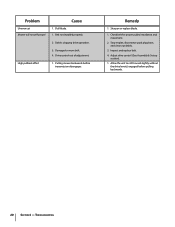
Dull blade. 1. Drive control out of adjustment. 1. Troubleshooting Belt not installed properly. 2. Pulling mower backwards before pulling backwards. 20 Section 8 - Adjust drive control. (See Assembly & Set-up ... drive operation. 3. Remedy 1. Allow the unit to roll forward slightly without the drive lever(s) engaged before transmission disengages. Damaged or worn belt. 4. Sharpen or replace blade. 1. Check belt for proper pulley installation and movement. 2. Stop engine, disconnect spark plug boot, and clean out debris. 3. Problem Uneven cut Mower will not self...
Dull blade. 1. Drive control out of adjustment. 1. Troubleshooting Belt not installed properly. 2. Pulling mower backwards before pulling backwards. 20 Section 8 - Adjust drive control. (See Assembly & Set-up ... drive operation. 3. Remedy 1. Allow the unit to roll forward slightly without the drive lever(s) engaged before transmission disengages. Damaged or worn belt. 4. Sharpen or replace blade. 1. Check belt for proper pulley installation and movement. 2. Stop engine, disconnect spark plug boot, and clean out debris. 3. Problem Uneven cut Mower will not self...
Operation Manual
Page 21
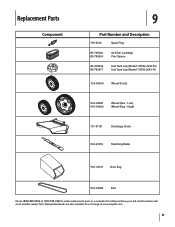
Parts Manual downloads are also available free of charge at www.troybilt.com 21 Low) Wheel (Rear - High) 731-07131 Discharge Chute 942-0741A Mulching Blade 964-04141 Grass Bag 954-04282 Belt Phone (800) 828-5500 or (330) 558-7220 to order replacement parts or a complete Parts Manual (have your ...
Parts Manual downloads are also available free of charge at www.troybilt.com 21 Low) Wheel (Rear - High) 731-07131 Discharge Chute 942-0741A Mulching Blade 964-04141 Grass Bag 954-04282 Belt Phone (800) 828-5500 or (330) 558-7220 to order replacement parts or a complete Parts Manual (have your ...
Operation Manual
Page 22
... or attachment not approved by Troy-Bilt for a period of thirty (30) days from the sale. Troy-Bilt warrants attachments for this product (excluding its option, repair or replace, free of Purchase to items such as: batteries, belts, blades, blade adapters, tines, grass bags...temporarily replace a warranted product. Attachments - HOW TO OBTAIN SERVICE: Warranty service is available, WITH PROOF OF PURCHASE, through Troy-Bilt's authorized channels of the product as mentioned above exclusions or limitations may carry a separate manufacturer's warranty. Box 361131, Cleveland...
... or attachment not approved by Troy-Bilt for a period of thirty (30) days from the sale. Troy-Bilt warrants attachments for this product (excluding its option, repair or replace, free of Purchase to items such as: batteries, belts, blades, blade adapters, tines, grass bags...temporarily replace a warranted product. Attachments - HOW TO OBTAIN SERVICE: Warranty service is available, WITH PROOF OF PURCHASE, through Troy-Bilt's authorized channels of the product as mentioned above exclusions or limitations may carry a separate manufacturer's warranty. Box 361131, Cleveland...


