Operation Manual
Page 5
...rim of the fuel tank or container opening at frequent intervals for proper tightness. Never fuel machine indoors because flammable vapors will accumulate in handling gasoline. Replace gasoline cap and tighten securely. 11. General Service: 1. Before cleaning, repairing, or inspecting, make a wheel or ...or on the ground away from a gasoline dispenser nozzle. 5. Do not use extra caution when servicing them. 5. Extinguish all nuts, bolts, and screws tight to make certain the blade and all moving parts or allow objects to operate at unsafe speeds. Never remove gas cap...
...rim of the fuel tank or container opening at frequent intervals for proper tightness. Never fuel machine indoors because flammable vapors will accumulate in handling gasoline. Replace gasoline cap and tighten securely. 11. General Service: 1. Before cleaning, repairing, or inspecting, make a wheel or ...or on the ground away from a gasoline dispenser nozzle. 5. Do not use extra caution when servicing them. 5. Extinguish all nuts, bolts, and screws tight to make certain the blade and all moving parts or allow objects to operate at unsafe speeds. Never remove gas cap...

Operation Manual
Page 9
Remove any packing material which may be between upper and lower handles. Remove wing nuts and carriage bolts from handle as instructed in Fig. 3-2. B A Figure 3-2 Figure 3-1 9 Assembly & Set-Up 3 Contents of Carton • One Lawn Mower • • One Lawn Mower Operator's ...One Side Discharge Chute Assembly NOTE: This unit is shipped without gasoline or oil in Fig. 3-1. a. Do not crimp cable while lifting the handle up as shown in the accompanying engine manual BEFORE operating your mower. Do not loosen or remove adjacent hex head screws. While stabilizing mower ...
Remove any packing material which may be between upper and lower handles. Remove wing nuts and carriage bolts from handle as instructed in Fig. 3-2. B A Figure 3-2 Figure 3-1 9 Assembly & Set-Up 3 Contents of Carton • One Lawn Mower • • One Lawn Mower Operator's ...One Side Discharge Chute Assembly NOTE: This unit is shipped without gasoline or oil in Fig. 3-1. a. Do not crimp cable while lifting the handle up as shown in the accompanying engine manual BEFORE operating your mower. Do not loosen or remove adjacent hex head screws. While stabilizing mower ...
Operation Manual
Page 10
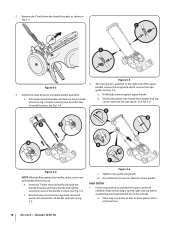
... See Fig. 3-4. Grass Catcher 1. Pull upward on the outside). Hold blade control against upper handle. b. Insert the T-bolts removed earlier through the handle brackets and lower handle and tighten securely to not pull handle all the way out. Figure 3-6 c. d. Follow steps below to assemble the grass catcher (... cable tie(s) to secure cable(s) to the right side of handle as shown in place. a. Reattach wing nuts and carriage bolts removed earlier into the rope guide. Assembly & Set-Up Remove the T-bolts from engine and slip starter rope into lower holes of the ...
... See Fig. 3-4. Grass Catcher 1. Pull upward on the outside). Hold blade control against upper handle. b. Insert the T-bolts removed earlier through the handle brackets and lower handle and tighten securely to not pull handle all the way out. Figure 3-6 c. d. Follow steps below to assemble the grass catcher (... cable tie(s) to secure cable(s) to the right side of handle as shown in place. a. Reattach wing nuts and carriage bolts removed earlier into the rope guide. Assembly & Set-Up Remove the T-bolts from engine and slip starter rope into lower holes of the ...

Operation Manual
Page 12
...the separate engine owner's manual. Add oil provided before starting unit for a change in one of the box. 2. Remove wing nuts and carriage bolts from handle. See Fig. 3-11 inset. 3. Never fuel the machine indoors or while the engine is most comfortable. Assembly & Set-Up For rough ...Up Gas and Oil Fill-Up Refer to fall when lever is a cutting height adjustment lever located above the front and rear right wheel. 1. Handle Pitch For convenience of operation, you may adjust the pitch of this manual (Electric Start Units). 12 Section 3 - Adjustments Cutting Height There is...
...the separate engine owner's manual. Add oil provided before starting unit for a change in one of the box. 2. Remove wing nuts and carriage bolts from handle. See Fig. 3-11 inset. 3. Never fuel the machine indoors or while the engine is most comfortable. Assembly & Set-Up For rough ...Up Gas and Oil Fill-Up Refer to fall when lever is a cutting height adjustment lever located above the front and rear right wheel. 1. Handle Pitch For convenience of operation, you may adjust the pitch of this manual (Electric Start Units). 12 Section 3 - Adjustments Cutting Height There is...


