Operation Manual
Page 1
Printed In USA TROY-BILT LLC, P.O. BOX 361131 CLEVELAND, OHIO 44136-0019 Form No. 769-07548 (December 13, 2011) Safe Operation Practices • Set-Up • Operation • Maintenance • Service • Troubleshooting • Warranty Operator's Manual Bronco, Super Bronco & Pro-Line CRT Tillers WARNING READ AND FOLLOW ALL SAFETY RULES AND INSTRUCTIONS IN THIS MANUAL BEFORE ATTEMPTING TO OPERATE THIS MACHINE. FAILURE TO COMPLY WITH THESE INSTRUCTIONS MAY RESULT IN PERSONAL INJURY.
Printed In USA TROY-BILT LLC, P.O. BOX 361131 CLEVELAND, OHIO 44136-0019 Form No. 769-07548 (December 13, 2011) Safe Operation Practices • Set-Up • Operation • Maintenance • Service • Troubleshooting • Warranty Operator's Manual Bronco, Super Bronco & Pro-Line CRT Tillers WARNING READ AND FOLLOW ALL SAFETY RULES AND INSTRUCTIONS IN THIS MANUAL BEFORE ATTEMPTING TO OPERATE THIS MACHINE. FAILURE TO COMPLY WITH THESE INSTRUCTIONS MAY RESULT IN PERSONAL INJURY.
Operation Manual
Page 2
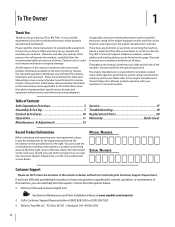
... familiarize yourself with a local authorized service dealer. We reserve the right to performance, power-rating, specifications, warranty and service. Troy-Bilt's Customer Support telephone numbers, website address and mailing address can locate the model plate by standing at the operator's position and ...new equipment, please locate the model plate on the equipment and record the information in this manual is responsible for purchasing a Troy-Bilt Tiller. You can be necessary, should you seek technical support via our web site, Customer Support Department, or with the machine, ...
... familiarize yourself with a local authorized service dealer. We reserve the right to performance, power-rating, specifications, warranty and service. Troy-Bilt's Customer Support telephone numbers, website address and mailing address can locate the model plate by standing at the operator's position and ...new equipment, please locate the model plate on the equipment and record the information in this manual is responsible for purchasing a Troy-Bilt Tiller. You can be necessary, should you seek technical support via our web site, Customer Support Department, or with the machine, ...
Operation Manual
Page 4
... any adjustments, or inspections. 13. Maintenance & Storage 1. Never tamper with the rim of filler neck to the instructions found in the ground and propel the tiller forward. Check their proper operation regularly. 3. Disconnect the spark plug wire and ground it against the engine to the operator's manual for safe loading, unloading...
... any adjustments, or inspections. 13. Maintenance & Storage 1. Never tamper with the rim of filler neck to the instructions found in the ground and propel the tiller forward. Check their proper operation regularly. 3. Disconnect the spark plug wire and ground it against the engine to the operator's manual for safe loading, unloading...
Operation Manual
Page 7
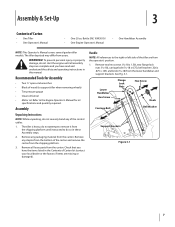
... from yours. Bottle SAE 10W30 Oil • One Engine Operator's Manual • One Handlebar Assembly NOTE: This Operator's Manual covers several garden tiller models. Remove any staples from the bottom of the control cables. 1. To prevent personal injury or property damage, do so in the Contents of... Carton • One Tiller • One Operator's Manual • One 20 oz. The tiller is heavy, do not severely bend any of the carton and remove the carton from the shipping platform. 3. ...
... from yours. Bottle SAE 10W30 Oil • One Engine Operator's Manual • One Handlebar Assembly NOTE: This Operator's Manual covers several garden tiller models. Remove any staples from the bottom of the control cables. 1. To prevent personal injury or property damage, do so in the Contents of... Carton • One Tiller • One Operator's Manual • One 20 oz. The tiller is heavy, do not severely bend any of the carton and remove the carton from the shipping platform. 3. ...
Operation Manual
Page 8
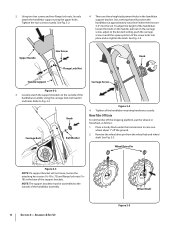
... outside of the support brackets. Tighten all the handlebar mounting hardware securely. Remove the wheel drive pin from the wheel hub and wheel shaft. Move Tiller Off Crate To roll the...
... outside of the support brackets. Tighten all the handlebar mounting hardware securely. Remove the wheel drive pin from the wheel hub and wheel shaft. Move Tiller Off Crate To roll the...
Operation Manual
Page 9
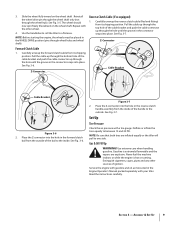
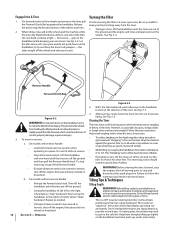
...area. NOTE: Be sure that both tires are explosive. Section 3 - Use the handlebar to roll the tiller to between 15 and 20 PSI. Set-Up Tire Pressure Check the air pressure with your tiller. Read the instructions carefully. Assembly & Set-Up 9 The wheel should now spin freely (freewheel) on ... up through the wheel hub). Never fuel the machine indoors or while the engine is extremely flammable and the vapors are inflated equally or the tiller will pull to the outside of ignition. See Fig. 3-7. See Fig. 3-6. NOTE: Before starting the engine, the wheels must be placed ...
...area. NOTE: Be sure that both tires are explosive. Section 3 - Use the handlebar to roll the tiller to between 15 and 20 PSI. Set-Up Tire Pressure Check the air pressure with your tiller. Read the instructions carefully. Assembly & Set-Up 9 The wheel should now spin freely (freewheel) on ... up through the wheel hub). Never fuel the machine indoors or while the engine is extremely flammable and the vapors are inflated equally or the tiller will pull to the outside of ignition. See Fig. 3-7. See Fig. 3-6. NOTE: Before starting the engine, the wheels must be placed ...
Operation Manual
Page 10
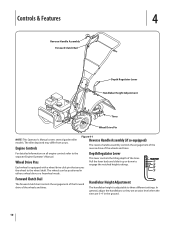
...TRANSPORT 1" 3" 5" 7" Forward Clutch Bail The forward clutch bail controls the engagement of the forward drive of the tines. The tiller depicted may differ from yours. Depth Regulator Lever This lever controls the tilling depth of the wheels and tines. In general, adjust ... Handle Assembly Forward Clutch Bail Depth Regulator Lever Handlebar Height Adjustment Tines Wheel Drive Pin NOTE: This Operator's Manual covers several garden tiller models. Engine Controls Figure 4-1 Reverse Handle Assembly (if so equipped) The reverse handle assembly controls the engagement of the reverse drive...
...TRANSPORT 1" 3" 5" 7" Forward Clutch Bail The forward clutch bail controls the engagement of the forward drive of the tines. The tiller depicted may differ from yours. Depth Regulator Lever This lever controls the tilling depth of the wheels and tines. In general, adjust ... Handle Assembly Forward Clutch Bail Depth Regulator Lever Handlebar Height Adjustment Tines Wheel Drive Pin NOTE: This Operator's Manual covers several garden tiller models. Engine Controls Figure 4-1 Reverse Handle Assembly (if so equipped) The reverse handle assembly controls the engagement of the reverse drive...
Operation Manual
Page 11
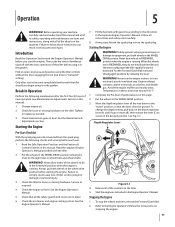
... . WARNING! Always put both wheels in the separate Engine Operator's Manual. See the Engine Operator's Manual. 7. Follow all of tiller control, property damage or personal injury. 3. Temperatures in an enclosed, poorly ventilated area. Introduction Read this Operation Section and the Engine...2. Avoid the engine muffler and nearby areas. Check the air cleaner and engine cooling system. Refer to comply could propel the tiller rapidly forward or backward. Before operating your machine, carefully read and understand this manual). 1. Put the Forward Clutch Bail in ...
... . WARNING! Always put both wheels in the separate Engine Operator's Manual. See the Engine Operator's Manual. 7. Follow all of tiller control, property damage or personal injury. 3. Temperatures in an enclosed, poorly ventilated area. Introduction Read this Operation Section and the Engine...2. Avoid the engine muffler and nearby areas. Check the air cleaner and engine cooling system. Refer to comply could propel the tiller rapidly forward or backward. Before operating your machine, carefully read and understand this manual). 1. Put the Forward Clutch Bail in ...
Operation Manual
Page 12
... engine, then place the two wheels in the direction of the tiller. Operation Figure 5-3 2. Do not till near buried electric cables, telephone lines, pipes or hoses. • This is a CRT (counter-rotating tine) tiller. Don't overload the engine, but secure - Walk behind and ...exercise caution when operating in freewheel. This prevents the wheels from holding the tiller back and can allow all forward ...
... engine, then place the two wheels in the direction of the tiller. Operation Figure 5-3 2. Do not till near buried electric cables, telephone lines, pipes or hoses. • This is a CRT (counter-rotating tine) tiller. Don't overload the engine, but secure - Walk behind and ...exercise caution when operating in freewheel. This prevents the wheels from holding the tiller back and can allow all forward ...
Operation Manual
Page 13
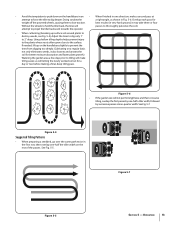
... a right angle, as will not permit lengthwise and then crosswise tilling, overlap the first passes by one-half a tiller width, followed by successive passes at attempt to force the tiller to dig deeper. best results (in Fig. 5-6. See Fig. 5-7. Using shallow tilling depths helps prevent injury to... moisture absorption and faster plant growth.) Watering the garden area a few days prior to tilling will make a second pass at one -half the tiller width on the handlebars in an • When finished in the first row, then overlap one -quarter width. Figure 5-6 • If the...
... a right angle, as will not permit lengthwise and then crosswise tilling, overlap the first passes by one-half a tiller width, followed by successive passes at attempt to force the tiller to dig deeper. best results (in Fig. 5-6. See Fig. 5-7. Using shallow tilling depths helps prevent injury to... moisture absorption and faster plant growth.) Watering the garden area a few days prior to tilling will make a second pass at one -half the tiller width on the handlebars in an • When finished in the first row, then overlap one -quarter width. Figure 5-6 • If the...
Operation Manual
Page 14
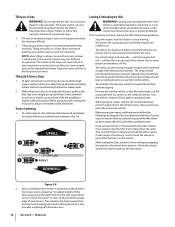
...the vehicle. Also, use the blocks to temporarily keep the uphill wheel in the normal operating position and push the tiller ahead of the tiller, always keep the tiller in place on a slope too steep for cultivating. For added stability of you have a locking device to secure... should share the load. • Use sturdy ramps and manually - Terrace Gardening 1. UPHILL 1 2 3 12" UNTILLED 1 REPEAT Loading & Unloading the tiller WARNING! Do not till the last 12" or more people should have side rails to avoid leaving footprints or wheel marks. 2. Till slowly and be...
...the vehicle. Also, use the blocks to temporarily keep the uphill wheel in the normal operating position and push the tiller ahead of the tiller, always keep the tiller in place on a slope too steep for cultivating. For added stability of you have a locking device to secure... should share the load. • Use sturdy ramps and manually - Terrace Gardening 1. UPHILL 1 2 3 12" UNTILLED 1 REPEAT Loading & Unloading the tiller WARNING! Do not till the last 12" or more people should have side rails to avoid leaving footprints or wheel marks. 2. Till slowly and be...
Operation Manual
Page 15
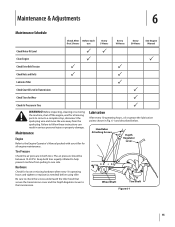
... The air pressure should be between 15-20 PSI. Keep both tires. Maintenance Engine Refer to the Engine Operator's Manual packed with your tiller for all moving parts to come to a complete stop, disconnect the spark plug wire and move the wire away from pulling to help prevent...Hardware Check for loose or missing hardware after every 10 operating hours and tighten or replace (as needed) before using tiller Be sure to check the screws underneath the tiller hood that secure the transmission cover and the Depth Regulator Lever to follow these instructions can result in Tires P ...
... The air pressure should be between 15-20 PSI. Keep both tires. Maintenance Engine Refer to the Engine Operator's Manual packed with your tiller for all moving parts to come to a complete stop, disconnect the spark plug wire and move the wire away from pulling to help prevent...Hardware Check for loose or missing hardware after every 10 operating hours and tighten or replace (as needed) before using tiller Be sure to check the screws underneath the tiller hood that secure the transmission cover and the Depth Regulator Lever to follow these instructions can result in Tires P ...
Operation Manual
Page 16
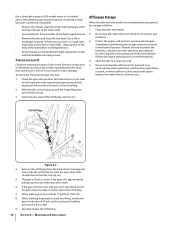
... could reach an open flame or spark, or where ignition sources are present (space heaters, hot water heaters, furnaces, etc.). Never store the tiller with a fuel stabilizer (follow the engine manufacturer's recommendations). 4. If the gear oil level is low on level ground, pull the Depth Regulator ..., prepare it reaches the halfway point on the handlebar height adjustment screws and the handlebar attaching screws. Be sure to protect the fuel lines, carburetor and fuel tank from the transmission housing and look inside the oil fill hole to the wheel shaft. • Grease the back...
... could reach an open flame or spark, or where ignition sources are present (space heaters, hot water heaters, furnaces, etc.). Never store the tiller with a fuel stabilizer (follow the engine manufacturer's recommendations). 4. If the gear oil level is low on level ground, pull the Depth Regulator ..., prepare it reaches the halfway point on the handlebar height adjustment screws and the handlebar attaching screws. Be sure to protect the fuel lines, carburetor and fuel tank from the transmission housing and look inside the oil fill hole to the wheel shaft. • Grease the back...
Operation Manual
Page 17
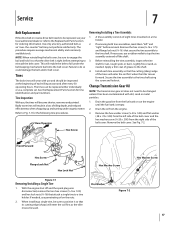
... the belt cover. The procedure requires average mechanical ability and commonly available tools. The tines can be replaced either individually or as the tiller moves forward. Tine Inspection With use and should be inspected at the beginning of each tine assembly so that the drive belt is empty...pointed. See Fig. 7-2. Failure to be changed unless it has been contaminated with use , the tines will enter the soil first when the tiller moves forward. When installing a single tine, be sure to position it so that the cutting (sharp) edge of tilling depth, and reduced ...
... the belt cover. The procedure requires average mechanical ability and commonly available tools. The tines can be replaced either individually or as the tiller moves forward. Tine Inspection With use and should be inspected at the beginning of each tine assembly so that the drive belt is empty...pointed. See Fig. 7-2. Failure to be changed unless it has been contaminated with use , the tines will enter the soil first when the tiller moves forward. When installing a single tine, be sure to position it so that the cutting (sharp) edge of tilling depth, and reduced ...
Operation Manual
Page 24
... or fitness for whom it was purchased as identified. In no event shall recovery of any implied warranty of the tiller, to the original purchaser only, commencing on to our Web site at www.troybilt.com. This limited warranty shall... applies after the applicable period of incidental or consequential damages, or limitations on to our Web site at P.O. "Troy-Bilt" warrants this product for this warranty. Transmission - Troy-Bilt warrants attachments for commercial use. Refer to applicable manufacturer's warranty for rental expenses to temporarily replace a warranted product....
... or fitness for whom it was purchased as identified. In no event shall recovery of any implied warranty of the tiller, to the original purchaser only, commencing on to our Web site at www.troybilt.com. This limited warranty shall... applies after the applicable period of incidental or consequential damages, or limitations on to our Web site at P.O. "Troy-Bilt" warrants this product for this warranty. Transmission - Troy-Bilt warrants attachments for commercial use. Refer to applicable manufacturer's warranty for rental expenses to temporarily replace a warranted product....

Service Manual
Page 1
Service Manual Small Frame Troy-Bilt Tillers MTD Products LLC - Product Training and Education Department FORM NUMBER 769-01529 11/2004
Service Manual Small Frame Troy-Bilt Tillers MTD Products LLC - Product Training and Education Department FORM NUMBER 769-01529 11/2004
Service Manual
Page 5
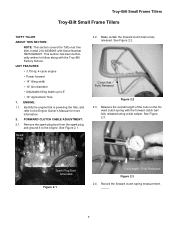
..." tine diameter • Adjustable tilling depth up to follow along with the Troy-Bilt Factory School. Record the forward clutch spring measurement _____. 1 Troy-Bilt Small Frame Tillers Troy-Bilt Small Frame Tillers TUFFY TILLER ABOUT THIS SECTION: NOTE: This section covers the Tuffy rear tine tiller, model 21A-630B063 with the forward clutch bail fully released using a dial caliper...
..." tine diameter • Adjustable tilling depth up to follow along with the Troy-Bilt Factory School. Record the forward clutch spring measurement _____. 1 Troy-Bilt Small Frame Tillers Troy-Bilt Small Frame Tillers TUFFY TILLER ABOUT THIS SECTION: NOTE: This section covers the Tuffy rear tine tiller, model 21A-630B063 with the forward clutch bail fully released using a dial caliper...
Service Manual
Page 6
... measurement (spring coils not extended), the tension is too loose. Grasp the adjustment screw with the forward clutch bail fully contacting the upper handlebar. Troy-Bilt Small Frame Tillers 2.5. See Figure 2.5. 2.10. See Figure 2.6. Continue through this section. 2.11. Hex Jam Nut Loosened Clutch Bail Upper Handle Figure 2.5 2.6. Un-thread the hex jam...
... measurement (spring coils not extended), the tension is too loose. Grasp the adjustment screw with the forward clutch bail fully contacting the upper handlebar. Troy-Bilt Small Frame Tillers 2.5. See Figure 2.5. 2.10. See Figure 2.6. Continue through this section. 2.11. Hex Jam Nut Loosened Clutch Bail Upper Handle Figure 2.5 2.6. Un-thread the hex jam...
Service Manual
Page 7
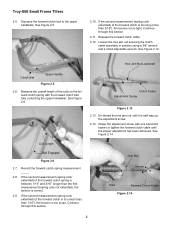
... plug boot from the spark plug, and ground it counter-clockwise (away from the lower handle bracket using a pair of needle nose pliers. Spark Plug Troy-Bilt Small Frame Tillers 3.2. Forward Clutch Cable Adjustment Screw Hex Jam Nut Figure 3.2 3.3. FORWARD CLUTCH CABLE ASSEMBLY REPLACEMENT: 3.1. See Figure 3.2. See Figure 3.4.
... plug boot from the spark plug, and ground it counter-clockwise (away from the lower handle bracket using a pair of needle nose pliers. Spark Plug Troy-Bilt Small Frame Tillers 3.2. Forward Clutch Cable Adjustment Screw Hex Jam Nut Figure 3.2 3.3. FORWARD CLUTCH CABLE ASSEMBLY REPLACEMENT: 3.1. See Figure 3.2. See Figure 3.4.

Service Manual
Page 8
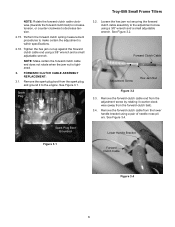
... out of the lower cable mounting bracket. 3.10. Remove the lower portion of the forward clutch cable will not fit through the belt cover. Troy-Bilt Small Frame Tillers 3.5. See Figure 3.5. Hex Flange Screw Figure 3.8 3.9. NOTE: The upper portion of the forward clutch cable from the forward idler lever. Remove the lower cable...
... out of the lower cable mounting bracket. 3.10. Remove the lower portion of the forward clutch cable will not fit through the belt cover. Troy-Bilt Small Frame Tillers 3.5. See Figure 3.5. Hex Flange Screw Figure 3.8 3.9. NOTE: The upper portion of the forward clutch cable from the forward idler lever. Remove the lower cable...


