
Operation Manual
Page 3
... in bare feet or sandals. Do not put hands and feet near rotating parts or in the feeding chambers and discharge opening , remove or empty bag, or inspect and repair the machine while the engine is running. Never operate this machine. Important Safe Operation Practices 2 WARNING: This symbol points out important...
... in bare feet or sandals. Do not put hands and feet near rotating parts or in the feeding chambers and discharge opening , remove or empty bag, or inspect and repair the machine while the engine is running. Never operate this machine. Important Safe Operation Practices 2 WARNING: This symbol points out important...

Operation Manual
Page 4
... or trailer bed with the rim of material through the feed opening while the engine is running . Allow engine to the machine. Vacuum bag must 8. Never over fill fuel tank. Fill tank to no more than ½ be kept closed at least two minutes before properly .... not use debris. Extinguish all times until all times during operation. Never fuel machine indoors. Never operate without vacuum bag and discharge chute running . vacuum bag while the engine is spilled, wipe it on yourself or your footing and keep machine free of your clothes which could...
... or trailer bed with the rim of material through the feed opening while the engine is running . Allow engine to the machine. Vacuum bag must 8. Never over fill fuel tank. Fill tank to no more than ½ be kept closed at least two minutes before properly .... not use debris. Extinguish all times until all times during operation. Never fuel machine indoors. Never operate without vacuum bag and discharge chute running . vacuum bag while the engine is spilled, wipe it on yourself or your footing and keep machine free of your clothes which could...

Operation Manual
Page 7
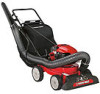
Assembly & Set-Up 3 Contents of Carton • One Chipper/Shredder Vacuum • One Upper and Lower Handle • One Bag • One Operator's Manual • One Hose Assembly • One Bottle of upper NOTE: This unit is on the handle brackets with notch in lower ...
Assembly & Set-Up 3 Contents of Carton • One Chipper/Shredder Vacuum • One Upper and Lower Handle • One Bag • One Operator's Manual • One Hose Assembly • One Bottle of upper NOTE: This unit is on the handle brackets with notch in lower ...

Operation Manual
Page 9
... extreme care when handling gasoline. WARNING: Never fill fuel tank indoors with gasoline as leverage when sliding the locking rod. NOTE: The bag/chute switch button attached to the separate engine owner's manual for smoother surfaces. Release lever towards wheel. thick layer of 2. Section 3... - Service the engine with engine running or until the engine has been allowed to secure bag in place. Never fuel the machine indoors or while the engine is extremely flammable and the vapors are in the separate engine owner...
... extreme care when handling gasoline. WARNING: Never fill fuel tank indoors with gasoline as leverage when sliding the locking rod. NOTE: The bag/chute switch button attached to the separate engine owner's manual for smoother surfaces. Release lever towards wheel. thick layer of 2. Section 3... - Service the engine with engine running or until the engine has been allowed to secure bag in place. Never fuel the machine indoors or while the engine is extremely flammable and the vapors are in the separate engine owner...

Operation Manual
Page 10
... severely. Stand behind unit and pull the recoil starter to switch vacuum suction between the nozzle and the hose assembly. Controls and Features 4 Recoil Starter Bag Hose Handle Hose Extension Chipper Chute Nozzle Height Adjustment Lever Hose Assembly Nozzle/Hose Vac Lever Nozzle Figure 4-1 WARNING: The operation of any adjustments or...
... severely. Stand behind unit and pull the recoil starter to switch vacuum suction between the nozzle and the hose assembly. Controls and Features 4 Recoil Starter Bag Hose Handle Hose Extension Chipper Chute Nozzle Height Adjustment Lever Hose Assembly Nozzle/Hose Vac Lever Nozzle Figure 4-1 WARNING: The operation of any adjustments or...

Operation Manual
Page 11
... your chipper/ shredder vacuum for instructions on starting and stopping the engine. Twist the two buttons on the back of unit. 5. Hold bag handle and bag clip while emptying the contents. 11 See Fig. 5-1. Fold outer flap over opening and fold inner flap over inner flap and insert buttons... on mounting bracket with one hand and pull lock rod on the bag through metal outlets. Operation 5 Starting & Stopping Engine Refer to unlock and empty contents. Twist the buttons to release. 4. See Fig. 5-2. 8. Grasp...
... your chipper/ shredder vacuum for instructions on starting and stopping the engine. Twist the two buttons on the back of unit. 5. Hold bag handle and bag clip while emptying the contents. 11 See Fig. 5-1. Fold outer flap over opening and fold inner flap over inner flap and insert buttons... on mounting bracket with one hand and pull lock rod on the bag through metal outlets. Operation 5 Starting & Stopping Engine Refer to unlock and empty contents. Twist the buttons to release. 4. See Fig. 5-2. 8. Grasp...

Operation Manual
Page 12
.... Insert round end of the hose adapter to operate the hose assembly. See Fig. 5-3. See Fig. 5-4. 3. b. The spring loaded pin must be discharged into catcher bag. See Fig. 5-5. 3. For best performance, it will be in the discharge area. After material has been shredded by the flail blades on hose extension to...
.... Insert round end of the hose adapter to operate the hose assembly. See Fig. 5-3. See Fig. 5-4. 3. b. The spring loaded pin must be discharged into catcher bag. See Fig. 5-5. 3. For best performance, it will be in the discharge area. After material has been shredded by the flail blades on hose extension to...
Operation Manual
Page 13
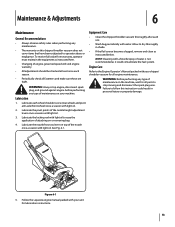
...8226; Changing of engine-governed speed will void engine warranty. • All adjustments should be checked at least once each use. • Wash bag periodically with light oil. 2. NOTE: Cleaning with a forceful spray of the nozzle height adjustment levers once a season with your unit for all ... machine, wait for all fasteners and make sure these are tight. Lubricate the nozzle/hose vac lever on top of maintenance on or removing bag. 4. Figure 6-1 5. Allow to stop engine, disconnect spark plug, and ground against engine before performing any type of the nozzle once a...
...8226; Changing of engine-governed speed will void engine warranty. • All adjustments should be checked at least once each use. • Wash bag periodically with light oil. 2. NOTE: Cleaning with a forceful spray of the nozzle height adjustment levers once a season with your unit for all ... machine, wait for all fasteners and make sure these are tight. Lubricate the nozzle/hose vac lever on top of maintenance on or removing bag. 4. Figure 6-1 5. Allow to stop engine, disconnect spark plug, and ground against engine before performing any type of the nozzle once a...

Operation Manual
Page 14
... screen by scraping or washing with water. Before unclogging the discharge chute, disconnect and ground the spark plug wire to a complete stop. 2. Remove the vacuum bag from the unit as follows: 6. Remove self tapping screw on top of unit that secures flail screen. Reinstall the screen. See Fig. 6-2. 14 Section 6- Figure...
... screen by scraping or washing with water. Before unclogging the discharge chute, disconnect and ground the spark plug wire to a complete stop. 2. Remove the vacuum bag from the unit as follows: 6. Remove self tapping screw on top of unit that secures flail screen. Reinstall the screen. See Fig. 6-2. 14 Section 6- Figure...

Operation Manual
Page 15
... Washer Wheel Lock Nut Figure 7-2 5. Figure 7-1 4. NOTE: When tipping the unit, empty the oil and fuel tank and keep engine spark plug side up. 1. Remove bag assembly or blower chute. 3. Remove the three hex cap screws holding the chipper chute to the pivot arm assemblies. See Fig. 7-1. Remove the flange lock...
... Washer Wheel Lock Nut Figure 7-2 5. Figure 7-1 4. NOTE: When tipping the unit, empty the oil and fuel tank and keep engine spark plug side up. 1. Remove bag assembly or blower chute. 3. Remove the three hex cap screws holding the chipper chute to the pivot arm assemblies. See Fig. 7-1. Remove the flange lock...

Operation Manual
Page 17
... plug. 8. Foreign object lodged in CHOKE position (if equipped). 5. Turn on CHOKE (if equipped). 3. Make certain the bag is correctly secured, and the bag/chute switch button is fully depressed. 1. Stop engine and disconnect spark plug wire. Water or dirt in correct starting position. ...hesitates) at full throttle. 4. fill tank with fresh fuel. 6. Blocked fuel line or stale fuel. 4. Move choke lever to ON position. 3. Empty bag. 1. Loose parts or damaged impeller. 1. Throttle lever (if equipped) not in fuel system. 6. Engine switch (if equipped) in OFF position. 3. Dirty...
... plug. 8. Foreign object lodged in CHOKE position (if equipped). 5. Turn on CHOKE (if equipped). 3. Make certain the bag is correctly secured, and the bag/chute switch button is fully depressed. 1. Stop engine and disconnect spark plug wire. Water or dirt in correct starting position. ...hesitates) at full throttle. 4. fill tank with fresh fuel. 6. Blocked fuel line or stale fuel. 4. Move choke lever to ON position. 3. Empty bag. 1. Loose parts or damaged impeller. 1. Throttle lever (if equipped) not in fuel system. 6. Engine switch (if equipped) in OFF position. 3. Dirty...

Operation Manual
Page 18
Replacement Parts Component 9 Part Number and Description 664-04029 Bag 981-0490 Chipper Blade 719-0329 Flail Blade (2 total) 734-04033 Wheel Phone (800) 828-5500 or (330) 558-7220 to order replacement parts or a complete Parts Manual (have your full model number and serial number ready). Parts Manual downloads are also available free of charge at www.troybilt.com. 18
Replacement Parts Component 9 Part Number and Description 664-04029 Bag 981-0490 Chipper Blade 719-0329 Flail Blade (2 total) 734-04033 Wheel Phone (800) 828-5500 or (330) 558-7220 to order replacement parts or a complete Parts Manual (have your full model number and serial number ready). Parts Manual downloads are also available free of charge at www.troybilt.com. 18

Operation Manual
Page 20
... the product. g. No other express warranty, whether written or oral, except as : batteries, belts, blades, blade adapters, tines, grass bags, wheels, rider deck wheels, seats, snow thrower skid shoes, friction wheels, shave plates, auger spiral rubber and tires. In no event ...the product, and has not been subject to new merchandise purchased and used in materials or workmanship. KITCHENER, ON N2G 4J1; "Troy-Bilt" warrants this warranty provide the sole and exclusive remedy arising from state to applicable manufacturer's warranty for a particular purpose, applies after ...
... the product. g. No other express warranty, whether written or oral, except as : batteries, belts, blades, blade adapters, tines, grass bags, wheels, rider deck wheels, seats, snow thrower skid shoes, friction wheels, shave plates, auger spiral rubber and tires. In no event ...the product, and has not been subject to new merchandise purchased and used in materials or workmanship. KITCHENER, ON N2G 4J1; "Troy-Bilt" warrants this warranty provide the sole and exclusive remedy arising from state to applicable manufacturer's warranty for a particular purpose, applies after ...

Parts Manual
Page 31
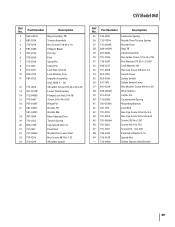
... x .88 x .38 Axle, 22.47" Elbow Fitting Push Nut,.25ID x.50OD Chipper Chute Flange Lock Nut, 5/16-18 Hex Cap Screw, 1/4-20 x 1.250 Debris Collection Bag Safety Glasses 31 CS Model Series 410 & 420 Ref No. 1 2 3 4 5 6 7 8 9 10 11 12 13 14 15 16 17 18 19 20 21 Part Number 981...
... x .88 x .38 Axle, 22.47" Elbow Fitting Push Nut,.25ID x.50OD Chipper Chute Flange Lock Nut, 5/16-18 Hex Cap Screw, 1/4-20 x 1.250 Debris Collection Bag Safety Glasses 31 CS Model Series 410 & 420 Ref No. 1 2 3 4 5 6 7 8 9 10 11 12 13 14 15 16 17 18 19 20 21 Part Number 981...

Parts Manual
Page 35
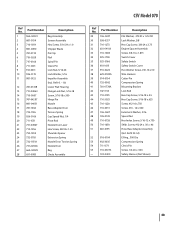
... 1/4-20 Pop Rivet Chipper Shredder Chute Chute Flap Flat Washer.28 ID x.74 OD Washer,.320 ID x.93 OD Support Brace Chute Flap Strip Chipper Bag Ass'y Safety Glasses 35 CS Model Series 450 & 460 Ref No.
... 1/4-20 Pop Rivet Chipper Shredder Chute Chute Flap Flat Washer.28 ID x.74 OD Washer,.320 ID x.93 OD Support Brace Chute Flap Strip Chipper Bag Ass'y Safety Glasses 35 CS Model Series 450 & 460 Ref No.
Parts Manual
Page 39
... Pivot Rod 22 731-04967 Nozzle Door Lever, Red 23 710-1256 Hex Screw, #8-18 x 1.25 24 750-1294 Shoulder Spacer Ref No. CSV Model 060 Ref No. Part Number Description 25 732-3118 Extension Spring 26 732-1151A Nozzle Door Torsion Spring 27 731-2294A Nozzle Door 28 664-04029... - 16 x.500 48 736-0607 External L-Washer 5/16 49 726-0139 Speed Nut - 723-0400 Safety Glasses (Not Shown) 39 Part Number Description 1 964-04031 Bag Assembly, TB 2 681-0154 Screen Assembly 3 710-1054 Hex Screw 5/16-24 x 1.0 4 981-0490 Chipper Blade 5 781-0735 Pin Clip 6 719-0329 Flail 7 ...
... Pivot Rod 22 731-04967 Nozzle Door Lever, Red 23 710-1256 Hex Screw, #8-18 x 1.25 24 750-1294 Shoulder Spacer Ref No. CSV Model 060 Ref No. Part Number Description 25 732-3118 Extension Spring 26 732-1151A Nozzle Door Torsion Spring 27 731-2294A Nozzle Door 28 664-04029... - 16 x.500 48 736-0607 External L-Washer 5/16 49 726-0139 Speed Nut - 723-0400 Safety Glasses (Not Shown) 39 Part Number Description 1 964-04031 Bag Assembly, TB 2 681-0154 Screen Assembly 3 710-1054 Hex Screw 5/16-24 x 1.0 4 981-0490 Chipper Blade 5 781-0735 Pin Clip 6 719-0329 Flail 7 ...
Parts Manual
Page 43
... Torsion Spring Cap Speed Nut, 1/4 Pivot Rod Nozzle Door Lever Hex Screw, #8-18 x 1.25 Shoulder Spacer Extension Spring Nozzle Door Torsion Spring Nozzle Door Bag Chute Assembly CSV Model 070 Ref No. 29 30 31 32 33 34 35 36 37 38 39 40 41 42 43 44 45 46 47 48... 781-1064 732-1156 926-0106 711-1551 731-04967 710-1256 750-1294 732-3118 732-1151A 731-2294A 664-04029 631-0083 Description Bag Assembly Screen Assembly Hex Screw, 5/16-24 x 1.0 Chipper Blade Pin Clip Flail Spiral Pin Clevis Pin Lock Nut, 5/16-24 Lock Washer, 5/16 Impeller Assembly...
... Torsion Spring Cap Speed Nut, 1/4 Pivot Rod Nozzle Door Lever Hex Screw, #8-18 x 1.25 Shoulder Spacer Extension Spring Nozzle Door Torsion Spring Nozzle Door Bag Chute Assembly CSV Model 070 Ref No. 29 30 31 32 33 34 35 36 37 38 39 40 41 42 43 44 45 46 47 48... 781-1064 732-1156 926-0106 711-1551 731-04967 710-1256 750-1294 732-3118 732-1151A 731-2294A 664-04029 631-0083 Description Bag Assembly Screen Assembly Hex Screw, 5/16-24 x 1.0 Chipper Blade Pin Clip Flail Spiral Pin Clevis Pin Lock Nut, 5/16-24 Lock Washer, 5/16 Impeller Assembly...

Parts Manual
Page 45
... 936-0217 710-1273 Description Chute Flap Strip Chute Flap Pop Rivet Discharge Chute Bag Nozzle Assembly Nozzle Flap Screw Height Adjustment Knob Spring Lever Index Bracket RH Index Bracket LH Shoulder ...Screw Flat Washer, .510 x 1.12 x.060 Hex Flange Lock Nut, 3/8-16 Door Assembly Chipper Chute Hex Cap Screw, 1/4-20 x.620 Flat Washer...16-24 x 1.0 Chipper Blade Hex Lock Nut 5/16-24 Flat Washer, .406 x 1/1/4 Lock Washer, 3/8 Hex Cap Screw, 3/8-24 x 2.75 CSV Model 202 Ref No. 37. 38. 39. 40. 41. 42. 43. 44. 45. 46. 47. 48. 49. 50. 51. 52. ...
... 936-0217 710-1273 Description Chute Flap Strip Chute Flap Pop Rivet Discharge Chute Bag Nozzle Assembly Nozzle Flap Screw Height Adjustment Knob Spring Lever Index Bracket RH Index Bracket LH Shoulder ...Screw Flat Washer, .510 x 1.12 x.060 Hex Flange Lock Nut, 3/8-16 Door Assembly Chipper Chute Hex Cap Screw, 1/4-20 x.620 Flat Washer...16-24 x 1.0 Chipper Blade Hex Lock Nut 5/16-24 Flat Washer, .406 x 1/1/4 Lock Washer, 3/8 Hex Cap Screw, 3/8-24 x 2.75 CSV Model 202 Ref No. 37. 38. 39. 40. 41. 42. 43. 44. 45. 46. 47. 48. 49. 50. 51. 52. ...

