
User Manual
Page 29
... Drive Recovery Utilities 58 Creating Recovery CDs/DVDs 59 Hard Disk Drive Recovery Options 60 Installing drivers and applications 66 Using the Toshiba Dual Pointing Device 67 Using the TouchPad 67 Disabling or enabling the TouchPad 68 Using external display devices 68 Directing the display ...output when you turn on the computer 69 Adjusting the quality of the external display......70 Using an external keyboard 70 Using a mouse 70 Connecting a printer 71 Setting up a printer 71 Connecting an optional external diskette drive........72 Turning off the...
... Drive Recovery Utilities 58 Creating Recovery CDs/DVDs 59 Hard Disk Drive Recovery Options 60 Installing drivers and applications 66 Using the Toshiba Dual Pointing Device 67 Using the TouchPad 67 Disabling or enabling the TouchPad 68 Using external display devices 68 Directing the display ...output when you turn on the computer 69 Adjusting the quality of the external display......70 Using an external keyboard 70 Using a mouse 70 Connecting a printer 71 Setting up a printer 71 Connecting an optional external diskette drive........72 Turning off the...

User Manual
Page 30
30 Contents Chapter 2: Learning the Basics 85 Computing tips 85 Using the keyboard 86 Character keys 86 Making your keyboard emulate a full-size keyboard 87 Ctrl, Fn, and Alt keys 87 Function keys 87 Special Windows® keys 88 Overlay keys 88 Using the overlay ... 99 Removing a disc with the computer on...........100 Removing a disc with the computer off ..........100 Caring for CD or DVD Discs 101 Toshiba's online resources 101 Chapter 3: Mobile Computing 102 Toshiba's energy-saver design 102 Running the computer on battery power 103 Battery Notice 103 Power management 104
30 Contents Chapter 2: Learning the Basics 85 Computing tips 85 Using the keyboard 86 Character keys 86 Making your keyboard emulate a full-size keyboard 87 Ctrl, Fn, and Alt keys 87 Function keys 87 Special Windows® keys 88 Overlay keys 88 Using the overlay ... 99 Removing a disc with the computer on...........100 Removing a disc with the computer off ..........100 Caring for CD or DVD Discs 101 Toshiba's online resources 101 Chapter 3: Mobile Computing 102 Toshiba's energy-saver design 102 Running the computer on battery power 103 Battery Notice 103 Power management 104
User Manual
Page 33
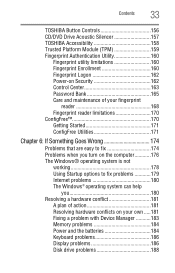
... Controls 156 CD/DVD Drive Acoustic Silencer 157 TOSHIBA Accessibility 158 Trusted Platform Module (TPM 159 Fingerprint Authentication Utility 160 Fingerprint utility limitations 160 Fingerprint Enrollment 160 Fingerprint Logon 162 Power-on Security 162 ... A plan of action 181 Resolving hardware conflicts on your own .....181 Fixing a problem with Device Manager ...........183 Memory problems 184 Power and the batteries 184 Keyboard problems 186 Display problems 186 Disk drive problems 188
... Controls 156 CD/DVD Drive Acoustic Silencer 157 TOSHIBA Accessibility 158 Trusted Platform Module (TPM 159 Fingerprint Authentication Utility 160 Fingerprint utility limitations 160 Fingerprint Enrollment 160 Fingerprint Logon 162 Power-on Security 162 ... A plan of action 181 Resolving hardware conflicts on your own .....181 Fixing a problem with Device Manager ...........183 Memory problems 184 Power and the batteries 184 Keyboard problems 186 Display problems 186 Disk drive problems 188
User Manual
Page 34
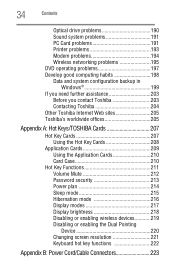
...198 Data and system configuration backup in Windows 199 If you need further assistance 203 Before you contact Toshiba 203 Contacting Toshiba 204 Other Toshiba Internet Web sites 205 Toshiba's worldwide offices 205 Appendix A: Hot Keys/TOSHIBA Cards 207 Hot Key Cards 207 Using the Hot Key Cards 208 Application Cards 209 Using the ... Display modes 217 Display brightness 218 Disabling or enabling wireless devices............219 Disabling or enabling the Dual Pointing Device 220 Changing screen resolution 221 Keyboard hot key functions 222 Appendix B: Power Cord/Cable Connectors 223
...198 Data and system configuration backup in Windows 199 If you need further assistance 203 Before you contact Toshiba 203 Contacting Toshiba 204 Other Toshiba Internet Web sites 205 Toshiba's worldwide offices 205 Appendix A: Hot Keys/TOSHIBA Cards 207 Hot Key Cards 207 Using the Hot Key Cards 208 Application Cards 209 Using the ... Display modes 217 Display brightness 218 Disabling or enabling wireless devices............219 Disabling or enabling the Dual Pointing Device 220 Changing screen resolution 221 Keyboard hot key functions 222 Appendix B: Power Cord/Cable Connectors 223
User Manual
Page 43
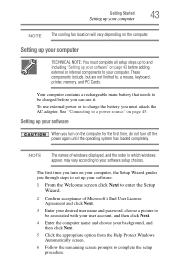
... your software" on page 43 before you turn on page 45. To use it. The first time you can use external power or to , a mouse, keyboard, printer, memory, and PC Cards. Setting up your computer TECHNICAL NOTE: You must attach the AC adaptor. Your computer contains a rechargeable main battery that needs...
... your software" on page 43 before you turn on page 45. To use it. The first time you can use external power or to , a mouse, keyboard, printer, memory, and PC Cards. Setting up your computer TECHNICAL NOTE: You must attach the AC adaptor. Your computer contains a rechargeable main battery that needs...
User Manual
Page 44
... with Toshiba 7 Click Start when the Thank You message appears. NOTE To register online, you can be connected to : ❖ Add more memory (see "Adding memory (optional)" on page 50) ❖ Connect a mouse (see "Using a mouse" on page 70) ❖ Connect a full-size keyboard (see... "Using an external keyboard" on page 70) ❖ Connect an external monitor (see "Using external display devices" on page 68) ❖ Connect a local printer (see ...
... with Toshiba 7 Click Start when the Thank You message appears. NOTE To register online, you can be connected to : ❖ Add more memory (see "Adding memory (optional)" on page 50) ❖ Connect a mouse (see "Using a mouse" on page 70) ❖ Connect a full-size keyboard (see... "Using an external keyboard" on page 70) ❖ Connect an external monitor (see "Using external display devices" on page 68) ❖ Connect a local printer (see ...
User Manual
Page 48
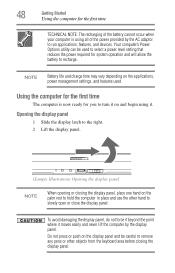
... panel. Using the computer for system operation and will allow the battery to hold the computer in place and use the other objects from the keyboard area before closing the display panel, place one hand on the display panel and be used . NOTE Battery life and charge time may vary depending...
... panel. Using the computer for system operation and will allow the battery to hold the computer in place and use the other objects from the keyboard area before closing the display panel, place one hand on the display panel and be used . NOTE Battery life and charge time may vary depending...
User Manual
Page 61
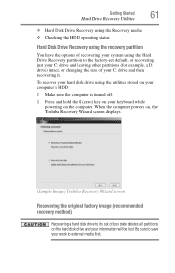
... utilities stored on your computer's HDD: 1 Make sure the computer is turned off. 2 Press and hold the 0 (zero) key on your keyboard while powering on the hard disk drive and your C: drive and then recovering it. Be sure to save your work to the factory-set default... your hard disk drive using the Hard Drive Recovery partition to external media first. When the computer powers on, the Toshiba Recovery Wizard screen displays. (Sample Image) Toshiba Recovery Wizard screen Recovering the original factory image (recommended recovery method) Recovering a hard disk drive to its out of your...
... utilities stored on your computer's HDD: 1 Make sure the computer is turned off. 2 Press and hold the 0 (zero) key on your keyboard while powering on the hard disk drive and your C: drive and then recovering it. Be sure to save your work to the factory-set default... your hard disk drive using the Hard Drive Recovery partition to external media first. When the computer powers on, the Toshiba Recovery Wizard screen displays. (Sample Image) Toshiba Recovery Wizard screen Recovering the original factory image (recommended recovery method) Recovering a hard disk drive to its out of your...
User Manual
Page 62
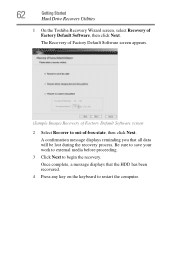
... Default Software, then click Next. A confirmation message displays reminding you that the HDD has been recovered. 4 Press any key on the keyboard to restart the computer. 62 Getting Started Hard Drive Recovery Utilities 1 On the Toshiba Recovery Wizard screen, select Recovery of Factory Default Software screen 2 Select Recover to begin the recovery.
... Default Software, then click Next. A confirmation message displays reminding you that the HDD has been recovered. 4 Press any key on the keyboard to restart the computer. 62 Getting Started Hard Drive Recovery Utilities 1 On the Toshiba Recovery Wizard screen, select Recovery of Factory Default Software screen 2 Select Recover to begin the recovery.
User Manual
Page 63
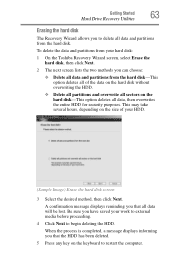
To delete the data and partitions from your hard disk: 1 On the Toshiba Recovery Wizard screen, select Erase the hard disk, then click Next. 2 The next screen lists the two methods you can choose: ❖ Delete all data ... entire HDD for security purposes. When the process is completed, a message displays informing you that the HDD has been deleted. 5 Press any key on the keyboard to restart the computer. Be sure you to delete all data will be lost. A confirmation message displays reminding you that all data and partitions from...
To delete the data and partitions from your hard disk: 1 On the Toshiba Recovery Wizard screen, select Erase the hard disk, then click Next. 2 The next screen lists the two methods you can choose: ❖ Delete all data ... entire HDD for security purposes. When the process is completed, a message displays informing you that the HDD has been deleted. 5 Press any key on the keyboard to restart the computer. Be sure you to delete all data will be lost. A confirmation message displays reminding you that all data and partitions from...
User Manual
Page 64
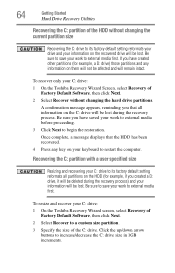
...drive to its factory default setting reformats all information on your work to external media first. To recover only your C: drive: 1 On the Toshiba Recovery Wizard screen, select Recovery of Factory Default Software, then click Next. 2 Select Recover to external media first. Once complete, a message ... created a D: drive, it will be lost. Click the up/down arrow buttons to begin the restoration. Be sure to save your keyboard to save your information on them will not be affected and will be deleted during the recovery process. Recovering the C: partition with a user...
...drive to its factory default setting reformats all information on your work to external media first. To recover only your C: drive: 1 On the Toshiba Recovery Wizard screen, select Recovery of Factory Default Software, then click Next. 2 Select Recover to external media first. Once complete, a message ... created a D: drive, it will be lost. Click the up/down arrow buttons to begin the restoration. Be sure to save your keyboard to save your information on them will not be affected and will be deleted during the recovery process. Recovering the C: partition with a user...
User Manual
Page 65
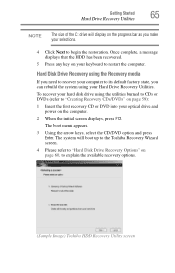
...the utilities burned to CDs or DVDs (refer to "Creating Recovery CDs/DVDs" on page 59): 1 Insert the first recovery CD or DVD into your keyboard to restart the computer. The system will display on the progress bar as you can rebuild the system using the Recovery media If you need.... 4 Click Next to begin the restoration. Getting Started 65 Hard Drive Recovery Utilities NOTE The size of the C: drive will boot up to the Toshiba Recovery Wizard screen. 4 Please refer to "Hard Disk Drive Recovery Options" on page 60, to explain the available recovery options. (Sample Image...
...the utilities burned to CDs or DVDs (refer to "Creating Recovery CDs/DVDs" on page 59): 1 Insert the first recovery CD or DVD into your keyboard to restart the computer. The system will display on the progress bar as you can rebuild the system using the Recovery media If you need.... 4 Click Next to begin the restoration. Getting Started 65 Hard Drive Recovery Utilities NOTE The size of the C: drive will boot up to the Toshiba Recovery Wizard screen. 4 Please refer to "Hard Disk Drive Recovery Options" on page 60, to explain the available recovery options. (Sample Image...
User Manual
Page 67
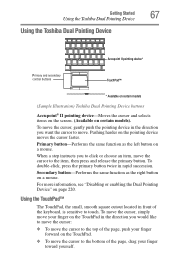
... Pointing Device Accupoint II pointing device* Primary and secondary control buttons TouchPad™ * Available on certain models (Sample Illustration) Toshiba Dual Pointing Device buttons Accupoint® II pointing device-Moves the cursor and selects items on the screen. (Available on page 220. To double-...TouchPad, the small, smooth square cutout located in the direction you to click or choose an item, move the cursor to the bottom of the keyboard, is sensitive to the top of the page, push your finger toward yourself. To move the cursor, simply move your finger on the TouchPad ...
... Pointing Device Accupoint II pointing device* Primary and secondary control buttons TouchPad™ * Available on certain models (Sample Illustration) Toshiba Dual Pointing Device buttons Accupoint® II pointing device-Moves the cursor and selects items on the screen. (Available on page 220. To double-...TouchPad, the small, smooth square cutout located in the direction you to click or choose an item, move the cursor to the bottom of the keyboard, is sensitive to the top of the page, push your finger toward yourself. To move the cursor, simply move your finger on the TouchPad ...
User Manual
Page 70
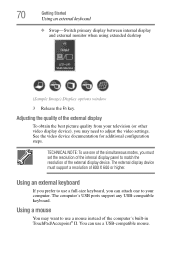
... between internal display and external monitor when using extended desktop (Sample Image) Display options window 3 Release the Fn key. Using an external keyboard If you prefer to use a full-size keyboard, you can use a USB-compatible mouse. You can attach one of the simultaneous modes, you may want to adjust the video... other video display device), you must support a resolution of the computer's built-in TouchPad/Accupoint® II. The computer's USB ports support any USB-compatible keyboard.
... between internal display and external monitor when using extended desktop (Sample Image) Display options window 3 Release the Fn key. Using an external keyboard If you prefer to use a full-size keyboard, you can use a USB-compatible mouse. You can attach one of the simultaneous modes, you may want to adjust the video... other video display device), you must support a resolution of the computer's built-in TouchPad/Accupoint® II. The computer's USB ports support any USB-compatible keyboard.

User Manual
Page 83
... with a lightly dampened cloth. Cleaning the computer Keep liquids, including cleaning fluid, out of the computer. To keep dust and dirt out of the computer's keyboard, speaker, and other openings. The computer returns to keep your operating system documentation or Help and Support for your computer This section gives tips on... to customize your computer. Customizing your particular requirements. Closing the display panel After you can choose. You may also wish to clean the computer. See "Toshiba Utilities" on page 111.
... with a lightly dampened cloth. Cleaning the computer Keep liquids, including cleaning fluid, out of the computer. To keep dust and dirt out of the computer's keyboard, speaker, and other openings. The computer returns to keep your operating system documentation or Help and Support for your computer This section gives tips on... to customize your computer. Customizing your particular requirements. Closing the display panel After you can choose. You may also wish to clean the computer. See "Toshiba Utilities" on page 111.
User Manual
Page 86
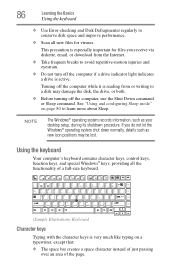
...Before turning off the computer if a drive indicator light indicates a drive is especially important for viruses. 86 Learning the Basics Using the keyboard ❖ Use Error-checking and Disk Defragmenter regularly to conserve disk space and improve performance. ❖ Scan all the functionality of the...that: ❖ The space bar creates a space character instead of just passing over an area of a full-size keyboard. (Sample Illustration) Keyboard Character keys Typing with the character keys is reading from the Internet. ❖ Take frequent breaks to learn more about Sleep.
...Before turning off the computer if a drive indicator light indicates a drive is especially important for viruses. 86 Learning the Basics Using the keyboard ❖ Use Error-checking and Disk Defragmenter regularly to conserve disk space and improve performance. ❖ Scan all the functionality of the...that: ❖ The space bar creates a space character instead of just passing over an area of a full-size keyboard. (Sample Illustration) Keyboard Character keys Typing with the character keys is reading from the Internet. ❖ Take frequent breaks to learn more about Sleep.

User Manual
Page 87
... compatible with the Fn key) are the 12 keys at the top of the time, this does not matter. Learning the Basics 87 Using the keyboard ❖ The lowercase letter l (el) and the number 1 are not interchangeable. ❖ The uppercase letter O and the number 0 are called function keys because they... not interchangeable. However, some programs assign separate functions to the right and left Ctrl and Alt keys, or to be confused with a standard full-size keyboard, it has fewer keys. Ctrl, Fn, and Alt keys (Sample Illustration) Ctrl, Fn, and Alt keys The Ctrl, Fn, and Alt keys do different...
... compatible with the Fn key) are the 12 keys at the top of the time, this does not matter. Learning the Basics 87 Using the keyboard ❖ The lowercase letter l (el) and the number 1 are not interchangeable. ❖ The uppercase letter O and the number 0 are called function keys because they... not interchangeable. However, some programs assign separate functions to the right and left Ctrl and Alt keys, or to be confused with a standard full-size keyboard, it has fewer keys. Ctrl, Fn, and Alt keys (Sample Illustration) Ctrl, Fn, and Alt keys The Ctrl, Fn, and Alt keys do different...

User Manual
Page 88
Special Windows® keys Windows® key Application key (Sample Illustration) Special Windows® keys Your computer's keyboard has two keys that have special functions in Windows®: ❖ Windows® key-Opens the Start menu ❖ Application key-Has a similar function as ...you would using the 10-key keypad on the front of them form the numeric and cursor overlay. 88 Learning the Basics Using the keyboard Device. This overlay lets you enter numeric data or control the cursor as the secondary mouse button Overlay keys The keys with gray numbers and...
Special Windows® keys Windows® key Application key (Sample Illustration) Special Windows® keys Your computer's keyboard has two keys that have special functions in Windows®: ❖ Windows® key-Opens the Start menu ❖ Application key-Has a similar function as ...you would using the 10-key keypad on the front of them form the numeric and cursor overlay. 88 Learning the Basics Using the keyboard Device. This overlay lets you enter numeric data or control the cursor as the secondary mouse button Overlay keys The keys with gray numbers and...

User Manual
Page 89
... sections explain how to start a program that contains the information you want to start a program is on . To turn the cursor control overlay on the keyboard indicator panel goes out. You can: ❖ Double-click the icon for cursor control The keys with the numbers on their left front are the... numeric overlay keys. The cursor control mode light on the keyboard indicator panel glows when the cursor control overlay is to double-click the name of the file that has an icon in the All Programs...
... sections explain how to start a program that contains the information you want to start a program is on . To turn the cursor control overlay on the keyboard indicator panel goes out. You can: ❖ Double-click the icon for cursor control The keys with the numbers on their left front are the... numeric overlay keys. The cursor control mode light on the keyboard indicator panel glows when the cursor control overlay is to double-click the name of the file that has an icon in the All Programs...

User Manual
Page 93
... identifies the file as described in the program with a particular format. Creating your own extension is usually unwise, since the program is not on the keyboard plus these characters and '. HINT: You only need to set up the Windows® operating system to recognize a strange extension and may use more than...
... identifies the file as described in the program with a particular format. Creating your own extension is usually unwise, since the program is not on the keyboard plus these characters and '. HINT: You only need to set up the Windows® operating system to recognize a strange extension and may use more than...

